
Can you lace dirt bike rims at home? Yes, you can lace dirt bike rims at home with the right tools, patience, and a good guide. Rebuilding dirt bike wheels is a rewarding process that can save you money and give you a deeper appreciation for your machine. This in-depth guide will walk you through motorcycle wheel lacing, from gathering your supplies to achieving perfectly tensioned spokes.
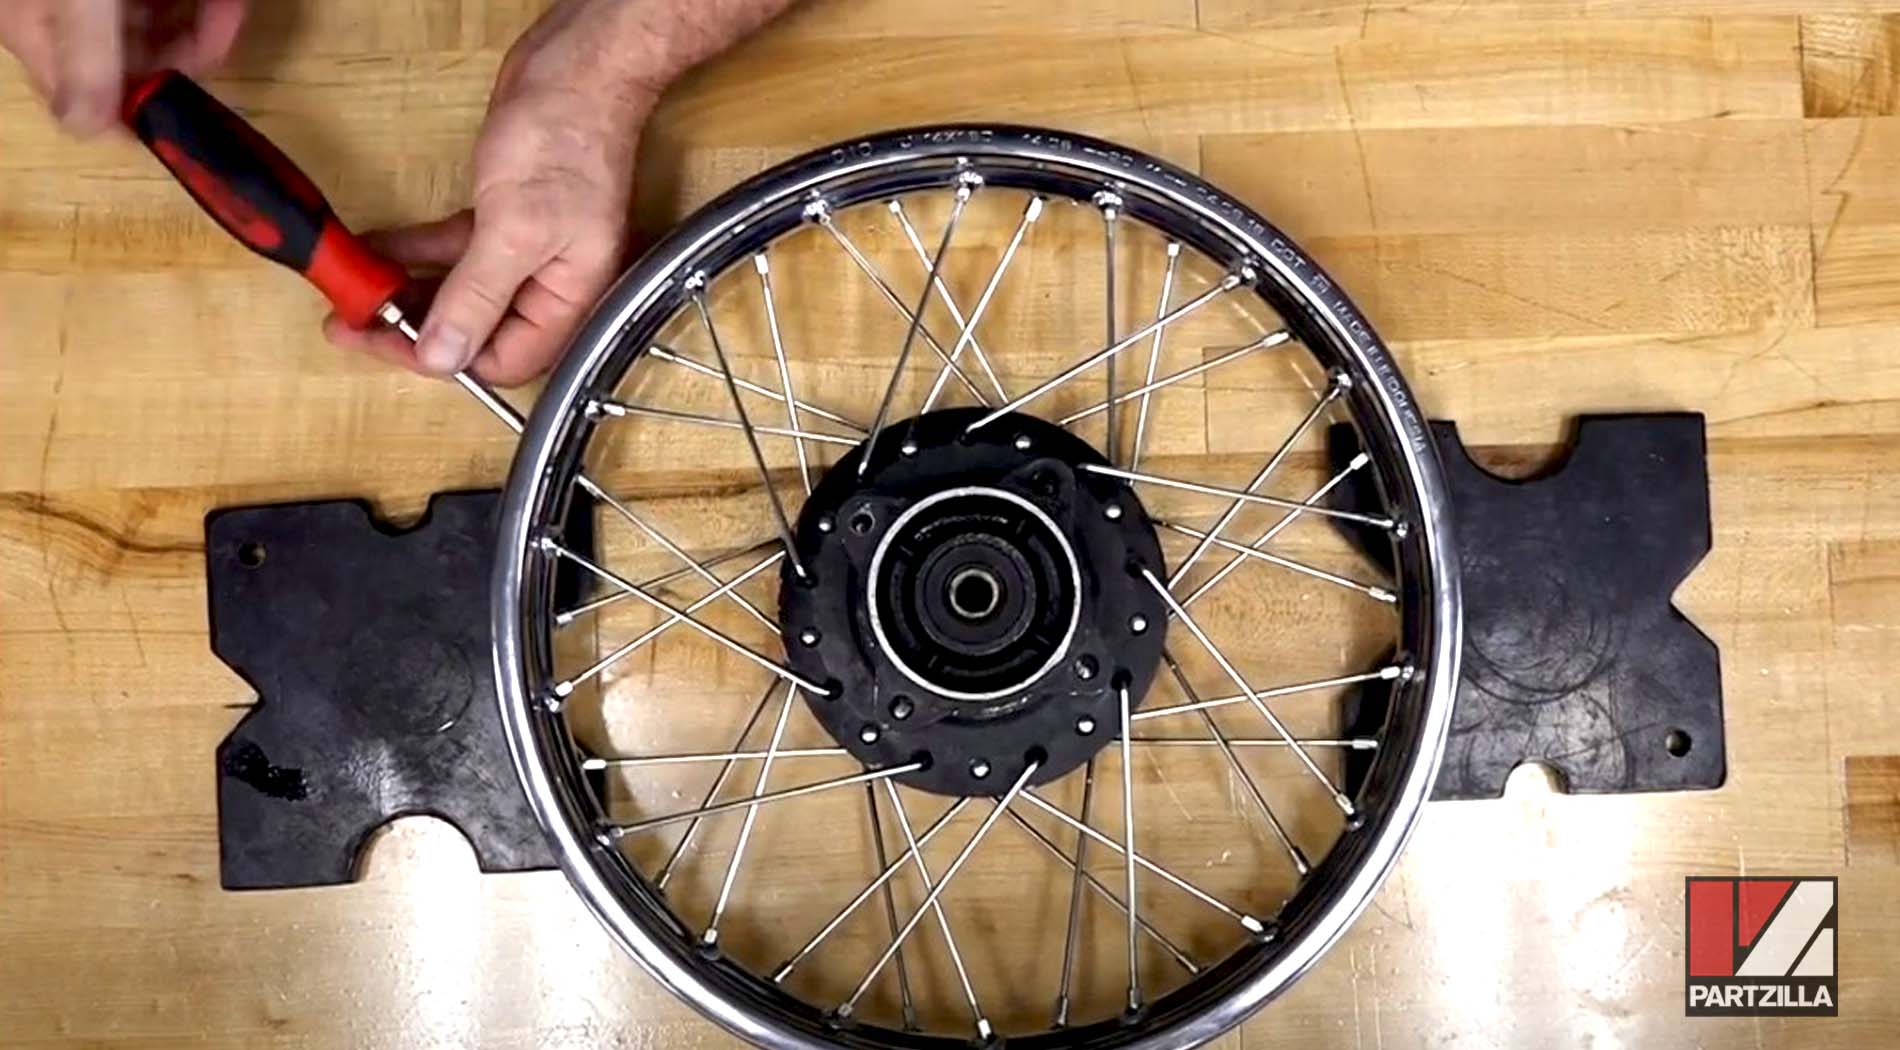
Image Source: cdn.partzilla.com
Why Lace Your Own Dirt Bike Wheels?
There are several compelling reasons to consider lacing your own dirt bike rims. Firstly, wheel building offers significant cost savings compared to professional services. While a shop might charge $150-$300 or more per wheel for lacing and truing, you can purchase the necessary components and tools for a similar or even lower initial investment, allowing you to save money on future rebuilds.
Secondly, it’s a fantastic way to gain hands-on experience and a deeper understanding of your motorcycle’s mechanics. Knowing how to replace a broken spoke or true a wobbly wheel on the trail can be invaluable.
Finally, it provides a sense of accomplishment. Building your own wheels means you’ve personally crafted a crucial part of your bike, fostering a unique connection to your ride. This guide aims to demystify the process, making spoke replacement and full wheel builds accessible.
Essential Tools for Motorcycle Wheel Lacing
Before you begin truing motorcycle wheels, ensure you have all the necessary tools. Having the right equipment makes the process smoother and the final result more precise.
- Spoke Wrench: This is your primary tool for tightening nipples. They come in various sizes, so make sure you have one that fits your spoke nipples. Some mechanics prefer a “box” style wrench for better grip.
- Nipple Driver (Optional but Recommended): A tool that fits onto a drill or a hand drill chuck, allowing you to quickly thread spokes into nipples. Use with caution to avoid overtightening.
- Tire Levers: For removing and installing tires and tubes.
- Rim Strips: Essential for protecting the tube from the spoke nipples. Always replace these when rebuilding.
- Tire Spoon Set: A specialized set of levers for removing tough tires.
- Valve Stem Tool: For removing and installing valve stems.
- Torque Wrench (Optional for initial seating, critical for some hub designs): While not always strictly necessary for basic lacing, it’s good for ensuring specific hub-related components are properly torqued.
- Truing Stand: This is crucial for accurate spoke tensioning and truing. It holds the wheel perfectly centered, allowing you to identify and correct lateral and radial runout.
- Spoke Tension Gauge (Highly Recommended): A tool that measures the actual tension of each spoke, ensuring consistency across the wheel. This is vital for a strong, durable wheel.
- Lubricant: A light oil or grease for threads can help prevent galling and allow for smoother nipple tightening.
- Rag and Cleaning Supplies: To keep everything clean during the process.
- Gloves and Safety Glasses: To protect yourself.
Gathering Your Components
For a full wheel build, you’ll need new components:
- Rim: Ensure it’s the correct size and type for your dirt bike.
- Hub: The center part of the wheel.
- Spokes and Nipples: These must be compatible with your rim and hub. Spokes have different lengths and gauges, and nipples are typically brass or aluminum. It’s best to buy a pre-cut and pre-threaded spoke kit if available for your specific wheel.
The Art of Motorcycle Wheel Lacing: Step-by-Step
This section details the meticulous process of motorcycle wheel lacing. Patience is key here; rushing will likely lead to mistakes.
Step 1: Preparation
- Clean Everything: Start with a clean workspace and clean all your components. Any dirt or debris can cause issues later.
- Inspect Components: Check your rim, hub, spokes, and nipples for any damage or defects.
- Install Rim Strip: Place the new rim stripping onto the rim. Ensure it’s centered and covers all spoke holes. This protects the inner tube.
- Install Valve Stem: If your rim requires it, install a new rubber valve stem.
Step 2: Hub and Spoke Orientation
- Hub Positioning: Place the hub in front of you. Identify the spoke holes on the hub flanges. These holes are typically drilled at an angle.
- Spoke Gauge and Length: Dirt bike wheels often use different length spokes and gauges for the drive side and non-drive side spokes. The spokes on the drive side (usually the right side for the rear wheel) are often stronger (thicker gauge or stronger material) and may be a different length to accommodate the forces of acceleration.
- Rim Orientation: Place the rim down with the valve stem hole facing you.
Step 3: Initial Spoke Placement (The “Lacing” Part)
This is where the pattern of radial lacing becomes important. Most dirt bike wheels use a 32 or 36-spoke pattern, often laced in a 3-cross pattern. For simplicity and strength, we’ll focus on a common 3-cross pattern, though variations exist.
- First Set of Spokes: Take a spoke and thread it through a hole in the hub flange. Now, find the corresponding hole in the rim. The key is to maintain the correct spoke angle and cross pattern.
- Hub Hole Selection: For a typical 3-cross pattern, you’ll start by placing spokes through the hub in a specific pattern. Imagine the hub as a clock face. If you place a spoke at “12 o’clock” on the hub, you’ll skip two holes on the hub flange and place the next spoke at “3 o’clock,” then “6 o’clock,” and “9 o’clock” on that same flange.
- Rim Hole Selection: Now, look at the rim. There are usually multiple holes between spoke positions. For a 3-cross pattern, you’ll skip a certain number of rim holes after the initial spoke passes through the rim.
- Crucial Rule: The “Inside” and “Outside” Spokes: You’ll have two sets of spokes: “inside” spokes and “outside” spokes. The spokes that emerge from the hub flange and go towards the center of the rim, crossing under other spokes, are typically the “inside” spokes for that side. Spokes that go outward, crossing over other spokes, are the “outside” spokes. You must maintain this order.
-
Threading the Spokes:
- Insert a spoke into a hub hole.
- Find the correct rim hole. For a 3-cross pattern, you’ll typically skip two rim holes from the valve stem hole (or a reference spoke) and thread the spoke from the inside of the hub flange outwards through the rim hole.
- Screw a nipple onto the spoke, just a few turns to hold it in place.
- Repeat this process for all spokes on one side of the hub, following the correct pattern and spoke angle. Ensure you’re using the correct length spokes for the side you’re working on.
-
Second Set of Spokes (The “Cross”): Once all spokes are started on one side, you’ll introduce the second set of spokes. These will “cross over” the first set.
- Take a new spoke. Thread it through the next available hole on the hub flange (following the skip-two pattern).
- Bring this spoke towards the rim. For a 3-cross pattern, it will typically go over one spoke already in the rim, then under the next, and then emerge from the rim hole.
- Screw a nipple onto this spoke, a few turns.
- Continue this for all spokes on this side of the hub.
-
Repeat for the Other Side: Flip the wheel over and repeat the entire process for the other side of the hub. Ensure you use the correct spoke length for this side. You’ll notice that the spoke pattern on the second side will mirror the first, but the spokes will emerge from the hub at opposite angles and cross in the opposite direction within the rim.
Table 1: Basic Spoke Lacing Pattern (Conceptual Example for 32 Spokes, 3-Cross)
| Spoke Position (Hub Flange) | Rim Hole Sequence (from Valve Stem) | Pattern Direction | Notes |
|---|---|---|---|
| 1 | Skip 2, Hole A | Radial | Starting spoke, nipple just started |
| 2 | Hole B | Radial | Spoke goes under existing spokes |
| 3 | Hole C | Radial | Spoke goes over existing spokes |
| 4 | Hole D | Radial | Spoke goes under existing spokes |
| 5 | Hole E | Radial | Spoke goes over existing spokes |
| … | … | … | Continue pattern, maintaining spoke angles |
Note: This is a simplified conceptual example. The actual hole numbering and skipping will depend on your specific hub and rim drilling.
Step 4: Initial Nipple Tightening (Bringing it Together)
Once all spokes are in place and have a few turns of the nipple, it’s time to snug them up.
- Even Tightening: Using your spoke wrench (or nipple driver), gradually tighten each nipple. The goal is to bring the spokes to a point where they are taut but not under significant tension. Think of it as making the spokes “sing” slightly when plucked.
- Check for Straightness: As you tighten, periodically spin the wheel and check for any major wobbles. Small wobbles are expected at this stage.
- Goal: The spokes should be evenly snug, with no slack. All nipples should be roughly the same distance from the rim.
Step 5: Spoke Tensioning and Truing
This is the most critical phase for achieving a strong and true wheel. This is where spoke tensioning and truing motorcycle wheels truly happens.
- Using the Truing Stand: Mount the wheel in your truing stand. Adjust the stand’s indicators to be very close to the rim’s edge.
- Identifying Runout: Spin the wheel slowly.
- Lateral Runout (Wobble): This is when the rim moves side-to-side. The indicator will touch the rim as it swings left or right.
- Radial Runout (Hop): This is when the rim moves up and down. The indicator will touch the rim as it moves in or out.
- Correcting Runout:
- Lateral Runout:
- If the rim is high in one spot (leaning to the right where the indicator is), tighten the spokes on the left side of the rim.
- If the rim is low in one spot (leaning to the left), tighten the spokes on the right side of the rim.
- Always make small, incremental adjustments – typically a quarter or half turn of the nipple at a time.
- Radial Runout:
- If the rim is high in one spot (moving outwards), tighten the spokes that converge at that point on the hub.
- If the rim is low in one spot (moving inwards), loosen the spokes that converge at that point on the hub.
- Again, make small, measured adjustments.
- Lateral Runout:
- Spoke Tensioning: As you true the wheel, you’ll also be increasing spoke tension. The goal is to achieve even tension across all spokes. This is where a spoke tension gauge is invaluable.
- Check Individual Spoke Tension: Use the tension gauge on each spoke.
- Adjust for Consistency: If you find spokes that are significantly tighter or looser than the others, adjust them accordingly. Tighten loose spokes and loosen tight spokes to match the general tension of the wheel.
- Target Tension: The ideal tension varies by rim, spokes, and application. Consult your rim or spoke manufacturer’s specifications if available. A common range for dirt bike spokes is around 60-80 in-lbs (inch-pounds) for aluminum nipples and slightly higher for brass.
- The “Tightening Race”: As you tighten spokes to correct runout, the overall tension increases. You’ll often find yourself tightening spokes on one side to correct a wobble, which can sometimes introduce a slight wobble on the opposite side. This is a continuous process of adjustment.
- “Stress Relieving” or “De-stressing”: After significant tightening and truing, it’s a good practice to “stress relieve” the wheel. With the wheel still in the truing stand, firmly push the spokes towards the hub and rim in several places around the wheel. You can do this by hand, or by gently tapping the tire with a rubber mallet. This helps the spokes seat properly and can reveal areas where nipples have loosened slightly due to the flexing. Re-check and adjust spoke tension and trueness after this step.
Step 6: Final Touches
- Re-check Everything: Once you’re satisfied with the trueness and spoke tension, give the entire wheel a final check. Ensure all nipples are snug and that there are no loose spokes.
- Spin Test: Give the wheel a good spin in the stand. It should rotate smoothly with minimal wobbling.
- Valve Stem Alignment: Ensure the valve stem is centered in the rim.
Common Pitfalls and How to Avoid Them
- Incorrect Spoke Length: Using spokes that are too long or too short will make wheel building impossible or result in a weak wheel. Always double-check spoke lengths.
- Wrong Lacing Pattern: Deviating from the factory or a proven lacing pattern will compromise wheel strength and trueness.
- Uneven Nipple Tightening: This is a common mistake that leads to poor truing. Tighten spokes evenly in small increments.
- Overtightening Nipples: This can strip threads, damage nipples, or even crack the rim. Use a spoke wrench and a tension gauge to avoid this.
- Ignoring Rim Strips: A damaged or missing rim stripping can lead to tube punctures. Always replace it.
- Lack of Patience: Motorcycle wheel lacing is a skill that takes time and practice. Don’t get discouraged if your first attempt isn’t perfect.
Frequently Asked Questions (FAQ)
How often should I check my dirt bike wheel spokes?
It’s a good practice to check your spoke tension before every few rides, especially after aggressive riding. Visually inspect for any loose or broken spokes.
Can I use aluminum nipples instead of brass?
Yes, aluminum nipples are lighter but also softer. They are more prone to corrosion and thread stripping if not tightened carefully. Brass nipples are heavier but more durable and less prone to seizing.
How do I know if my spokes need replacing?
Look for signs of corrosion, bending, or damage. If a spoke is significantly rusted or bent, it should be replaced.
What is radial lacing?
Radial lacing is a pattern where spokes run directly from the hub to the rim without crossing. While common on some bicycle wheels for aesthetics or specific performance goals, dirt bike wheels predominantly use a crossed spoke pattern (like 3-cross) for strength and to absorb torsional forces. This guide primarily focuses on the crossed patterns used in dirt bikes.
How tight should my spokes be?
Spoke tension varies, but a good target for dirt bike wheels is around 60-80 in-lbs for aluminum nipples and 70-90 in-lbs for brass. Using a spoke tension gauge is the best way to ensure consistency.
My wheel still wobbles after lacing. What did I do wrong?
Common issues include uneven spoke tightening, incorrect lacing pattern, or not making enough small adjustments. Ensure you’re addressing both lateral and radial runout systematically. Re-stress relieving the wheel after initial tensioning can also help.
Is it worth rebuilding my old dirt bike wheels?
If your rim is straight and undamaged, rebuilding is often cost-effective. A new set of rims, spokes, and nipples, combined with your labor, can be significantly cheaper than buying a new complete wheelset.
Conclusion
Wheel building for dirt bikes is an achievable skill with the right approach. By meticulously following these steps, utilizing the correct tools, and exercising patience, you can successfully lace and true your dirt bike rims. This knowledge empowers you to maintain your bike, save money, and truly appreciate the craftsmanship involved in rebuilding dirt bike wheels. Happy wrenching!