
Determining the correct bike frame size is crucial for comfort, efficiency, and preventing injuries. The answer to “How do I measure the frame size of a bike easily?” lies in a combination of simple measurements and understanding a few key bike components. You can easily measure your bike’s frame size at home by taking your inseam measurement and comparing it to a bike manufacturer’s size chart, or by learning to read the key measurements on the bike itself.
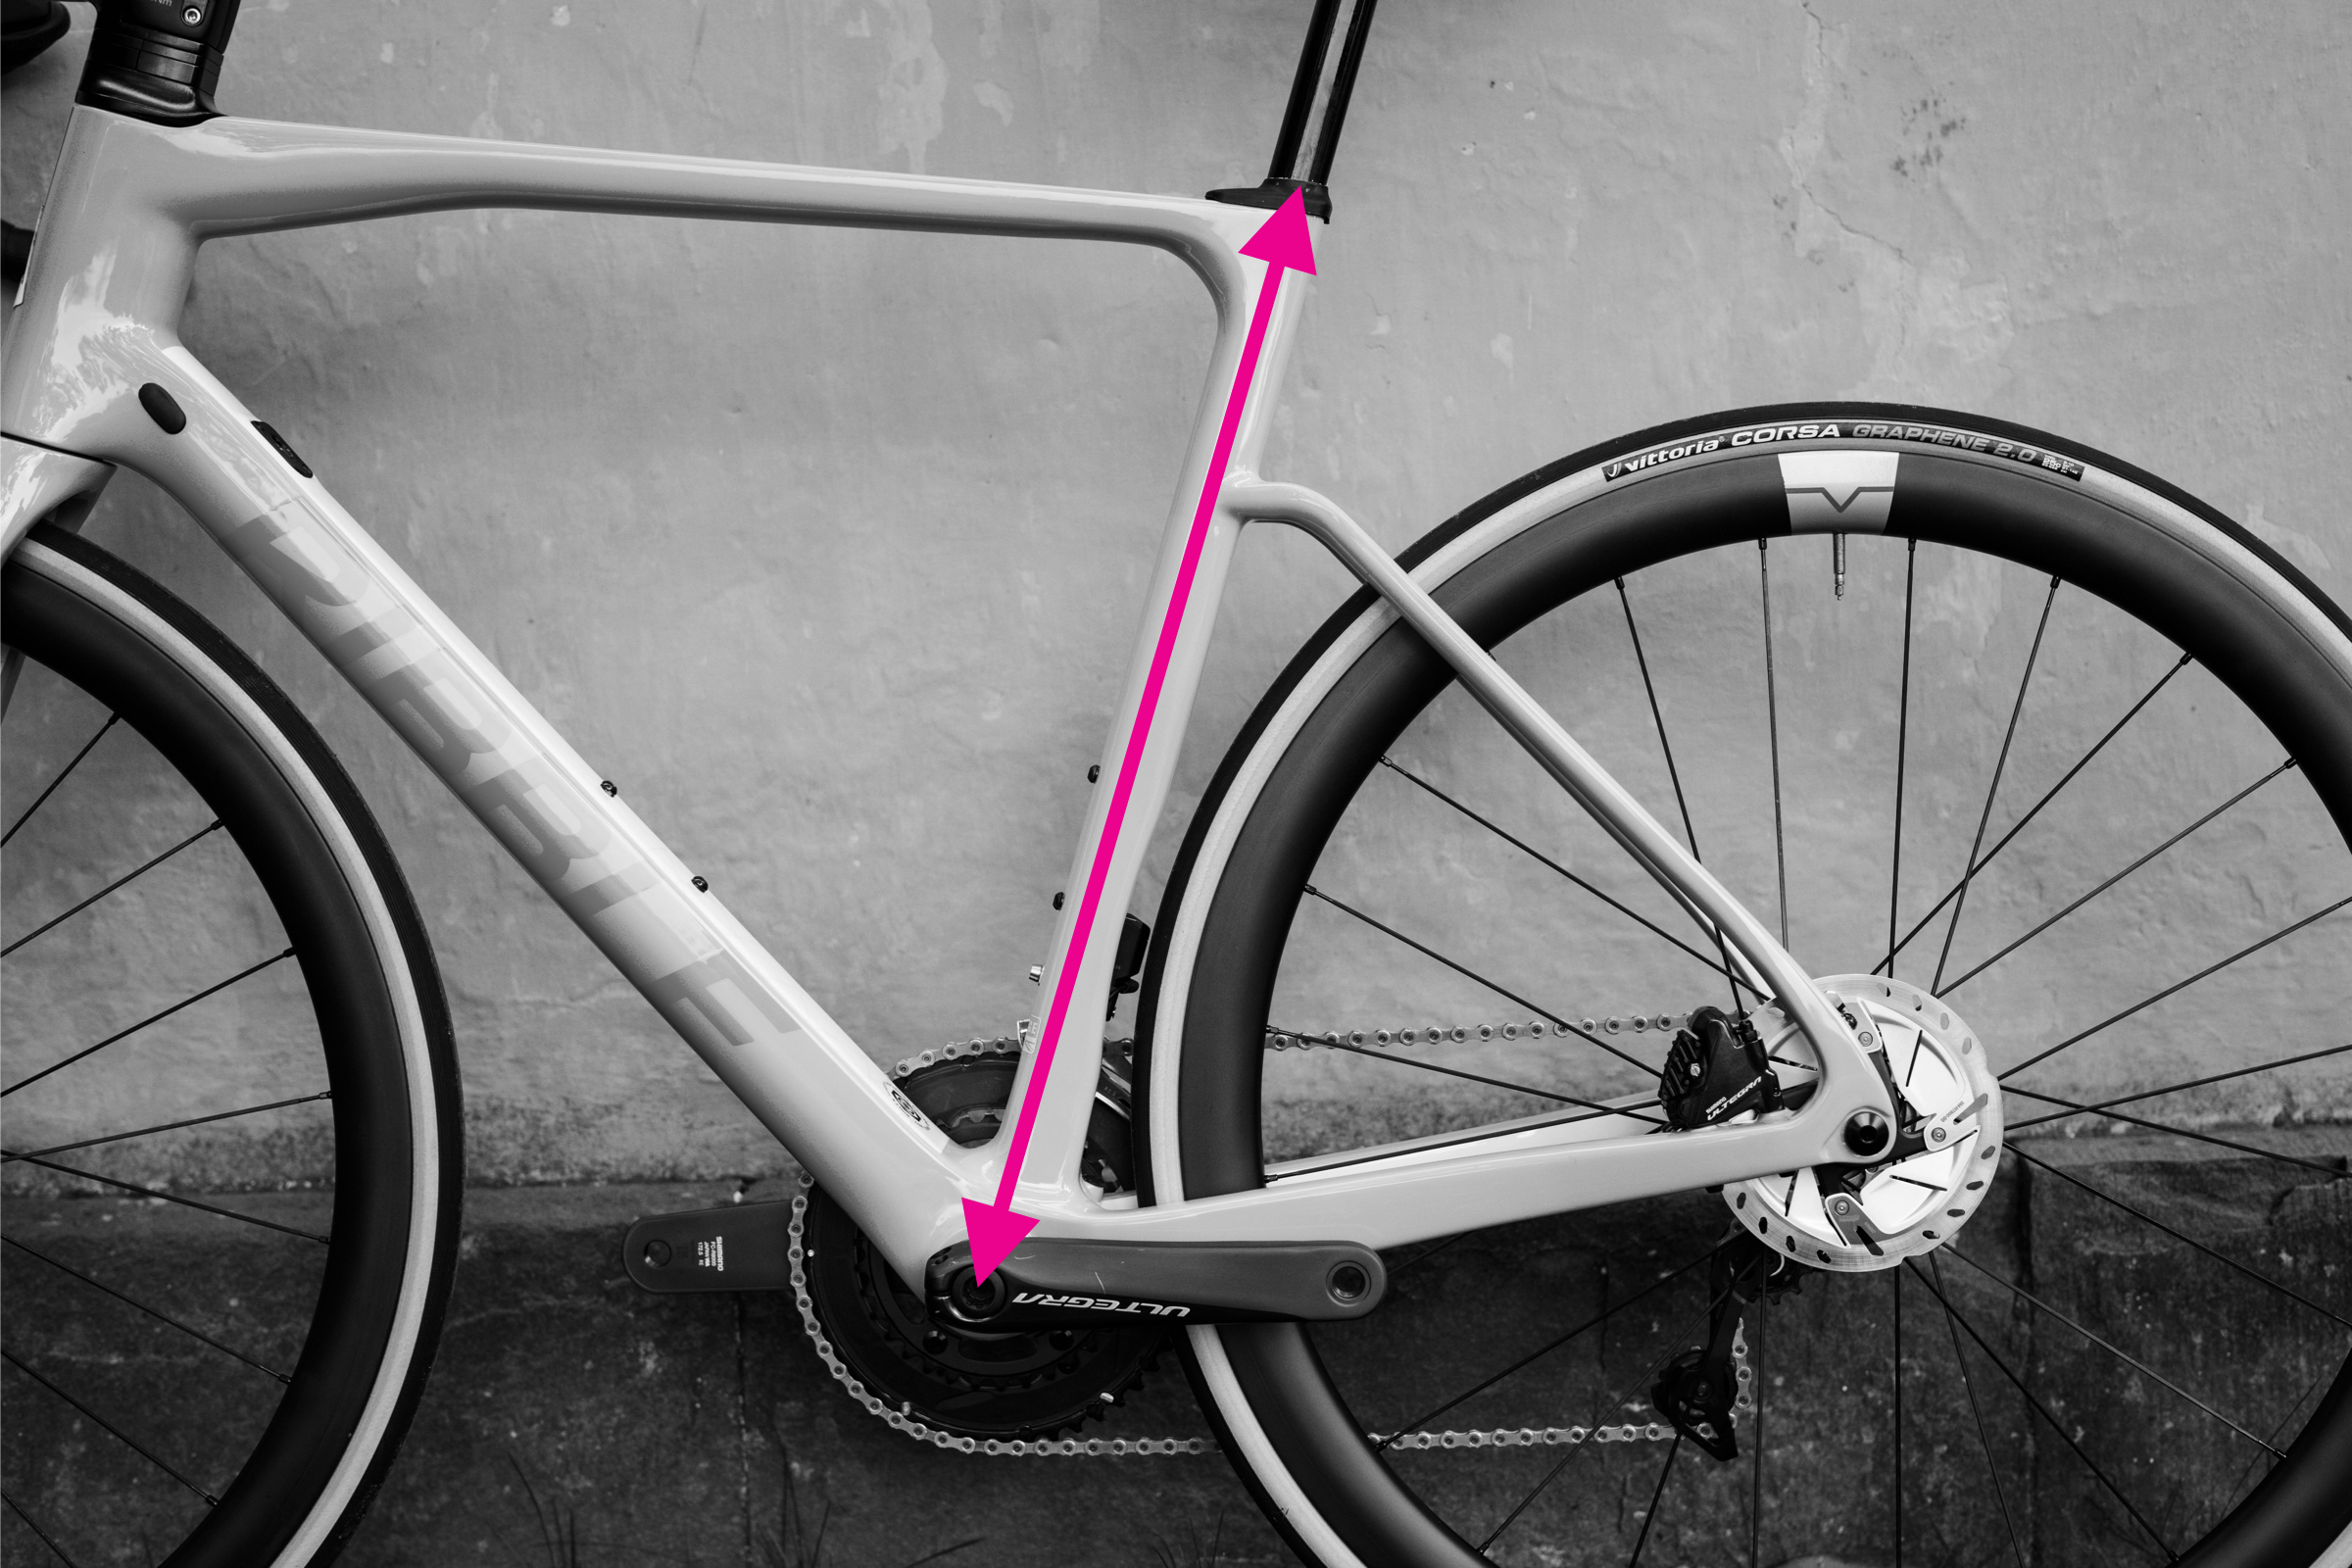
Image Source: c02.purpledshub.com
Finding Your Perfect Bike Fit: A Comprehensive Guide
Buying a new bike is exciting, but the sheer variety of sizes and styles can be overwhelming. Choosing the wrong frame size can lead to discomfort, inefficient pedaling, and even pain. This guide will walk you through how to easily measure and understand bike frame measurements, helping you find the perfect fit for your riding adventures. We’ll delve into the intricacies of bicycle geometry, explain how various bike frame measurements contribute to the overall feel of a bike, and introduce you to helpful tools like a frame size calculator.
The Importance of Proper Bike Sizing
A bike that’s too big or too small can make riding a chore. Here’s why getting it right matters:
- Comfort: A correctly sized bike allows you to maintain a natural riding posture, reducing strain on your back, neck, and wrists.
- Efficiency: When your bike fits, your body can generate power more effectively. You’ll pedal smoothly and with less wasted effort.
- Control: A bike that fits well feels more stable and predictable, allowing you to maneuver with confidence.
- Injury Prevention: Improper sizing can lead to repetitive stress injuries. Finding the right fit helps keep you healthy and injury-free.
Key Bike Frame Measurements Explained
To measure your bike frame size, you’ll need to know what to look for. Different types of bikes (road, mountain, hybrid) have slightly different ways of measuring and categorizing their frames. However, several core bike frame measurements are common across most types.
1. Seat Tube Length
This is one of the most traditional ways bike frames were sized, especially for road bikes.
- What it is: The seat tube length is the measurement from the center of the bottom bracket (where the cranks attach) up to the top of the seat tube. On many modern bikes, the seat tube might not have a clean, straight line to the top; in such cases, it’s often measured to where the top tube meets the seat tube.
- How to measure:
- Locate the bottom bracket shell.
- Find the point where the seat tube intersects the top tube.
- Using a tape measure, measure the straight-line distance between these two points.
- Why it matters: This measurement is a primary indicator of how high or low your saddle will be relative to the pedals, influencing your leg extension.
2. Effective Top Tube (ETT) Length
This measurement is crucial for determining the bike’s cockpit length and how stretched out you’ll be.
- What it is: The effective top tube is an imaginary horizontal line from the head tube to the seat tube. It represents the length of the rider’s horizontal reach.
- How to measure:
- Identify the head tube (where the handlebars are connected).
- Identify the seat tube (where the seat post goes).
- Imagine a horizontal line extending from the top of the head tube directly to the seat tube.
- Measure this horizontal distance from the center of the head tube to the center of the seat tube.
- Why it matters: The ETT, combined with the stem length and handlebar reach, dictates how far forward you’ll be leaning and how comfortable your upper body will be. A longer ETT generally means a more stretched-out riding position.
3. Head Tube Length
This measurement affects the bike’s front-end height and, consequently, your riding posture.
- What it is: The head tube length is the actual physical length of the tube that houses the headset bearings and allows the fork to rotate.
- How to measure:
- Locate the head tube.
- Measure the length of this tube.
- Why it matters: A longer head tube, in combination with the fork’s steerer tube length, contributes to a higher handlebar position. This can provide a more upright and comfortable riding posture, which is often preferred by casual riders or those with back issues. Shorter head tubes lead to a lower, more aggressive position.
4. Head Tube Angle
This aspect of bicycle geometry significantly impacts how the bike handles.
- What it is: The head tube angle is the angle at which the head tube is set relative to the ground (or a horizontal line).
- How to measure: This is not something you can easily measure with a tape measure. It’s a specification provided by the manufacturer. However, you can visualize it: a steeper angle (closer to 90 degrees) means quicker steering, while a slacker angle (further from 90 degrees) leads to more stable steering.
- Why it matters: A steeper head tube angle generally makes the bike feel more agile and responsive, ideal for quick turns and maneuverability. A slacker head tube angle promotes stability, especially at higher speeds and on rough terrain, making it common on mountain bikes.
5. Seat Tube Angle
This influences your position relative to the pedals.
- What it is: The seat tube angle is the angle of the seat tube relative to the ground.
- How to measure: Like the head tube angle, this is a manufacturer’s specification.
- Why it matters: A steeper seat tube angle pushes your saddle forward relative to the bottom bracket, resulting in a more forward and aerodynamic riding position. A slacker angle moves the saddle back, placing you more directly over the pedals, which can be beneficial for climbing or for riders who prefer a more relaxed position.
6. Standover Height
This is a critical measurement for safety and ease of mounting/dismounting.
- What it is: The standover height is the distance from the ground to the top of the bike’s top tube, measured at a point directly above the bottom bracket.
- How to measure:
- Place the bike on a level surface.
- Using a tape measure, measure the distance from the ground to the highest point of the top tube, typically where the seat tube and top tube meet.
- Why it matters: You should be able to straddle the bike with both feet flat on the ground, with a comfortable amount of clearance between your crotch and the top tube. For mountain bikes, a clearance of 2-4 inches is recommended for safety. For road bikes, 1-2 inches is usually sufficient.
7. Reach and Stack
These are modern measurements that provide a more accurate picture of the bike’s fit, especially for performance-oriented bikes.
- What is Reach: Reach is the horizontal distance from the center of the bottom bracket to the center of the top of the head tube. It essentially measures how long the bike is from front to back in a horizontal plane.
- What is Stack: Stack is the vertical distance from the center of the bottom bracket to the center of the top of the head tube. It measures how high the front of the bike is.
- How to measure: These are complex measurements to take accurately without specialized tools. They are best found in the bike’s specifications provided by the manufacturer.
- Why they matter: Reach and stack are crucial for understanding the bike’s fit in terms of body position. A longer reach generally means a more stretched-out position, while a shorter reach allows for a more upright posture. A higher stack means the handlebars are higher, leading to a more relaxed position, while a lower stack results in a more aggressive, aerodynamic tuck. Many modern frame size calculators rely heavily on reach and stack data.
Measuring Your Body for Bike Fit
Before you can compare your body to a bike’s measurements, you need to know your own body’s dimensions. The most important measurement for determining general bike size is your inseam measurement for bike fit.
Calculating Your Inseam Measurement for Bike Fit
Your inseam is the length from your crotch to the floor when standing upright.
- What you’ll need: A book or a thin, rigid object (like a level), a tape measure, and a wall.
- How to measure:
- Stand with your back against a wall, wearing the shoes you typically cycle in.
- Place the book or rigid object between your legs, pressing it upwards firmly against your crotch, as if you were sitting on a saddle. Ensure it’s level.
- Have a friend or family member help you measure from the floor straight up to the top of the book/object. This is your inseam.
- Alternatively, you can mark the top of the book on the wall and then measure from the floor to the mark.
- Why it matters: Your inseam is the primary factor in determining the correct seat tube height and, by extension, the overall frame size.
Using Bike Frame Measurements to Find Your Size
Now that you know your inseam and are familiar with key bike frame measurements, you can start finding the right bike.
Method 1: The Inseam Method (For Beginners)
This is the simplest way to get a general idea of your frame size, especially when buying a first bike or a bike for casual riding.
- Measure your inseam as described above.
- Find the manufacturer’s size chart for the specific bike model you are interested in. These are usually available on the brand’s website.
- Look for the “standover height” or “inseam recommendation” within the size chart.
- Compare your inseam measurement to the chart. Ensure that your inseam is at least 1-2 inches (for road bikes) or 2-4 inches (for mountain bikes) greater than the bike’s standover height. This ensures you can safely dismount.
Example: If your inseam is 30 inches and you’re looking at a road bike, you’d want a bike with a standover height of around 28-29 inches.
Method 2: Using a Frame Size Calculator
Many online resources offer a frame size calculator. These tools can be very helpful, especially if you have more specific needs or are looking at bikes where the inseam method might be less precise.
- How they work: These calculators typically ask for your height, inseam, and sometimes other measurements like arm length or torso length. They then compare this data against a database of bicycle geometry for various bike types and brands to recommend a size.
- Where to find them: Search online for “bike frame size calculator” or “road bike frame size calculator” or “mountain bike frame size calculator.” Reputable cycling websites and bike manufacturers often provide these tools.
- What to input:
- Height
- Inseam measurement (crucial!)
- Sometimes, arm length and torso length for more refined results.
- What they output: They will typically suggest a frame size (e.g., S, M, L, or a numerical size like 54cm) and sometimes provide recommended reach and stack figures.
Method 3: Measuring Your Existing Bike (If it fits well)
If you already own a bike that fits you comfortably and efficiently, you can measure its key bike frame measurements and use that information to find a new bike of similar dimensions.
- What you’ll need: A tape measure, a level, and potentially a calculator or spreadsheet.
- Measurements to take:
- Seat Tube Length: From the center of the bottom bracket to the top of the seat tube.
- Effective Top Tube (ETT) Length: Horizontal measurement from the center of the head tube to the center of the seat tube.
- Head Tube Length: The actual length of the head tube.
- Standover Height: From the ground to the top of the top tube.
- How to use this data: Once you have these measurements from your well-fitting bike, you can compare them to the specifications of new bikes you’re considering. Look for bikes with similar ETT length, reach, and stack.
Understanding Bicycle Geometry and Its Impact on Fit
Bicycle geometry refers to the angles and lengths of the various tubes that make up the bike frame. These dimensions dictate how the bike handles, how comfortable it is, and how it will fit your body.
How Reach and Stack Influence Your Position
Reach and stack are particularly important for modern bike fitting as they provide a more holistic view of the rider’s position.
- Reach: A longer reach means the rider will be more stretched out, leading to a lower, more aerodynamic position. This is common on performance road bikes and gravel bikes.
- Stack: A higher stack means the handlebars will be higher relative to the pedals, resulting in a more upright and comfortable riding position. This is often found on endurance road bikes, hybrid bikes, and mountain bikes.
By looking at the reach and stack of a bike, you can get a good idea of the intended riding posture, even before measuring the frame.
The Role of Head Tube Angle and Seat Tube Angle
- Head Tube Angle:
- Steeper angles (e.g., 73 degrees for road bikes) result in quicker steering and a more responsive feel.
- Slacker angles (e.g., 68 degrees for many mountain bikes) provide more stability, especially downhill and over rough terrain.
- Seat Tube Angle:
- Steeper angles (e.g., 73 degrees) position the rider more forward over the pedals.
- Slacker angles (e.g., 71 degrees) position the rider further back.
These angles, along with the effective top tube and seat tube length, contribute to the overall bicycle geometry that determines the bike’s handling characteristics and how it will feel under you.
Factors Beyond Basic Frame Measurements
While bike frame measurements are essential, a perfect bike fitting experience considers other factors:
- Rider Flexibility: A very flexible rider can comfortably handle a bike with a lower stack and longer reach, while someone less flexible may need a more upright position with a higher stack and shorter reach.
- Riding Style: A racer will want a different fit than a casual commuter. Racers often opt for a more aggressive, aerodynamic position (lower stack, longer reach), while commuters prioritize comfort and visibility (higher stack, shorter reach).
- Type of Riding:
- Road Cycling: Focus on efficiency and aerodynamics. Effective top tube and reach are key for a stretched-out position.
- Mountain Biking: Focus on control and stability. Head tube angle, reach, and standover height are critical for navigating varied terrain.
- Gravel Riding: A blend of road and mountain bike characteristics. Reach, stack, and standover height are important for comfort over long distances and varied surfaces.
- Commuting/Hybrid: Comfort and an upright position are prioritized. Head tube length and stack play a significant role.
The Ultimate Solution: Professional Bike Fitting
If you’re serious about cycling, especially for performance or long-distance riding, a professional bike fitting is highly recommended.
- What it involves: A qualified bike fitter will assess your body mechanics, flexibility, and riding goals. They use specialized tools and knowledge to adjust your bike’s fit, often involving changes to the saddle height, saddle position, stem length, handlebar rise, and even crank length.
- Benefits: A professional bike fitting can:
- Maximize comfort and minimize pain.
- Improve pedaling efficiency and power output.
- Enhance bike handling and control.
- Prevent injuries.
- Help you choose the right bike size and model in the first place.
Frequently Asked Questions (FAQs)
Q: Can I measure my bike frame size without taking it apart?
A: Yes, most key bike frame measurements like seat tube length, effective top tube length, and standover height can be measured with a tape measure without disassembling the bike. However, head tube angle and reach/stack are best obtained from the manufacturer’s specifications.
Q: What is the most important bike frame measurement for me?
A: While all measurements are important for the overall feel, the effective top tube length and reach are often considered most critical for determining your comfortable riding position. Your inseam measurement is paramount for selecting the correct frame size based on standover height.
Q: How do I know if my current bike is the right size?
A: If you experience any of the following, your bike might be the wrong size:
* Too Big: Difficulty standing over the bike, feeling stretched out, knee hitting handlebars, feeling unstable.
* Too Small: Feeling cramped, knees hitting your elbows when turning, saddle too far forward, unable to get enough leg extension.
* General Discomfort: Persistent pain in your back, neck, shoulders, or knees.
Q: Where can I find the geometry charts for specific bikes?
A: Geometry charts are typically found on the manufacturer’s official website for each bike model. They are usually located in the product description or specifications section.
Q: What is a good standover height clearance for a mountain bike?
A: For mountain bikes, it’s recommended to have a standover height clearance of 2 to 4 inches (5 to 10 cm) between the top tube and your crotch when standing over the bike. This provides safety when dismounting on uneven terrain.
Q: How does my inseam measurement for bike fit relate to a bike’s size?
A: Your inseam measurement is used to determine the appropriate seat tube length and standover height for your frame size. Most bike manufacturers provide charts that correlate inseam measurements with recommended frame sizes or standover heights. Generally, your inseam should be 4-6 inches larger than the standover height for road bikes, and 6-10 inches larger for mountain bikes.
By mastering these simple measurement techniques and familiarizing yourself with key bike frame measurements and bicycle geometry, you can confidently select a bike that fits you perfectly, ensuring countless hours of comfortable and enjoyable riding. If in doubt, always consult with a professional for a bike fitting session.