
What is the ideal way to measure a bike saddle? Measuring your bike saddle involves assessing its dimensions to ensure it aligns with your body and riding style for optimal comfort and performance. This guide will walk you through the essential steps for accurately measuring your bike saddle and why each measurement matters for a perfect bike fit.
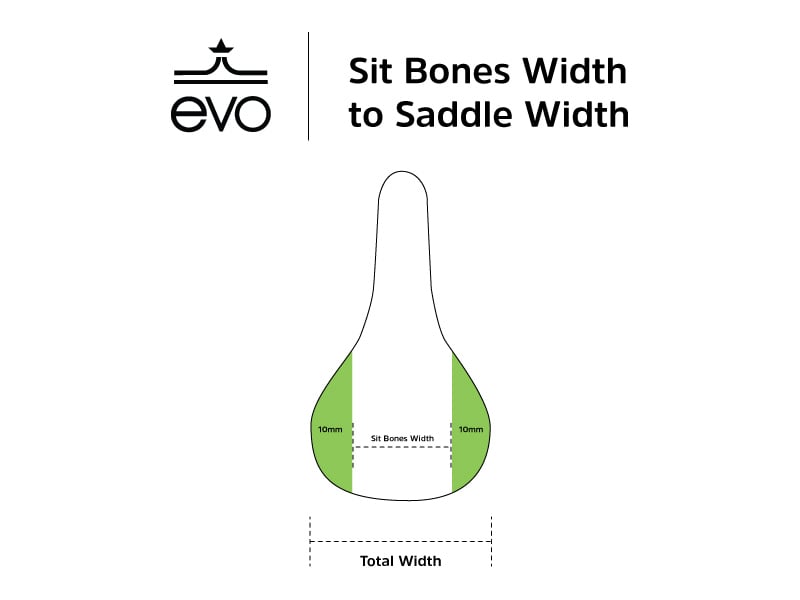
Image Source: static.evo.com
Why Saddle Measurements Matter
Finding the right bike saddle is a journey, not a destination. A poorly fitting saddle can lead to significant discomfort, pain, and even injury. Understanding how to measure your current saddle, or a potential new one, is a crucial step in achieving saddle comfort. It helps you identify key dimensions that directly impact your riding experience. These measurements are vital for saddle pressure distribution, avoiding perineal pressure, and ultimately, enjoying your rides.
Measuring Your Current Saddle: A Comprehensive Approach
Before you even think about buying a new saddle, it’s beneficial to measure your current one. This gives you a baseline and helps you articulate what works and what doesn’t.
What Tools Do You Need?
- Measuring Tape: A standard flexible measuring tape is ideal.
- Ruler or Straight Edge: For ensuring straight lines and precise measurements.
- Pen and Paper or Digital Note: To record your findings.
- A Flat Surface: To place the saddle on for accurate measurements.
Step 1: Measuring Saddle Width
Saddle width is arguably the most critical measurement for comfort. It determines how well your sit bones (ischial tuberosities) are supported.
-
How to Measure:
- Place the saddle on a flat surface.
- Identify the widest part of the saddle. This is usually towards the rear.
- Use your measuring tape to measure across the widest point, from the outer edge of one side rail to the outer edge of the other side rail, or across the widest points of the saddle shell itself.
- Ensure the tape is held straight and level.
-
Why it Matters:
- Sit Bone Support: A saddle that’s too narrow won’t support your sit bones, leading to pressure on soft tissues.
- Perineal Pressure: A saddle that’s too wide can cause chafing and unwanted pressure on the perineum.
- Body Weight Distribution: Proper width helps distribute your body weight evenly.
Step 2: Measuring Saddle Length
While less critical than width for initial comfort, saddle length can influence your ability to shift positions on the bike.
-
How to Measure:
- With the saddle on a flat surface, measure from the absolute front tip of the saddle to the absolute rear tip of the saddle.
- Ensure your measuring tape follows the contour of the saddle for the most accurate reading.
-
Why it Matters:
- Rider Position: Longer saddles offer more room to move forward and backward, which can be beneficial for different riding styles (e.g., climbing, sprinting).
- Aerodynamics: A longer saddle might allow for a more aggressive, aerodynamic position.
Step 3: Measuring Saddle Rail Width
The saddle rail width is important for compatibility with your bike’s seatpost clamp.
-
How to Measure:
- Locate the saddle rails, which are the metal tubes that attach the saddle to the seatpost.
- Measure the distance between the two parallel rails at their widest point, usually where they are attached to the saddle shell.
- Standard rail widths are often 7mm (round) or 7x9mm (oval). Carbon rails can also be oval.
-
Why it Matters:
- Compatibility: Most seatpost clamps are designed for specific rail dimensions. Ensure your new saddle’s rails will fit your existing seatpost clamp.
- Strength: Oval rails, especially carbon ones, can offer increased strength and stiffness.
Step 4: Measuring Saddle Setback
Saddle setback refers to how far the saddle is positioned behind the seatpost’s center clamp. This measurement is more about adjusting your position on the bike rather than measuring the saddle itself, but it’s a key component of bike fit.
-
How to Measure (This is done on the bike):
- Ensure your bike is on a level surface.
- Use a plumb bob or a straight edge and a measuring tape.
- Stand behind the bike.
- Place the straight edge across the widest part of the saddle.
- Measure the horizontal distance from the front of the seatpost clamp (where it grips the rails) to the vertical line extending down from the crank spindle (the center of the bottom bracket).
- Alternatively, you can measure from the saddle rail to the center of the seatpost clamp.
-
Why it Matters:
- Knee Position: Setback influences the position of your knees relative to the pedals, impacting power transfer and preventing knee pain.
- Weight Distribution: Adjusting setback helps distribute your weight correctly over the bike.
Step 5: Measuring Saddle Height
Saddle height is another crucial adjustment for bike fit, ensuring your legs can extend efficiently without over-straightening or being too bent.
-
How to Measure (This is done on the bike):
- Ensure your bike is on a level surface.
- Stand next to your bike.
- Place your heel on the pedal at its lowest point (6 o’clock position).
- Your leg should be almost fully extended, with a slight bend in the knee.
- To measure more precisely: From the center of the bottom bracket (crank spindle), measure vertically up to the top of the saddle, then horizontally to the center of the seatpost.
-
Why it Matters:
- Power Output: Correct saddle height maximizes your pedaling efficiency and power.
- Injury Prevention: Too high or too low a saddle can lead to knee and hip strain.
- Comfort: Proper height reduces unnecessary fatigue and improves saddle comfort.
Step 6: Assessing Saddle Tilt
Saddle tilt refers to the angle of the saddle relative to the ground. This is adjusted to fine-tune comfort and alleviate pressure points.
-
How to Measure (This is done on the bike):
- Place a spirit level on the saddle.
- Ensure the saddle is level from side to side first.
- Note the reading. A slight downward tilt might be preferred by some riders, especially on aggressive bikes, to relieve perineal pressure. A level saddle is often a good starting point.
-
Why it Matters:
- Pressure Relief: A slight nose-down tilt can reduce pressure on soft tissues.
- Posture: Tilt affects your pelvic position and overall riding posture.
- Chafing: Incorrect tilt can lead to increased chafing.
Key Saddle Features to Consider Beyond Measurements
When you’re looking for a new saddle, these additional features, informed by your measurements, play a significant role in saddle comfort and bike fit:
-
Saddle Shape (Profile):
- Flat: Offers freedom of movement, good for aggressive positions.
- Waved/Curved: Provides more support for riders who tend to stay in one position.
- S-Shaped: A balance between flat and curved, offering support and freedom.
-
Saddle Padding:
- Gel vs. Foam: Gel offers good initial comfort but can compress over time. Foam provides more consistent support.
- Density: Firmer padding often provides better support for longer rides, preventing excessive saddle pressure build-up.
-
Cutouts and Channels:
- Purpose: These are designed to relieve perineal pressure for both men and women.
- Effectiveness: They can significantly improve comfort by reducing direct pressure on sensitive areas.
-
Saddle Rail Material:
- Steel: Durable and affordable, but can be heavy and less vibration-dampening.
- Titanium: Lightweight and offers good vibration absorption, providing a smoother ride.
- Carbon Fiber: The lightest and stiffest option, excellent at absorbing road vibrations, but also the most expensive and can be brittle if impacted.
How Your Measurements Inform Your Next Saddle Purchase
Once you have measured your current saddle and perhaps experienced its limitations, you can use this data to guide your search for a new one.
- If your current saddle is too narrow: Look for wider options. Your sit bone measurement (which you can get from a professional bike fit or by sitting on cardboard) will be a good guide here.
- If your current saddle is too wide: Consider narrower saddles. This might be the case if you experience chafing on the inner thighs.
- If you want more or less ability to move forward/backward: Look at saddles with different saddle length or rail adjustment range.
- If you’re experiencing numbness or pain: A saddle with a cutout or channel might be a solution, and you can measure the size and placement of cutouts on potential new saddles.
The Role of a Professional Bike Fit
While measuring your saddle is a great DIY step, a professional bike fit can take your saddle comfort to the next level. A fitter will:
- Accurately Measure Sit Bone Width: This is the most crucial factor for determining saddle width.
- Analyze Your Riding Style and Flexibility: This helps determine the ideal saddle shape and profile.
- Adjust Saddle Height, Setback, and Tilt: They use specialized tools to get these measurements precise for your body.
- Address Specific Issues: They can diagnose and fix problems causing saddle pressure or perineal pressure.
- Recommend Specific Saddles: Based on all the data, they can suggest saddles that are likely to work for you.
Saddle Measurement Summary Table
| Measurement | What it Affects | How to Measure | Key Considerations |
|---|---|---|---|
| Saddle Width | Sit bone support, perineal pressure | Widest point of the saddle, edge to edge. | Should match sit bone width for proper support. |
| Saddle Length | Rider position flexibility | Front tip to rear tip of the saddle. | Influences ability to shift weight fore/aft. |
| Saddle Rail Width | Seatpost clamp compatibility, strength | Distance between the two parallel rails. | Standard sizes are 7mm round, 7x9mm oval. Check compatibility. |
| Saddle Setback | Knee position over pedal, weight distribution | Horizontal distance from crank spindle to widest part of saddle (measured on bike). | Affects power transfer and joint strain. |
| Saddle Height | Pedaling efficiency, power output, injury risk | Pedal at 6 o’clock, leg should be nearly straight (measured on bike). | Crucial for preventing knee and hip pain. |
| Saddle Tilt | Pressure relief, posture, chafing | Angle of the saddle relative to horizontal (measured on bike using a level). | Slight nose-down tilt can relieve perineal pressure. |
Common Saddle Fit Issues and Their Solutions (Relating to Measurements)
-
Numbness/Tingling (especially in the perineal area):
- Cause: Too much saddle pressure on soft tissues.
- Measurement Link: Saddle too narrow, saddle too high, or saddle too level (no tilt).
- Solution: Try a wider saddle, lower saddle height, or introduce a slight saddle tilt. Consider a saddle with a cutout or channel.
-
Chafing on Inner Thighs:
- Cause: Saddle too wide, or saddle shape is causing friction.
- Measurement Link: Saddle width is likely too great for your sit bone width.
- Solution: Try a narrower saddle. Ensure your saddle height and saddle setback are correct to prevent rocking.
-
Lower Back Pain:
- Cause: Reaching too far, poor posture, or saddle too high.
- Measurement Link: Incorrect saddle height or excessive saddle setback (forcing you too far forward).
- Solution: Adjust saddle height and saddle setback. Ensure your handlebars are at an appropriate height.
-
Knee Pain (front or back):
- Cause: Incorrect saddle height or saddle setback.
- Measurement Link: Too high or too low height, or incorrect setback.
- Solution: Fine-tune your saddle height and saddle setback with precision.
Frequently Asked Questions (FAQ)
Q1: What is the most important measurement for a bike saddle?
A1: Saddle width is generally considered the most critical measurement, as it directly impacts how well your sit bones are supported and how saddle pressure is distributed.
Q2: Can I measure my saddle width at home without a professional bike fit?
A2: Yes, you can measure your current saddle’s width with a tape measure. However, to determine the correct width for you, it’s best to measure your sit bone width. This can be done by sitting on a piece of firm foam or cardboard with a flat surface beneath it, then measuring the distance between the two indentations. Many cyclists find a professional bike fit invaluable for this.
Q3: What does saddle setback mean?
A3: Saddle setback refers to the position of your saddle relative to the bottom bracket. It’s how far back the saddle is placed, and it affects your knee position over the pedal, influencing power and comfort.
Q4: How do I know if my saddle tilt is correct?
A4: A good starting point is a level saddle. However, many riders find a slight downward tilt (just a degree or two) reduces perineal pressure and improves saddle comfort. If you experience numbness or discomfort, adjusting the saddle tilt is a key adjustment.
Q5: What are saddle rails made of, and does it matter?
A5: Saddle rails are commonly made of steel, titanium, or carbon fiber. Steel is durable, titanium offers a balance of weight and vibration damping, and carbon fiber is the lightest and best at absorbing vibrations, but also the most expensive. Rail material affects the saddle’s weight, ride feel, and compatibility with seatpost clamps (e.g., oval carbon rails may require specific clamps).
Q6: How does saddle length affect my ride?
A6: Saddle length influences how much you can shift your position on the bike. Longer saddles allow for greater fore-aft movement, which can be useful for riders who like to change their position frequently for climbing, sprinting, or aerodynamic benefits.
By taking the time to accurately measure your bike saddle and consider these key dimensions, you’re taking a significant step towards achieving superior saddle comfort and optimizing your overall bike fit. Remember, investing time in these measurements can save you from discomfort and enhance every ride.