
Image Source: rideonmagazine.com.au
How To Measure Reach On A Bike: Your Guide for a Perfect Fit
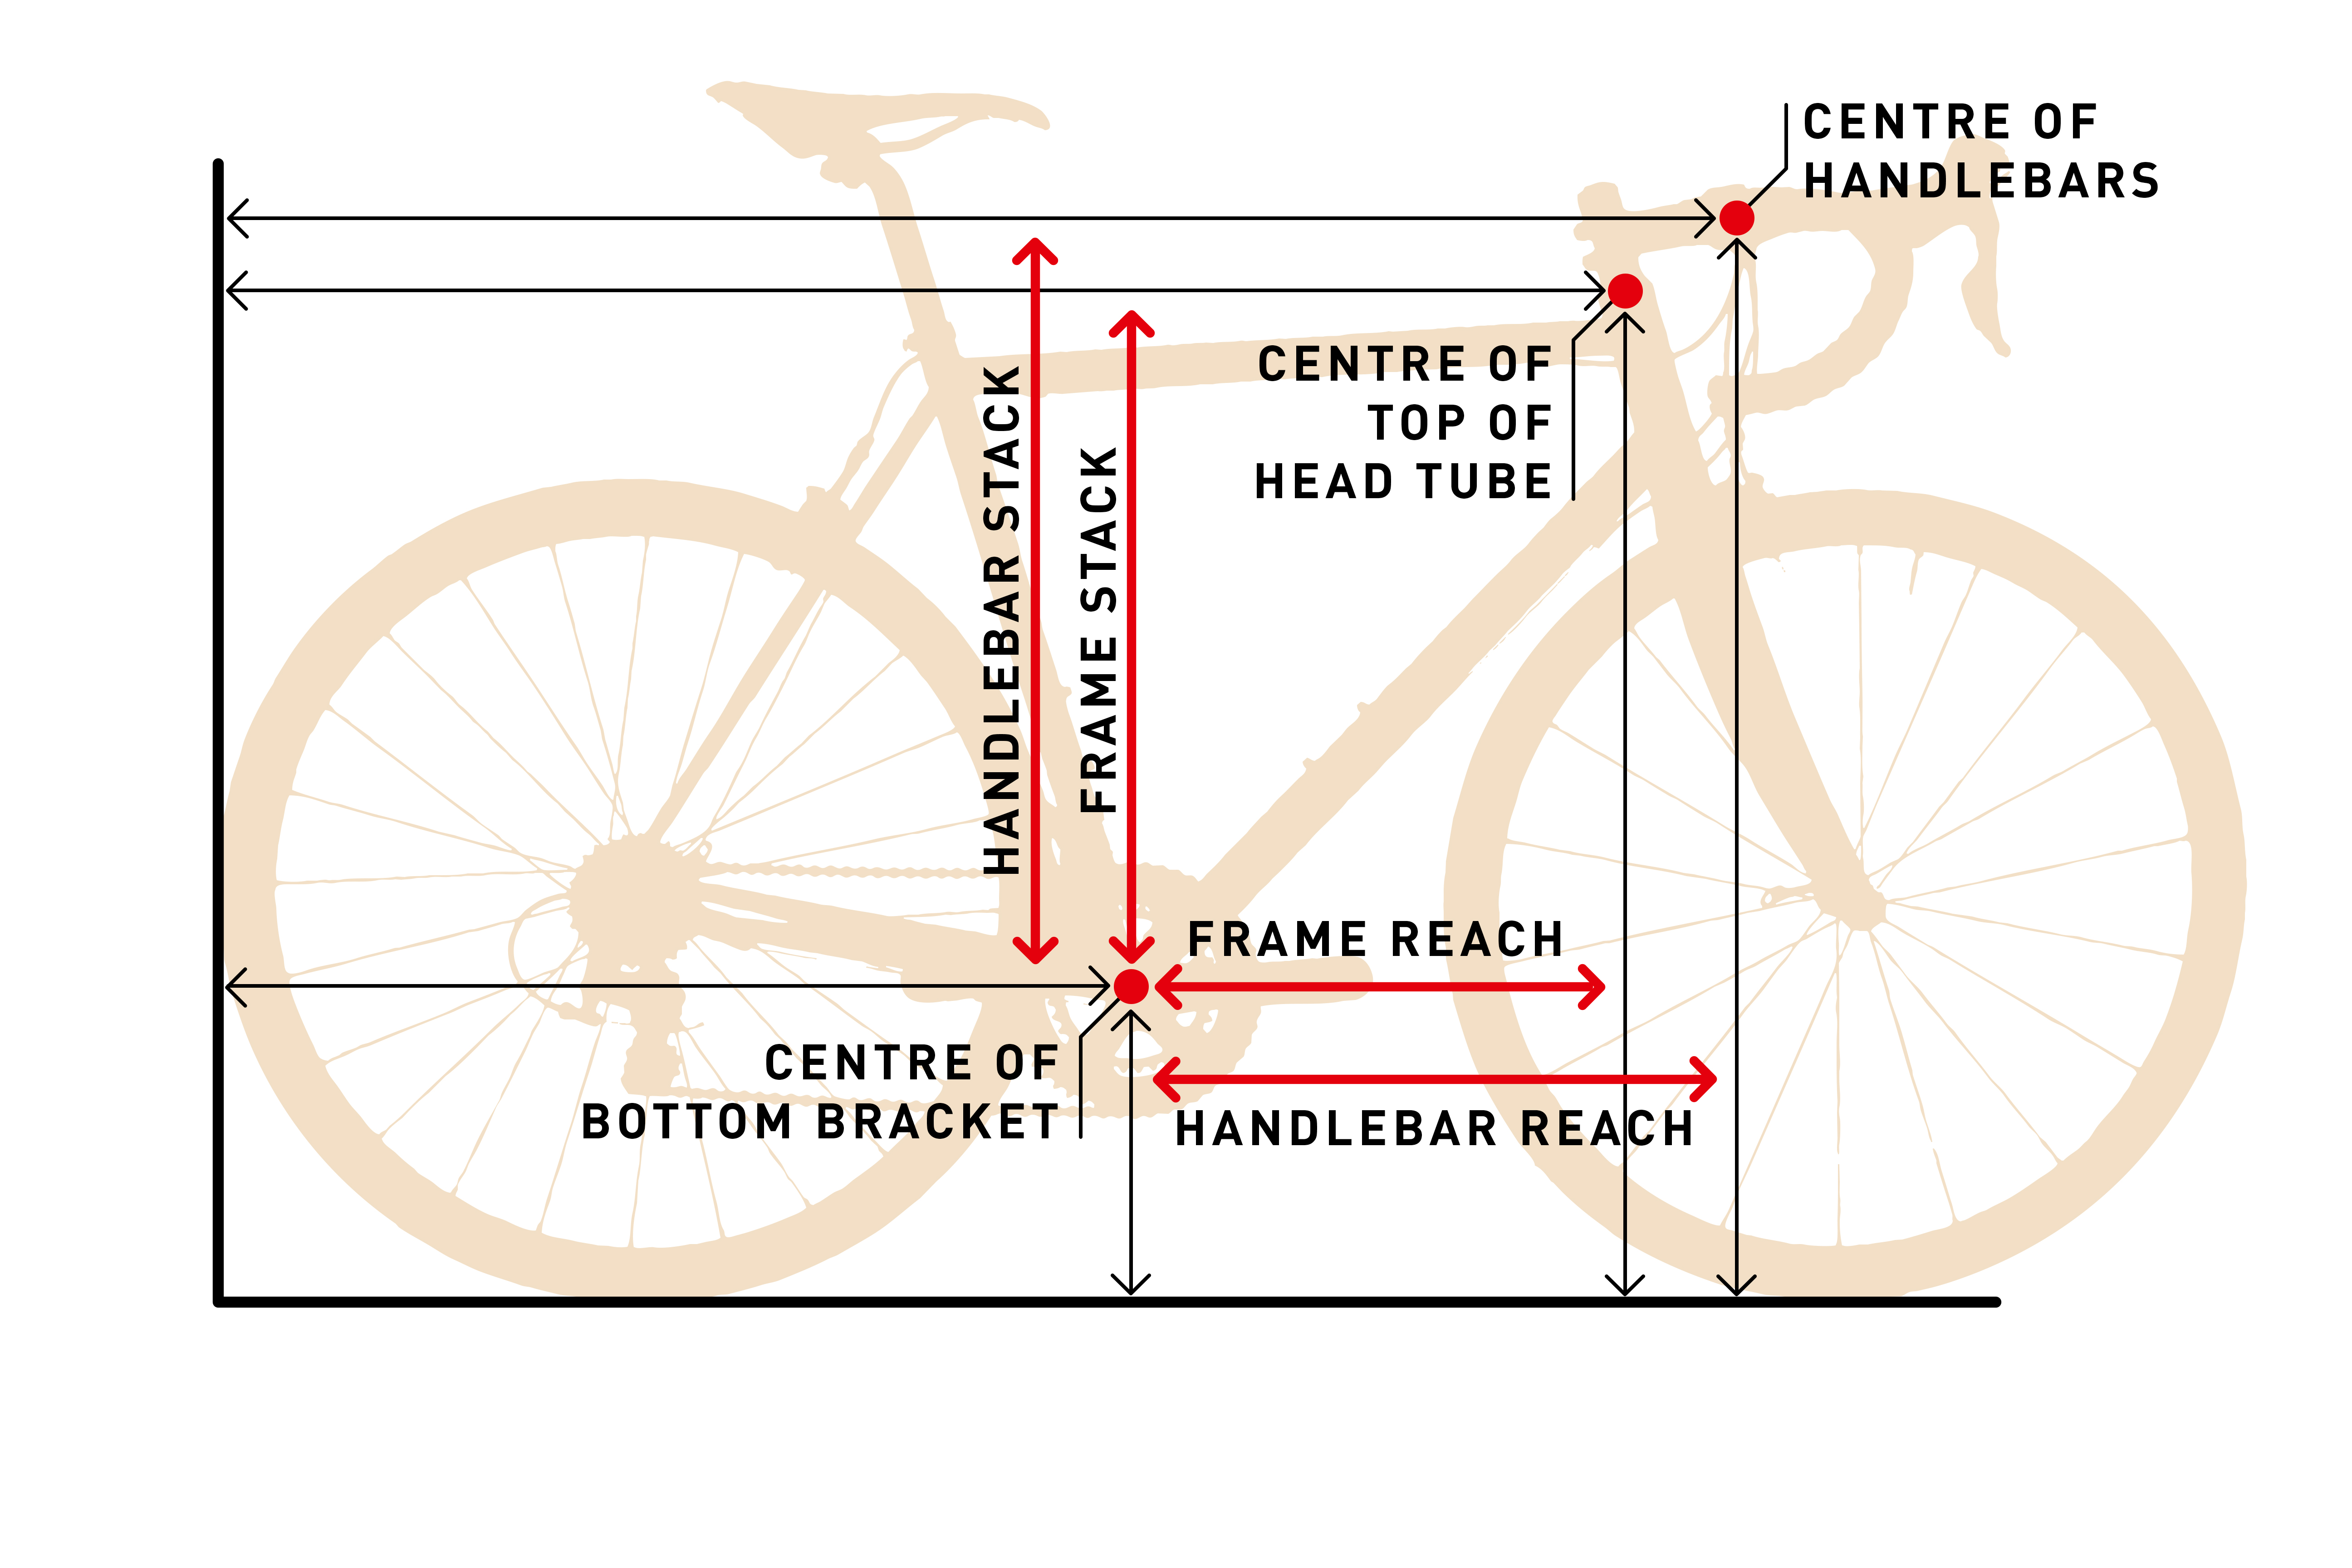
What is bike reach? Bike reach is the horizontal distance from the center of the bottom bracket to the center of the top of the head tube, as measured on the bike’s frame. Can I adjust my bike reach? Yes, you can adjust bike reach through various bike fitting adjustments and component choices. Who is bike reach for? Bike reach is crucial for all cyclists, from beginners to professionals, as it directly impacts comfort, control, and efficiency.
Getting the right fit on your bicycle is key to enjoying your rides, preventing pain, and riding faster. One of the most important measurements that influence this perfect fit is bike reach measurement. This isn’t just about how “big” or “small” a bike feels; it’s about how your body interacts with the frame’s geometry. A proper cycling reach guide helps you find that sweet spot, ensuring your saddle to handlebar distance is just right for your body.
Many cyclists overlook the importance of reach, often focusing more on standover height or seat tube length. However, reach plays a vital role in your overall riding posture. Too short, and you might feel cramped, leading to shoulder and neck pain. Too long, and you could experience lower back strain, hand numbness, and a loss of control. This in-depth guide will help you with how to find bike reach that suits you and how to achieve an effective cycling reach.
Deciphering Bike Geometry Reach
Before we dive into measuring, let’s briefly touch upon what influences reach on a bike. Bike geometry reach is a fundamental design element of a bicycle frame. It’s a key factor in determining how a bike will feel when you ride it.
Key Components Affecting Reach:
- Top Tube Length (Effective): This is the primary measurement that dictates the bike’s reach. It’s the horizontal distance from the center of the seat tube to the center of the head tube.
- Head Tube Length: A longer head tube generally increases the handlebar height, which can indirectly affect how “stretched out” you feel.
- Head Tube Angle: This influences how the bike steers and can subtly impact rider position.
- Stack Height: While not directly part of reach, stack (the vertical distance from the bottom bracket to the top of the head tube) works in conjunction with reach to define your cockpit.
Understanding these elements helps explain why two bikes with the same effective top tube length might still feel different.
Why Reach Matters for Your Cycling Experience
Your bicycle reach setup directly impacts several aspects of your ride:
- Comfort: A well-matched reach prevents unnecessary strain on your back, neck, shoulders, and wrists.
- Control: A proper reach allows for optimal weight distribution and balance, giving you more confidence when steering and navigating.
- Efficiency: When you’re in a comfortable and balanced position, your pedaling is more efficient, and you can generate more power.
- Breathing: An overly long or short reach can restrict your diaphragm, making it harder to breathe deeply.
- Vision: A good reach allows you to look ahead comfortably without straining your neck.
How to Measure Bike Reach: Your Personal Guide
So, how do you go about measuring bike frame reach for yourself? There are a few ways to approach this, ranging from simple at-home methods to professional bike fitting.
Method 1: The DIY Approach (Using Your Body Measurements)
This method involves taking your own body measurements and comparing them to a bike’s specifications. It’s a good starting point for understanding what might work for you.
What You’ll Need:
- A flexible measuring tape.
- A friend to help (optional, but recommended for accuracy).
- A wall or a stable surface to lean against.
- A way to record your measurements.
Steps:
-
Measure Your Torso Length:
- Stand with your back against a wall, feet shoulder-width apart.
- Place a book or a level across your collarbones.
- Mark the wall at the top of the book (where the bottom of the book meets your sternal notch).
- Then, place the book between your legs, resting on your crotch, and mark the wall at the top of the book (this marks your saddle height point).
- Measure the distance on the wall between these two marks. This is your torso length.
-
Measure Your Arm Length:
- Stand with your arm relaxed at your side.
- Have a friend measure from the bony prominence at the top of your shoulder (acromion process) down to the center of your clenched fist.
- Alternatively, you can measure from the same shoulder point down to your wrist bone. For this guide, let’s focus on the fist measurement for simplicity.
-
Calculate Your Ideal Reach Range:
- This is where it gets a bit more general. Body proportions vary greatly. However, as a rough guide:
- Torso Length + Arm Length = Approximate Rider Length
- This “Rider Length” can be loosely correlated to frame size. However, bike fitting reach is more nuanced than just one number.
- A common approach for a neutral position is to consider your torso length in relation to your leg length. Cyclists with longer torsos and shorter arms might prefer shorter reach, while those with shorter torsos and longer arms might need longer reach.
- This is where it gets a bit more general. Body proportions vary greatly. However, as a rough guide:
Interpreting the DIY Measurements:
These measurements provide a general idea, but they don’t directly translate into a specific reach number in millimeters. They are best used to:
- Compare yourself to others with similar body types.
- Understand if you generally have a longer torso or longer arms, which can influence your preference for reach.
- Have some baseline data if you consult a bike fitter or a knowledgeable shop.
Method 2: Measuring Your Current Bike’s Reach
If you already have a bike that feels reasonably comfortable, you can measure its reach to get a tangible number. This is a crucial step in measuring bike frame reach.
What You’ll Need:
- Your bicycle.
- A measuring tape or a long ruler.
- A spirit level or a straight edge.
- A way to ensure the bike is upright and level. A bike stand is ideal, but leaning it against a wall with careful positioning can work.
Steps:
-
Ensure the Bike is Level:
- Place the bike on a level surface.
- If using a stand, ensure it’s stable. If leaning, try to make sure the wheels are perpendicular to the ground and the frame is as level as possible.
-
Locate Key Points:
- Bottom Bracket Center: This is the center of the spindle where the crank arms attach.
- Head Tube Center (Top): This is the center of the steerer tube at the very top of the head tube, where the stem attaches.
-
Perform the Measurement:
- Place the spirit level across the top of the head tube. The center of the spirit level should align with the center of the head tube.
- Place the measuring tape so one end is at the center of the bottom bracket.
- Run the tape horizontally towards the head tube, aligning it with the center of the spirit level.
- Read the measurement where the measuring tape intersects the vertical line going through the center of the head tube. This is the frame’s reach.
Important Considerations:
- Frame Size: Bike manufacturers list “reach” in their geometry charts, usually in millimeters. This is the most accurate way to know a frame’s reach. You can find these charts on the manufacturer’s website.
- Component Variations: The “frame reach” is just one part of your total cockpit reach. The stem length, handlebar rise, and handlebar reach/drop also significantly contribute to your final effective cycling reach.
Method 3: The Professional Bike Fit
For the most accurate and personalized approach to bike fitting reach, a professional bike fit is highly recommended. A bike fitter uses specialized tools and their expertise to assess your body, flexibility, and riding style to determine the optimal reach for you.
What a Professional Bike Fit Involves:
- Static Assessment: The fitter will take various body measurements (like those described in Method 1, but more precise).
- Dynamic Assessment: You’ll ride the bike on a trainer while the fitter observes your posture, pedaling efficiency, and any signs of strain. They might use motion capture technology or video analysis.
- Adjustments: Based on the assessment, the fitter will adjust your current bike (if possible) or recommend changes to components like the stem, handlebars, or even a different frame size.
- Personalized Recommendations: They will provide you with specific measurements and advice for adjusting bike reach and other contact points.
A professional bike fit is an investment, but it can significantly improve your comfort, performance, and prevent injuries. It’s the ultimate cycling reach guide tailored specifically to you.
Adjusting Bike Reach: Fine-Tuning Your Cockpit
Once you know your ideal reach or have measured your current setup, you might need to make adjustments. This is where the practical side of adjusting bike reach comes into play.
Common Adjustments for Reach:
-
Stem Length: This is the most common and effective way to alter reach.
- Shorter Stem: Decreases reach, bringing the handlebars closer.
- Longer Stem: Increases reach, moving the handlebars further away.
- Consider: Stem angle also affects handlebar height, so a shorter stem might also raise your bars.
-
Stem Rise/Angle: Changing the angle or rise of your stem can also influence how “stretched out” you feel.
- A stem with more rise (or a negative angle flipped to positive) will bring the handlebars closer and higher, effectively shortening the perceived reach.
- A flatter stem will generally extend the reach.
-
Handlebar Offset/Reach/Drop: Different handlebars have varying dimensions.
- Handlebar Reach: This is the horizontal distance from the stem clamp to the drop section of the handlebar. A handlebar with a shorter reach will bring the drops closer to you.
- Handlebar Drop: The vertical distance from the top of the bar to the drops. A shallower drop can also make the drops feel more accessible.
- Handlebar Flare: If the drops angle outwards, this can feel different on your wrists and how far your hands are positioned.
-
Saddle Position (Fore/Aft): While the saddle position primarily affects your leg extension and knee position, moving your saddle forward or backward on its rails can subtly alter your saddle to handlebar distance. Moving the saddle forward shortens the effective reach, and moving it back lengthens it.
Table: Common Adjustments and Their Impact on Reach
| Adjustment | Change | Impact on Reach | Impact on Handlebar Height |
|---|---|---|---|
| Stem Length | Shorter Stem | Decreases | Can increase |
| Longer Stem | Increases | Can decrease | |
| Stem Angle/Rise | More Rise/Positive | Decreases (effectively) | Increases |
| Less Rise/Negative | Increases (effectively) | Decreases | |
| Handlebar Reach | Shorter Reach Bar | Decreases | Minimal |
| Longer Reach Bar | Increases | Minimal | |
| Saddle (Fore/Aft) | Forward | Decreases (subtly) | Minimal |
| Backward | Increases (subtly) | Minimal |
Finding Your Optimal Bike Reach
The goal is to find a reach that allows you to maintain a relaxed, neutral posture on the bike.
Signs of Incorrect Reach:
-
Too Long Reach:
- Lower back pain or stiffness.
- Numbness in hands or wrists.
- Neck and shoulder strain.
- Difficulty reaching the brakes.
- Feeling like you’re “hanging off” the bike.
-
Too Short Reach:
- Feeling cramped, especially in the knees and chest.
- Difficulty getting low into an aerodynamic position.
- Knuckles are white from gripping too hard.
- Slight knee-to-handlebar overlap when turning.
The “Happy Medium” Posture:
When your reach is correct, you should be able to:
- Rest your hands on the hoods with a slight bend in your elbows.
- Maintain a neutral spine, avoiding excessive rounding or arching.
- Look ahead comfortably without straining your neck.
- Reach the brake levers easily and with control.
- Transition smoothly between the hoods, tops, and drops (if applicable).
Bike Reach Measurement and Frame Size
It’s important to distinguish between bike reach measurement as a feature of a frame’s geometry and your personal ideal reach. While manufacturers use reach to define their frame sizes, your individual body proportions and flexibility will dictate what size frame is truly optimal for you.
For example, a rider with a longer torso might be comfortable on a larger frame with a longer reach, while someone with shorter arms might prefer a smaller frame or a frame with a shorter reach specification, even if their overall height suggests a larger size. This is why relying solely on “what size bike” is often insufficient for a perfect fit.
Frequently Asked Questions (FAQ)
-
Q: How do I know if my bike reach is wrong?
A: You’ll likely experience discomfort such as back pain, neck strain, hand numbness, or a feeling of being too stretched out or too cramped. -
Q: Can I change my bike’s reach after buying it?
A: Yes, you can adjust your bike’s reach by changing the stem length, stem angle, or handlebar type. -
Q: Does saddle height affect reach?
A: Saddle height primarily affects leg extension. However, by moving your saddle fore/aft, you can subtly alter your effective reach to the handlebars. -
Q: What is “effective top tube length” and how does it relate to reach?
A: Effective top tube length is a key component of frame geometry that contributes significantly to the overall reach. It’s the horizontal distance from the seat tube to the head tube. -
Q: Is there a single “correct” reach measurement for everyone?
A: No, the ideal reach varies significantly based on individual body proportions, flexibility, and riding style. A professional bike fit is the best way to determine your optimal reach.
Achieving the perfect bike fit is an ongoing process, and measuring bike frame reach is a critical piece of that puzzle. By taking the time to understand your body, measure your current setup, and explore adjustment options, you can ensure a comfortable, efficient, and enjoyable cycling experience. Whether you use DIY methods or seek professional help, prioritizing your bicycle reach setup will pay dividends in every pedal stroke.