
What is bike reach, and how do you measure it? Bike reach is the horizontal distance from the center of the bottom bracket to the center of the top of the head tube. This guide will help you measure it accurately.
Measuring your bike’s reach is a crucial step in achieving a comfortable and efficient riding position. Whether you’re a seasoned cyclist or just starting, knowing how to measure and interpret this key measurement can significantly improve your bike fit and overall riding experience. This article serves as your comprehensive resource, breaking down the process, explaining why it matters, and how it relates to other important bike geometry aspects.
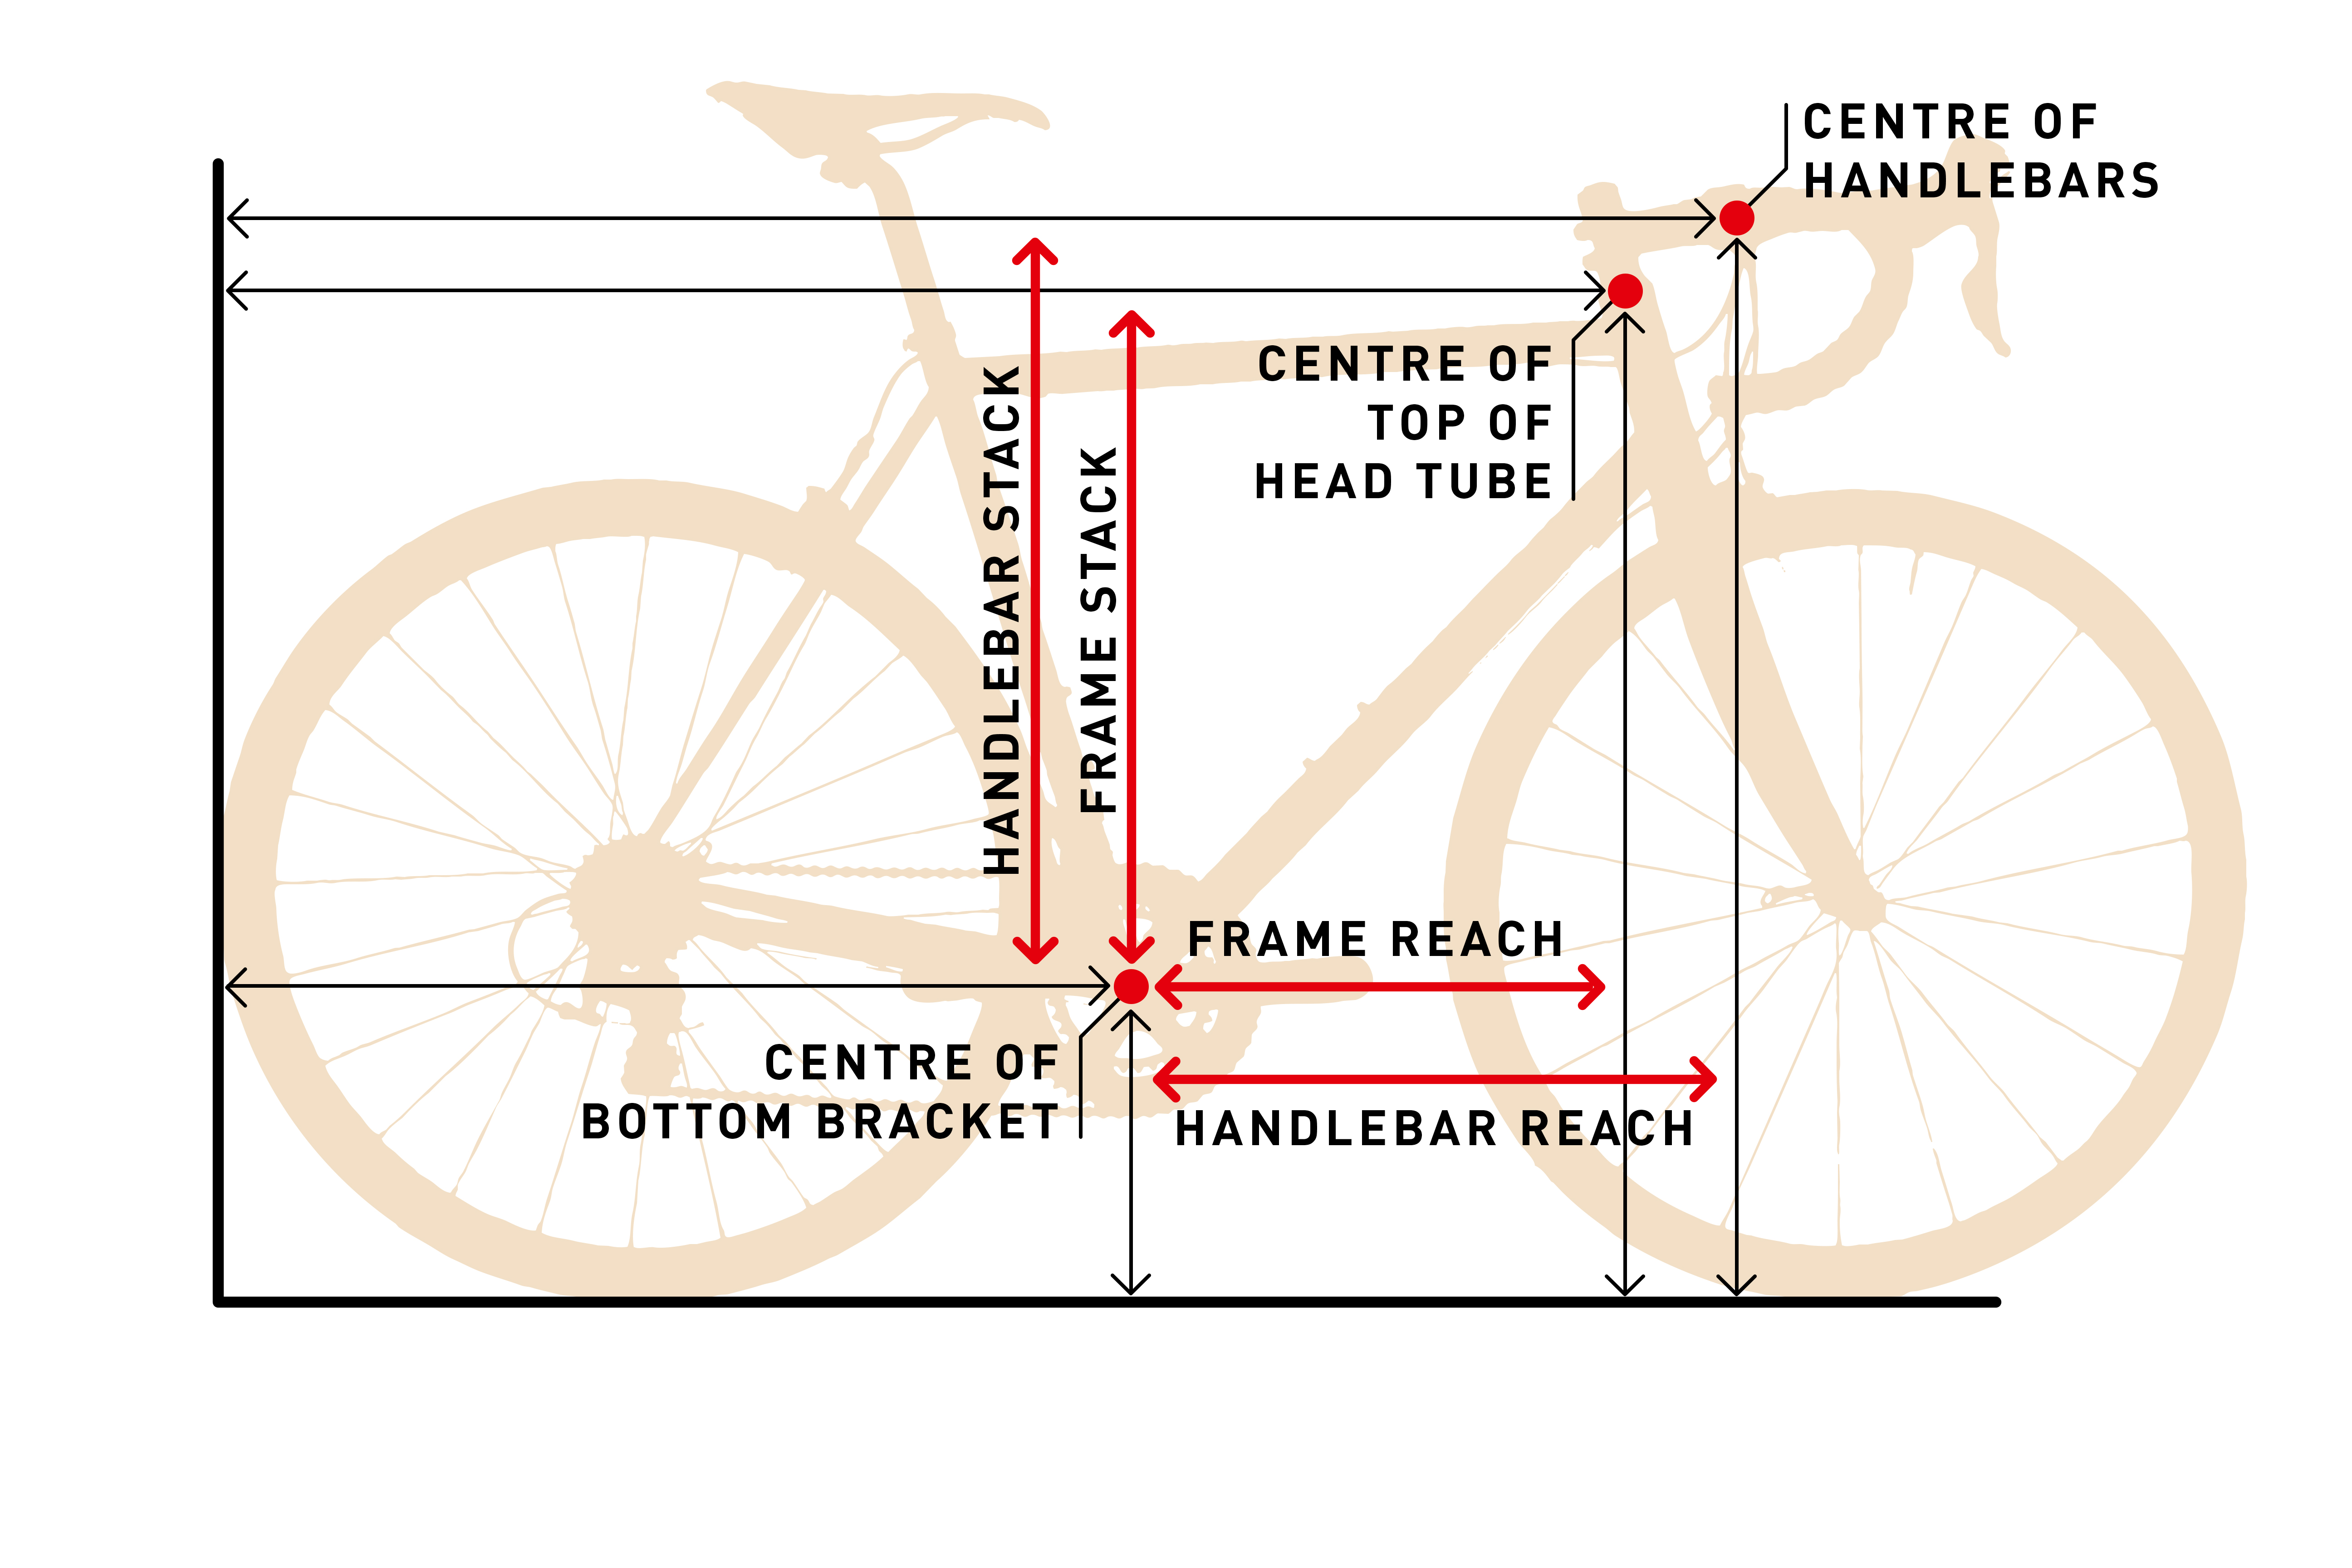
Image Source: rideonmagazine.com.au
Deciphering Bike Reach: The Basics
Bike reach is a fundamental measurement that dictates how far forward you’ll be stretched when you’re on the bike. It’s directly influenced by the frame’s design, specifically the top tube length and the head tube angle. A longer reach generally means a more stretched-out position, often favored by racers for aerodynamics. A shorter reach typically results in a more upright and relaxed posture, beneficial for comfort on longer rides or for riders who prioritize a less aggressive stance.
Why Reach Matters for Your Bike Fit
Your body’s flexibility, torso length, and arm length all play a role in how well you’ll fit on a particular bike. Reach directly impacts:
- Comfort: Too much reach can lead to back pain, shoulder strain, and numb hands. Too little can feel cramped and lead to knee pain as you might be too close to the handlebars.
- Control: An appropriate reach allows for better weight distribution, which is vital for steering and handling, especially on descents or in technical terrain.
- Efficiency: The right reach enables you to maintain a powerful pedaling position without unnecessary strain, translating to more efficient power output.
Measuring Your Bike’s Reach: A Step-by-Step Approach
To measure your bike’s reach accurately, you’ll need a tape measure or a long ruler. It’s best to have a friend help you, as holding the tape measure steady while ensuring it’s perfectly horizontal can be tricky.
Essential Tools for Measuring
- Tape Measure: A metal tape measure is ideal for its rigidity.
- Level: To ensure your tape measure is perfectly horizontal.
- Pen and Paper: To record your measurements.
The Measurement Process
- Locate the Bottom Bracket Center: This is the center of the crank axle, where the pedals attach.
- Locate the Top of the Head Tube Center: The head tube is the part of the frame where the fork steers the front wheel. Find the very top center point.
- Position the Tape Measure: Place the end of your tape measure at the center of the bottom bracket.
- Ensure Horizontal Alignment: Keeping the tape measure perfectly horizontal, extend it towards the head tube. Use a level to confirm it’s straight.
- Mark the Head Tube: Mark the point on the head tube that is directly in line with the tape measure when it’s horizontal and at the same height as the bottom bracket center.
- Read the Measurement: The distance from the center of the bottom bracket to this marked point on the head tube is your bike’s reach.
Important Note: This is the frame’s inherent reach. However, the effective top tube length is often quoted by manufacturers and is a more practical measure for determining rider position. We’ll delve into that next.
Fathoming Effective Top Tube Length
While “reach” refers to the frame’s geometric dimension, effective top tube length (ETT) is a more rider-centric measurement. It represents the horizontal distance from the center of the seat tube to the center of the head tube. This measurement, along with the seat tube angle and head tube angle, strongly dictates how the bike will feel and how you’ll position yourself on it.
Why ETT is Crucial for Your Fit
- Determines Cockpit Length: ETT, combined with stem length, directly influences how far you’ll reach the handlebars from the saddle.
- Impacts Riding Posture: A longer ETT usually means a longer cockpit, requiring a more stretched-out position. A shorter ETT leads to a more compact, upright posture.
- Interplay with Other Measurements: ETT works in conjunction with stack height (vertical distance) to define the overall riding position.
How to Measure Effective Top Tube Length
- Identify the Seat Tube: This is the large tube that extends upwards from the bottom bracket, housing the seatpost.
- Identify the Head Tube: As mentioned before, this is where the fork is housed.
- Measure Horizontally: Measure the horizontal distance from the center of the seat tube (where the seatpost enters) to the center of the head tube.
- Use a Level: Ensure your tape measure remains perfectly horizontal throughout the measurement.
Most manufacturers will list the ETT for their frames. This is a vital number when comparing different bikes or when considering a frame swap.
The Role of Handlebar Reach and Stem Length
Beyond the frame’s inherent geometry, the components you choose significantly alter your actual reach to the handlebars. This is where handlebar reach and stem length come into play.
Handlebar Reach: What It Is
Handlebar reach is a measurement specific to the handlebars themselves. It’s the horizontal distance from the center clamp area of the handlebar (where it attaches to the stem) to the drops (the lowest part of the curved section of road handlebars) or the grip area on mountain bike handlebars.
Stem Length: A Critical Component
The stem length is the component that connects your handlebars to the steerer tube of your fork. Changing the stem length is one of the easiest and most effective ways to fine-tune your reach.
- Shorter Stem: Brings the handlebars closer to you, resulting in a more upright and comfortable position. It can also make steering quicker and more responsive.
- Longer Stem: Extends the handlebars further away, creating a more stretched-out, aerodynamic position. This can improve stability at high speeds but may feel less comfortable for riders with limited flexibility.
Calculating Your Effective Cockpit Length
Your actual reach to the handlebars is a combination of the frame’s ETT and your stem length, plus the reach of your handlebars.
Effective Cockpit Length = ETT + Stem Length + Handlebar Reach (from center clamp to grip)
This calculation gives you a more accurate picture of how far you’ll be stretched when you’re in the saddle and on the hoods or drops.
How Other Bike Geometry Affects Your Position
Reach isn’t measured in isolation. Several other aspects of bike geometry contribute to your overall riding position and comfort.
Seat Tube Angle and Its Impact on Reach
The seat tube angle influences where your saddle height and position will be relative to the bottom bracket.
- Steeper Seat Tube Angle: Places the saddle further forward relative to the bottom bracket. This can shorten the effective reach to the handlebars and is often found on aggressive road bikes.
- Slacker Seat Tube Angle: Positions the saddle further back. This can lengthen the effective reach and is more common on endurance or mountain bikes.
Head Tube Angle: Steering and Reach
The head tube angle primarily affects steering and handling, but it also plays a subtle role in reach.
- Steeper Head Tube Angle: Leads to quicker steering and can feel like it brings the handlebars slightly closer.
- Slacker Head Tube Angle: Results in more stable, slower steering and can feel like it pushes the handlebars slightly further away.
Stack and Reach: A Comprehensive Pairing
Stack is the vertical distance from the center of the bottom bracket to the center of the top of the head tube. Reach is the horizontal equivalent. Together, stack and reach provide a two-dimensional representation of a frame’s geometry that is incredibly useful for comparing different bikes.
- High Stack, Low Reach: This combination typically results in a more upright and comfortable riding position.
- Low Stack, High Reach: This configuration usually leads to a more aggressive, aerodynamic, and stretched-out position.
Many cyclists use stack and reach to find bikes that offer a similar feel to their current setup, even from different brands.
Personalizing Your Bike Reach: Practical Adjustments
Once you’ve measured your bike and its components, you can start making adjustments to personalize your fit.
Saddle Position Adjustments
Your saddle height and fore/aft position also affect your reach.
- Saddle Height: If your saddle is too high, you’ll likely be reaching too far. If it’s too low, you might feel cramped.
- Saddle Fore/Aft: Moving your saddle forward on its rails will effectively shorten your reach to the handlebars, while moving it backward will lengthen it. A common guideline for saddle fore/aft position is to have the front of your kneecap directly over the pedal spindle when the crank arm is horizontal.
Stem Swaps and Handlebar Choices
As discussed, changing your stem length is a primary method for adjusting reach.
- Experimenting with Stem Lengths: If you feel too stretched out, try a shorter stem. If you feel cramped, try a longer stem.
- Handlebar Shape: Different handlebars have varying reach and drop dimensions. A handlebar with a shorter reach will bring you closer to the controls.
Professional Bike Fit: When to Seek Expert Advice
While these measurements and adjustments can help, nothing beats a professional bike fit. A trained bike fitter will:
- Assess Your Body Measurements: They’ll measure your flexibility, torso length, leg length, and arm length.
- Analyze Your Riding Style: They’ll consider whether you’re a racer, a casual rider, or an endurance cyclist.
- Utilize Tools and Technology: Many fitters use motion capture systems and pressure mapping to fine-tune your position.
- Recommend Adjustments: They can advise on stem length, handlebar type, saddle position, and even cleat placement to optimize your comfort and performance.
A professional bike fit is an investment that can prevent injuries, improve efficiency, and make cycling a much more enjoyable experience.
Frequently Asked Questions (FAQ)
Q1: How do I know if my bike’s reach is correct?
A: You’ll feel it. If you experience pain in your back, neck, shoulders, or hands, your reach might be too long or too short. You might feel overly stretched or cramped.
Q2: Can I adjust my bike’s reach without buying new parts?
A: Yes, you can often adjust your saddle’s fore/aft position, and sometimes flip your stem (if it has an angle) to change the effective rise and therefore slightly alter your reach. However, significant changes usually require a different stem.
Q3: What is a typical reach measurement for a road bike?
A: Road bike reach varies greatly by size and model, but for a medium-sized frame, it often falls between 370mm and 390mm.
Q4: How does my flexibility affect the ideal bike reach?
A: More flexible riders can generally tolerate a longer reach and lower stack, allowing for a more aerodynamic position. Less flexible riders will benefit from a shorter reach and higher stack for a more upright and comfortable position.
Q5: Who is a professional bike fit for?
A: A professional bike fit is for anyone who rides a bike regularly, from beginners to seasoned athletes, who wants to improve comfort, prevent injuries, and maximize performance.
Q6: Does handlebar reach mean the same thing as bike reach?
A: No. Bike reach (or frame reach) is a measurement of the frame itself. Handlebar reach is a measurement of the handlebar’s shape. They are related but distinct.
Q7: How do I measure saddle height?
A: A common method is to measure the distance from the center of the bottom bracket to the top surface of the saddle, along the seat tube, typically with the crank arm in the 3 o’clock position. However, a professional bike fit will determine your optimal saddle height based on your inseam and pedaling biomechanics.
Q8: What is the difference between effective top tube length and top tube length?
A: Effective top tube length is a horizontal measurement from the center of the seat tube to the center of the head tube. Traditional top tube length is often measured along the top tube itself, which can be angled, making ETT a more consistent and comparable metric.
Q9: How important is the head tube angle in determining my riding position?
A: While the head tube angle primarily influences handling and steering stability, it does subtly affect your perceived reach. A slacker head tube angle can push the front wheel further out, indirectly influencing how you position yourself.
Q10: If I change my stem, will it affect my bike’s handling?
A: Yes, changing stem length will alter your bike’s handling characteristics. A shorter stem generally makes steering quicker and more agile, while a longer stem makes it more stable and less twitchy.