
Can you put a front wheel on a bike easily? Yes, you absolutely can! With a few simple steps, you’ll have your front wheel securely attached and be ready to roll. This guide will walk you through the entire process, making front wheel installation a breeze, whether you’re dealing with a standard quick release wheel or a more traditional bolt-on axle.
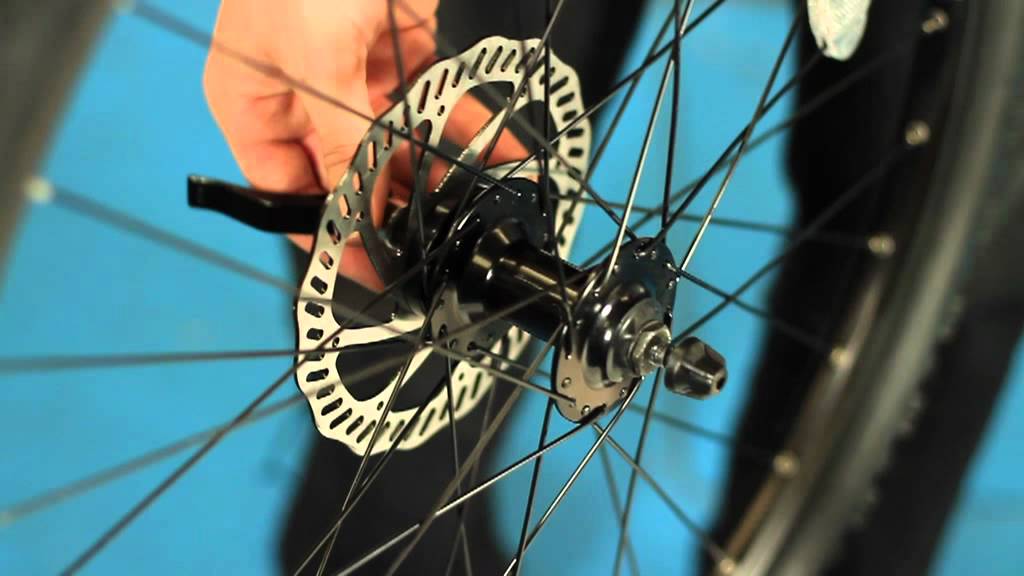
Image Source: i.ytimg.com
Getting Ready for Front Wheel Installation
Before you start attaching the bike front wheel, gather your tools and make sure your bike is in a stable position. This might mean placing it in a bike stand, leaning it securely against a wall, or having a friend help hold it steady. Having a clear workspace is also helpful, so you don’t lose any small parts.
Essential Tools and Parts
- The Front Wheel: Ensure it’s the correct size for your bike.
- Wrenches (if not a quick release): Typically 15mm or 17mm wrenches are needed for bolt-on axles.
- Tire Levers: For easier bike tire placement if you’ve removed it.
- Pump: To inflate the tire once it’s installed.
- Gloves (optional): To keep your hands clean.
- Rag: For wiping down components.
Understanding Different Front Wheel Attachment Systems
Bikes use a couple of main ways to attach the front wheel. Knowing which type you have is the first step in a successful front wheel installation.
Quick Release Systems
This is the most common system on modern bikes. It uses a lever to clamp the wheel into the fork dropouts.
- The Lever: This is the part you open and close.
- The Skewer: This is the rod that goes through the center of the hub.
- The Nuts: These thread onto the skewer on the outside of the fork.
How it works: When you close the lever, it pulls the skewer through the hub and tightens it against the fork dropouts, holding the wheel firmly in place.
Bolt-On Axles
Older bikes and some BMX or single-speed bikes use nuts to hold the wheel in place.
- The Axle: This is a solid rod that goes through the hub.
- The Nuts: These thread directly onto the ends of the axle.
How it works: You tighten these nuts with a wrench to secure the wheel.
Step-by-Step: Attaching the Bike Front Wheel
Let’s break down the front wheel installation process into simple, manageable steps.
Step 1: Prepare the Fork and Wheel
- Clean the Fork Dropouts: Look at the slots at the bottom of your bike’s front fork, called fork dropouts. Make sure they are clean and free of dirt or debris. Any grit can prevent the wheel from seating properly. Use a rag to wipe them out.
- Check the Hub: Inspect the bike’s front hub. If it’s a quick release wheel, ensure the skewer is properly inserted through the hub and the lever is on the non-drive side (usually the left side) of the bike. For bolt-on axles, ensure the axle is clean.
Step 2: Orienting the Wheel and Tire
- Tire Direction: Most bike tires have a specific direction of rotation, often indicated by an arrow on the sidewall. Make sure the arrow points forward when you install the wheel. This helps with grip and water displacement. This step is crucial for proper bike tire placement.
- Valve Stem Alignment: If you have rim brakes, it’s often best to position the valve stem so it’s not directly in line with the brake pads. This can prevent slight rubbing and make it easier to inflate.
Step 3: Seating the Wheel in the Fork Dropouts
This is where the actual axle mounting happens.
For Quick Release Wheels:
- Open the Lever: Flip the quick-release lever open. It should now be sticking out horizontally.
- Loosen the Nuts (if needed): If the lever is very tight, you might need to unscrew the nut on the opposite side slightly. You want enough thread engagement so the lever can close firmly, but not so much that it’s impossible to close.
- Position the Wheel: Lift the front of the bike slightly or tilt it to allow the wheel’s axle to slide into the fork dropouts. The axle should rest snugly in the bottom of the slots.
- Ensure Proper Seating: Make sure the axle is fully seated at the bottom of both dropouts. You can often see a small gap between the top of the axle and the dropout slot if it’s not fully in. Give the wheel a gentle wiggle to confirm it’s settled.
For Bolt-On Axles:
- Position the Wheel: Lift the front of the bike and place the axle into the fork dropouts.
- Start the Nuts: Thread the nuts onto the axle by hand. Make sure they are going on straight and not cross-threading.
- Initial Tightening: Tighten the nuts by hand as much as you can.
Step 4: Securing the Wheel
This is the critical step for ensuring the wheel stays on.
For Quick Release Wheels:
- Lever Position: With the wheel seated, close the quick-release lever. It should feel firm and offer resistance. The lever should ideally end up pointing upwards or backward, away from the frame and potential snagging hazards.
- Lever Tightness Check: This is very important for front wheel installation. You can test the tightness by trying to open the lever with one hand. It should require a deliberate effort. Another test is to try and pull the wheel out of the dropouts with the lever closed; it should not budge. If it’s too loose, open the lever, tighten the nut on the non-lever side a bit, and try closing the lever again. If it’s too tight to close, open the lever, unscrew the nut slightly, and try again. The goal is a secure clamp.
For Bolt-On Axles:
- Tighten with a Wrench: Using your wrench, tighten the nuts on both sides of the axle.
- Even Tightening: Tighten them evenly, alternating between sides. This ensures the wheel stays centered in the fork.
- Firmness Check: Tighten them firmly, but don’t overtighten to the point of stripping the threads or damaging the fork. The wheel should be held securely with no wobble.
Step 5: Final Checks and Adjustments
- Wheel Centering: Look at the wheel from the front and back. Is it centered between the fork blades? If not, loosen the securing mechanism slightly, adjust the wheel’s position, and re-tighten.
- Spoke Alignment and Brake Clearance: Spin the wheel to check for any rubbing. If you have rim brakes, ensure the wheel is running true and not contacting the brake pads. If it is, you may need to adjust the wheel’s position in the dropouts slightly or true the wheel itself (a more advanced task). Proper spoke alignment contributes to a true-running wheel.
- Tire Clearance: Make sure the tire has enough clearance from the fork crown and the brake calipers.
- Inflation: Use your pump to inflate the tire to the recommended pressure, which is usually printed on the sidewall of the tire.
Common Pitfalls and How to Avoid Them
Even with simple steps, a few things can go wrong during front wheel installation.
Pitfall: Wheel Not Seating Properly
- Cause: Debris in the fork dropouts, or the axle not being at the very bottom of the dropout slot.
- Solution: Clean the dropouts thoroughly. Lift the wheel into place and ensure it’s fully settled at the bottom of the slots before tightening. Wiggling the wheel helps it seat.
Pitfall: Quick Release Lever Too Loose or Too Tight
- Cause: Incorrect adjustment of the nut on the non-lever side.
- Solution: Remember that the quick-release skewer is like a cam. You want enough thread engagement so that when the lever is closed, it presses firmly against the dropout. Adjust the nut in small increments. The lever should require a firm push to close and stay closed.
Pitfall: Tire Rubbing on Brake Pads
- Cause: Wheel is not centered in the fork, or the brake needs adjustment.
- Solution: First, ensure the wheel is centered. If it’s still rubbing, you may need to adjust your brake calipers. For rim brakes, often loosening the brake mounting bolt slightly, centering the pads, and re-tightening can fix this.
Pitfall: Forgetting to Tighten
- Cause: Rushing the process or getting distracted.
- Solution: Always perform the final checks. Give the wheel a spin and try to move it; it should feel absolutely secure. Never ride with a loosely attached wheel.
What if My Bike Has Disc Brakes?
Front wheel installation with disc brakes is very similar, but there are a few extra considerations:
- Rotor Alignment: The brake rotor on the wheel needs to align correctly with the brake caliper mounted on the fork.
- No Wheel Centering Issues: Disc brake setups are typically designed so that when the axle is properly seated and secured, the rotor will align with the caliper.
- Lever Tightening: The lever tightening process for quick release is the same. For thru-axles (a different type of axle that screws directly into the fork), you tighten the axle itself using an Allen key, following the torque specifications if provided.
When to Seek Professional Help
While attaching the bike front wheel is a manageable DIY task, there are times when it’s best to visit your local bike shop:
- Damaged Fork Dropouts: If the slots in your fork are bent or damaged, this needs professional attention.
- Bent Axle: If you suspect your axle is bent, it’s unsafe to ride.
- Difficulty with Thru-Axles: Thru-axles, common on modern mountain bikes, require specific attention to torque and may be confusing for beginners.
- Persistent Brake Rubbing: If you can’t resolve brake rubbing after front wheel installation and basic adjustments.
- General Uncertainty: If you’re ever unsure or uncomfortable with any part of the process, a bike mechanic can quickly and safely do it for you.
Frequently Asked Questions (FAQ)
Q1: How tight should a quick release be?
A: A quick release lever should be tight enough that it requires a firm push to close and leaves a slight imprint on your palm if you push it hard. It should feel very secure, and you shouldn’t be able to pull the wheel out of the dropouts with the lever closed.
Q2: What if the front wheel is wobbly after installation?
A: If the wheel wobbles, it might not be seated correctly in the fork dropouts. Ensure the axle is at the very bottom of both slots and try re-tightening. If it still wobbles, the wheel itself might need truing, which is a more complex repair.
Q3: Can I use a regular nut on a quick release skewer?
A: No, you should not interchange nuts. Quick release skewers and their corresponding nuts are designed to work together, with specific thread pitches and nut shapes. Using the wrong nut can lead to an unsafe attachment.
Q4: Do I need tools to install a quick release front wheel?
A: Generally, no. The beauty of a quick release wheel is that it’s designed to be tool-free for installation and removal. However, a small wrench might be needed if the QR nut is overtightened and you need to adjust it.
Q5: What are fork dropouts?
A: Fork dropouts are the slots or openings at the bottom of your front fork where the wheel’s axle attaches. They are designed to hold the wheel securely in place.
By following these detailed steps, you’ll master the art of front wheel installation and be back on your bike with confidence and a properly secured front wheel. Happy cycling!