
How To Tighten E Bike Brakes: Prevent Accidents
Can you tighten e-bike brakes yourself? Yes, you can tighten your e-bike brakes yourself with basic tools and a little guidance. Regular maintenance, including tightening, is crucial for safe riding. This comprehensive guide will walk you through the process of e-bike brake adjustment, ensuring your electric bike stops reliably and keeps you safe on every journey. We’ll cover everything from basic cable tension adjustments to more involved hydraulic system checks, ensuring your e-bike braking system troubleshooting becomes a breeze.
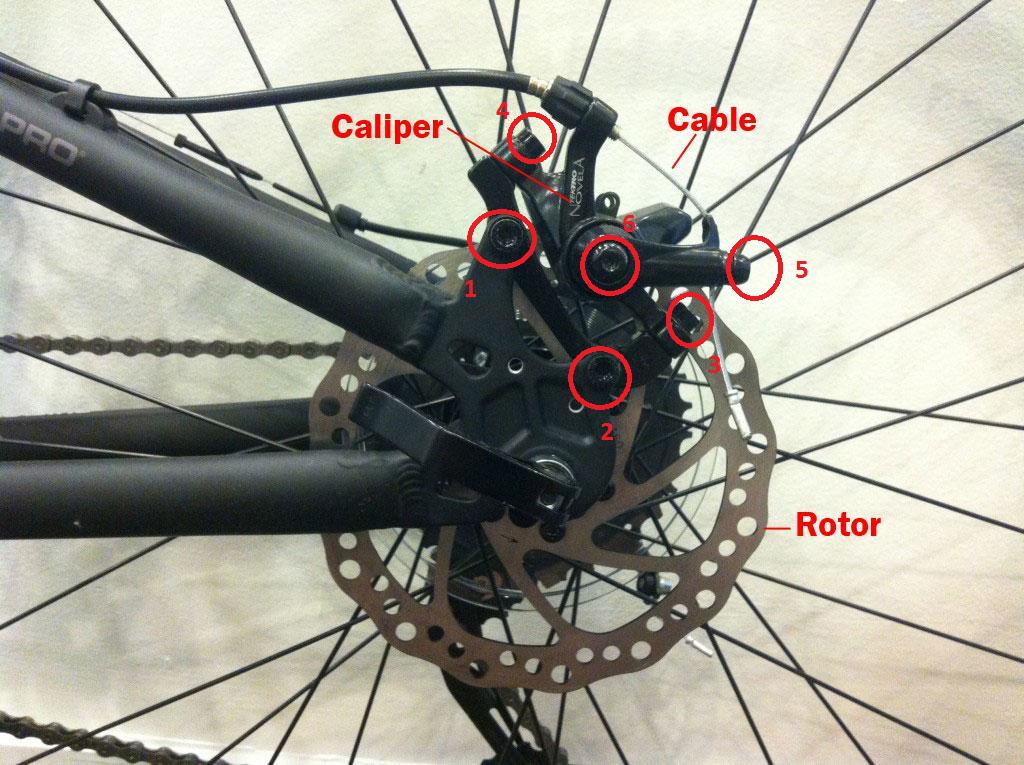
Image Source: www.elecycles.com
Why E-Bike Brake Tightness Matters
Your e-bike’s braking system is your primary safety feature. When brakes aren’t working correctly, it can lead to serious accidents. Loose or ineffective brakes mean longer stopping distances, reduced control, and a higher risk of collisions. This is especially true for e-bikes, which are often heavier and faster than traditional bicycles due to the motor and battery. Maintaining proper e-bike brake adjustment is not just about performance; it’s about preventing dangerous situations.
The Risks of Poorly Adjusted Brakes
- Increased Stopping Distance: Loose brakes require more effort and time to engage, drastically increasing how far you travel before stopping.
- Loss of Control: Inability to slow down or stop effectively can lead to losing control of the bike, especially in emergencies or on inclines.
- Component Wear: Improperly adjusted brakes can cause uneven wear on brake pads and rotors, leading to premature failure and more costly repairs.
- Accidents and Injuries: The most significant risk is a collision with objects, pedestrians, or other vehicles, resulting in potential injuries to yourself and others.
Deciphering Your E-Bike’s Brake System
Before you start tightening, it’s important to know what kind of brakes your e-bike has. The two main types are mechanical disc brakes and hydraulic disc brakes.
Mechanical Disc Brakes
Mechanical disc brakes work similarly to traditional rim brakes, but instead of a cable pulling a brake pad against the wheel rim, it pulls a lever that presses a brake pad against a metal rotor attached to the wheel hub.
How they work:
A cable connects the brake lever to the brake caliper. When you squeeze the lever, the cable pulls on a mechanism within the caliper. This mechanism pushes the brake pads inward, clamping onto the rotor.
Advantages:
* Simpler to maintain and adjust.
* Easier to fix on the go if a cable breaks.
* Generally less expensive.
Disadvantages:
* Can be less powerful than hydraulic brakes.
* Braking feel might be less modulated (less sensitive control).
* Cables can stretch, requiring more frequent adjustment.
Hydraulic Disc Brakes
Hydraulic disc brakes use brake fluid to transmit force from the lever to the caliper. This system is generally more powerful and offers better modulation than mechanical brakes.
How they work:
When you squeeze the brake lever, you push a piston in the master cylinder within the lever assembly. This action pressurizes the brake fluid in the hose. The fluid travels down the hose to the caliper, where it pushes pistons in the caliper. These pistons then press the brake pads against the rotor.
Advantages:
* More stopping power.
* Smoother and more consistent braking feel.
* Less lever effort required for strong braking.
* Sealed system, meaning less maintenance for contamination.
Disadvantages:
* More complex to maintain.
* Require specialized tools and knowledge for bleeding.
* Fluid can leak, which requires immediate attention.
How To Adjust Mechanical E-Bike Brakes
For mechanical disc brakes, the primary adjustment involves mechanical e-bike brake cable tension. This is usually done at the lever or the caliper itself.
Adjusting Cable Tension at the Lever
Most brake levers have a barrel adjuster. This is a threaded knob that you can twist to change the cable tension.
Steps:
- Locate the Barrel Adjuster: Find the small, rotating knob on your brake lever or where the cable enters the lever.
- Test Brake Engagement: Squeeze the brake lever. If it feels too loose or the lever pulls all the way to the handlebar, you need to increase tension.
- Turn the Adjuster:
- To increase tension (make the brake tighter), twist the barrel adjuster counter-clockwise (away from the lever body). This effectively shortens the housing, pulling the cable tighter.
- To decrease tension (make the brake looser), twist the barrel adjuster clockwise (towards the lever body).
- Test Again: After each small adjustment, squeeze the lever to feel the difference. You want the lever to engage firmly before it gets close to the handlebar, leaving a comfortable gap for your fingers.
Adjusting Cable Tension at the Caliper
Some mechanical disc brakes also have adjusters on the caliper itself. These usually allow you to move the fixed pad closer to the rotor.
Steps:
- Locate Caliper Adjusters: Look for small knobs or nuts on the brake caliper body, usually near where the brake pads are located.
- Test Brake Engagement: Squeeze the lever to check the current tension.
- Make Adjustments:
- If the lever is too loose, you might need to tighten the cable. Sometimes, this is done by loosening a cable anchor bolt, pulling the cable slightly tighter by hand, and then re-tightening the bolt.
- Alternatively, some calipers have an adjuster that moves the stationary pad closer to the rotor. Turning this adjuster clockwise usually moves the pad inward. Be careful not to push the pad so close that it rubs the rotor when the brake is not applied.
- Check for Rotor Rub: Spin the wheel. If the brake pads are rubbing against the rotor, you’ve tightened it too much or need to center the caliper.
Centering the Caliper
If your brake pads are constantly rubbing the rotor, the caliper might not be centered.
Steps:
- Loosen Caliper Bolts: Slightly loosen the two bolts that attach the brake caliper to the frame or fork mount.
- Squeeze Lever: Squeeze the brake lever firmly to pull the caliper and pads against the rotor.
- Tighten Bolts: While holding the lever squeezed, carefully re-tighten the caliper mounting bolts. This should help center the caliper over the rotor.
- Release Lever and Check: Release the lever and spin the wheel. The rubbing should be reduced or eliminated. You may need to make minor adjustments using the barrel adjuster or caliper adjuster if still present.
How To Adjust Hydraulic E-Bike Brakes
Hydraulic e-bike brake adjustment is a bit different. While you don’t typically adjust cable tension, you manage the system by ensuring there’s proper fluid pressure and pad positioning. The key is to address any sponginess or lack of power.
Adjusting Lever Reach and Feel
Many hydraulic brake levers have a small screw or dial that adjusts the lever’s reach (how far it is from the handlebar) and sometimes the “bite point” (how far you need to pull the lever before the brakes engage).
Steps:
- Locate Adjuster: Look for a small screw on the lever body, often near the pivot point or on the lever blade itself.
- Adjust Reach: Turn the screw to move the lever closer to or further from the handlebar. Set it to a comfortable position for your hand.
- Adjust Bite Point (if available): Some levers have a separate adjuster for the bite point. Turning this can make the brakes engage sooner or later in the lever stroke. Be cautious with this adjustment; the lever should never be able to reach the handlebar.
Addressing Spongy Levers: Hydraulic E-Bike Brake Bleed
A spongy lever feel, where the lever feels soft and pulls too far without much resistance, is often a sign that there’s air in the hydraulic system. This requires a hydraulic e-bike brake bleed. This process removes air and replaces old fluid with fresh fluid.
Important Note: Brake bleeding is a more advanced procedure. If you’re not comfortable or don’t have the right tools, it’s best to take your e-bike to a professional mechanic.
Tools Needed:
- Brake bleed kit specific to your brake brand (e.g., Shimano, SRAM, Tektro)
- Correct type of brake fluid (DOT fluid for some brands, mineral oil for others – check your e-bike manual)
- Torque wrench
- Allen keys
- Latex gloves
- Shop towels or rags
General Bleeding Steps (varies by manufacturer):
- Prepare: Secure your e-bike, perhaps in a repair stand. Place a container to catch old fluid.
- Attach Bleed Port Cap: Remove the bleed port cap on the caliper and lever. Attach the correct syringe or funnel from your bleed kit to the caliper bleed port.
- Open Bleed Port: Attach the syringe or funnel to the lever’s bleed port. Open the bleed port screw on the caliper (usually with an Allen key).
- Push Fluid Upwards: Slowly push new brake fluid from the caliper syringe up into the system. Watch the lever and see if air bubbles emerge into the lever syringe or funnel.
- Work the Lever: While pushing fluid, gently pump the brake lever a few times. This helps dislodge air bubbles.
- Purge Air: Continue pushing fluid and working the lever until no more air bubbles appear.
- Close Caliper Bleed Port: Once no air is visible, close the caliper bleed port screw while the syringe is still attached and under pressure.
- Remove Syringe/Funnel: Remove the syringe or funnel from the caliper.
- Flush Lever Port: Remove the syringe or funnel from the lever. Close the lever bleed port.
- Clean Up: Clean any spilled fluid immediately with a rag. Brake fluid can damage paint.
- Test: Squeeze the brake lever. It should feel firm and engage consistently. Test the braking power by rolling the bike backwards.
Bicycle Brake Caliper Tuning for Hydraulic Brakes
Even with hydraulic brakes, bicycle brake caliper tuning might be needed if there’s persistent rubbing or uneven pad wear. This is similar to centering mechanical calipers.
Steps:
- Loosen Caliper Mounting Bolts: Slightly loosen the two bolts that attach the caliper to the frame or fork.
- Apply Brake Lever: Squeeze the brake lever firmly. This will help center the caliper over the rotor.
- Tighten Caliper Bolts: While holding the lever squeezed, carefully tighten the mounting bolts to the manufacturer’s recommended torque.
- Release Lever and Check: Release the lever. Spin the wheel to ensure there’s no rubbing. If there is minor rubbing, you might need to slightly adjust the caliper by loosening the bolts, nudging the caliper a tiny bit, and re-tightening.
E-Bike Brake Pad Replacement
Worn-out brake pads are a common cause of reduced braking performance and noisy brakes. E-bike brake pad replacement is a routine maintenance task.
Identifying Worn Brake Pads
- Visual Inspection: Look at the brake pads through the caliper. If the friction material (the part that contacts the rotor) is very thin (less than 1mm), it’s time for replacement.
- Braking Performance: If your brakes feel weak or require more lever pull than before, it could be worn pads.
- Noise: Squealing or grinding noises can indicate worn pads, especially if the noise persists even when the brakes aren’t applied.
Steps for Replacing Brake Pads (General Guide)
Important: Always refer to your specific e-bike or brake manufacturer’s manual for detailed instructions.
- Remove Wheel: Release the brake and remove the wheel from the bike.
- Access Brake Pads: The method varies by caliper type. You might need to remove a small pin, clip, or bolt holding the pads in place.
- Remove Old Pads: Gently pull or slide out the old brake pads. Note their orientation.
- Clean Caliper: Clean any dust or debris from the caliper with a clean rag.
- Push Pistons Back (Hydraulic Brakes): If you have hydraulic brakes, you’ll need to push the pistons back into the caliper to make room for the new, thicker pads. Use a specialized piston tool or a flathead screwdriver (be very careful not to damage the pistons or seals). Do not squeeze the brake lever after pushing the pistons back without pads in place.
- Insert New Pads: Place the new brake pads into the caliper, ensuring they are oriented correctly.
- Reinstall Retaining Pin/Clip: Secure the new pads with the pin, clip, or bolt.
- Reinstall Wheel: Put the wheel back on the e-bike.
- Bed In New Pads: Squeeze the brake lever repeatedly to seat the pads against the rotor. Then, ride the bike and perform several moderate stops from a moderate speed, gradually increasing intensity. This process, called “bedding in,” transfers a thin layer of pad material to the rotor, ensuring optimal braking. Avoid sudden hard stops during the bedding-in period.
E-Bike Brake Maintenance Guide
Regular maintenance is key to keeping your e-bike brakes in top condition. Here’s a checklist:
- Weekly/After Every Few Rides:
- Check lever feel: Ensure it’s firm and not spongy.
- Spin wheels: Listen for any brake rub.
- Visual inspection: Look for obvious damage to cables, hoses, or rotors.
- Monthly:
- Clean rotors and pads: Use a disc brake cleaner or isopropyl alcohol. Avoid getting oil or lubricants on them.
- Check pad wear: If you’re unsure, inspect them.
- Adjust cable tension (mechanical brakes): If needed, use barrel adjusters.
- Every 6 Months to a Year (or as needed):
- Hydraulic E-bike Brake Bleed: If you experience spongy levers or reduced power.
- E-bike Brake Pad Replacement: When pads are worn.
- Inspect Hoses/Cables: Check for any signs of wear, fraying, or damage. Replace if necessary.
- Check Rotor Condition: Ensure they are not warped or excessively worn.
E-bike Braking System Troubleshooting
Here’s a table to help diagnose common braking issues:
| Problem | Possible Cause(s) | Solution |
|---|---|---|
| Spongy Brake Lever | Air in hydraulic system; Low brake fluid | Hydraulic e-bike brake bleed; Check for leaks and top up fluid. |
| Brake Lever Reaches Handlebar | Worn brake pads; Air in hydraulic system; Cable stretch (mechanical) | Replace pads; Bleed hydraulics; Adjust cable tension on mechanical brakes; Check for leaks. |
| Brakes Feel Weak | Worn brake pads; Contaminated pads/rotors; Air in hydraulic system; Poor adjustment | Replace pads; Clean rotors/pads; Bleed hydraulics; Adjust cable tension or caliper centering. |
| Brake Rubbing | Misaligned caliper; Bent rotor; Pads too close to rotor | Center caliper; True or replace rotor; Adjust caliper or use barrel adjuster to create slight clearance. |
| Squealing/Screeching | Contaminated pads/rotors; Worn pads; Misaligned caliper; New pads not bedded in | Clean pads/rotors; Replace pads; Center caliper; Bed in new pads properly. |
| Grinding Noise | Worn pads down to metal backing; Debris trapped between pad and rotor | Immediate replacement of pads and potentially rotor. Inspect caliper for trapped debris. |
| Leaking Fluid | Damaged hose; Loose fitting; Damaged caliper seal; Damaged lever seal | Identify source of leak and replace faulty part; Seek professional help if unsure. |
Final Thoughts on Cycling Brake System Tuning
Properly maintained brakes are fundamental to safe cycling. Whether you’re navigating busy city streets or exploring trails, ensuring your e-bike braking system is in perfect working order is paramount. Don’t wait for a problem to arise; make regular e-bike brake maintenance a priority. By following these guidelines for e-bike brake adjustment, bicycle brake caliper tuning, and other essential checks, you can significantly reduce the risk of accidents and enjoy your electric bike with confidence. Remember, your brakes are your lifeline – keep them sharp!
Frequently Asked Questions (FAQ)
Q1: How often should I check my e-bike brakes?
A1: It’s recommended to do a quick check of your brake lever feel and look for any obvious issues before every ride. A more thorough check, including pad wear inspection, should be done at least monthly.
Q2: My hydraulic brakes feel spongy. What should I do?
A2: A spongy feel usually means there is air in the hydraulic lines. You’ll need to perform a hydraulic e-bike brake bleed to remove the air and restore firm braking. If you’re not comfortable doing this, take it to a bike shop.
Q3: How do I know when to replace my e-bike brake pads?
A3: You can usually tell by visually inspecting the pads. If the friction material is worn down to about 1mm or less, it’s time for a replacement. Reduced braking power or noisy brakes can also be indicators.
Q4: Can I use car brake cleaner on my e-bike disc brake rotors?
A4: It’s best to use cleaners specifically designed for bicycle disc brakes or isopropyl alcohol. Some automotive cleaners can leave residues that contaminate brake pads and rotors, reducing braking performance.
Q5: My brakes are squealing loudly. What’s causing this?
A5: Squealing can be caused by several factors, including contaminated brake pads or rotors, glazed pads (worn smooth), or a caliper that isn’t perfectly aligned. Cleaning the system, replacing contaminated pads, or ensuring proper caliper alignment can help resolve squealing. Sometimes, new pads need to be properly “bedded in” to prevent noise.
Q6: Is it okay for my brake pads to rub slightly when I’m not braking?
A6: Some very minor, intermittent rubbing might occur, especially on mountain bikes with powerful disc brakes. However, continuous or noticeable rubbing indicates a problem. You should aim to eliminate all rubbing by centering your calipers and ensuring proper e-bike brake adjustment.
Q7: How do I adjust the reach of my brake levers?
A7: Most hydraulic and some mechanical brake levers have a small barrel adjuster or a small screw on the lever body. Turning this adjuster will move the lever closer to or further from the handlebar, allowing you to set your preferred reach for comfort and control.