
Can I change fork seals on my dirt bike myself? Yes, you absolutely can! With the right tools and a bit of patience, a DIY dirt bike fork repair is an achievable project for most riders. This guide will walk you through the entire process of motorcycle fork seal replacement, ensuring your dirt bike suspension service is back to its plush best.
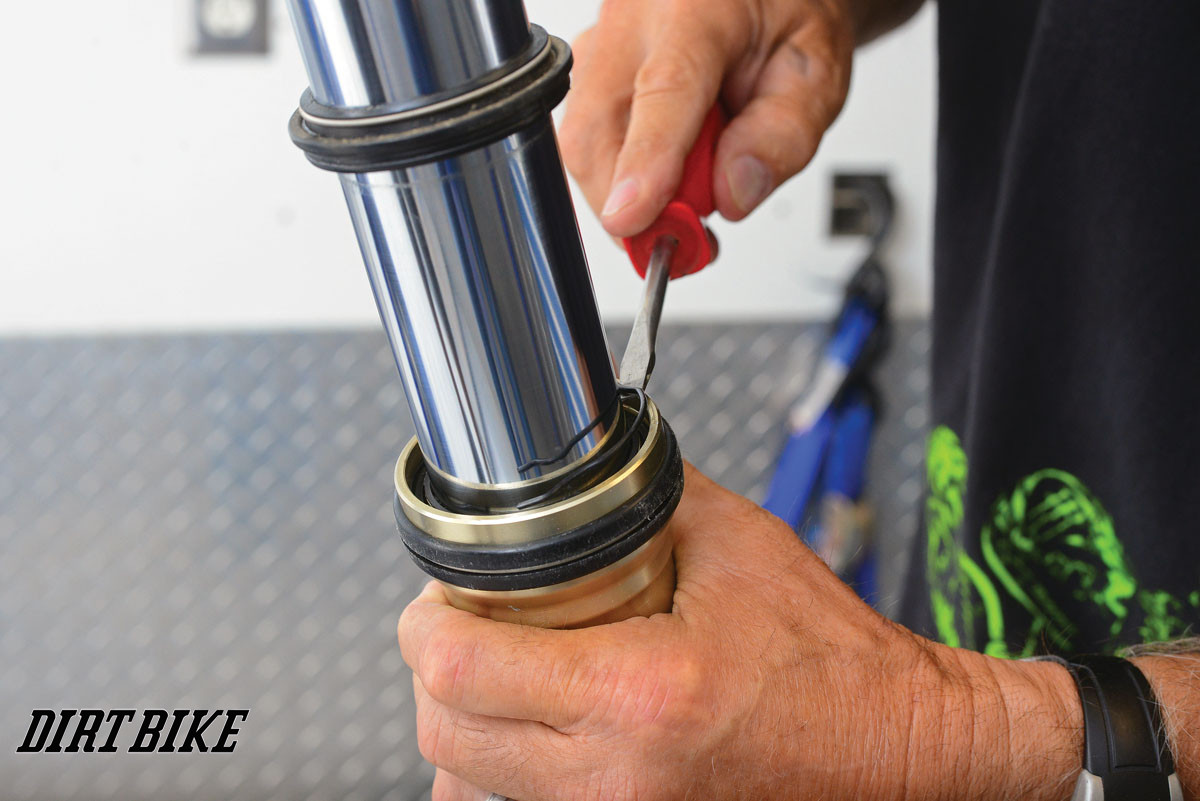
Image Source: dirtbikemagazine.com
Why Replace Fork Seals?
Fork seals are critical components in your dirt bike’s suspension. They are responsible for keeping the fork oil contained within the fork legs and preventing dirt, dust, and water from entering the delicate internals. Over time, these seals wear out due to friction, contamination, and general use.
Signs of Worn Fork Seals:
- Oil Leaks: This is the most obvious sign. You’ll see oil dripping down the fork stanchions, often collecting around the lower fork legs.
- Degraded Suspension Performance: Leaking seals mean you’re losing oil, which is essential for damping. This can lead to the forks feeling soft, bouncy, or even bottoming out dirt bike forks prematurely.
- Sticky or Inconsistent Action: Dirt and debris entering the fork can cause the suspension to feel stiff or unpredictable.
- Visible Damage: Inspect the seals closely. Cracks, tears, or a hardened, brittle appearance indicate they need replacing.
Addressing worn fork seals promptly is crucial for maintaining optimal handling, safety, and the longevity of your dirt bike’s front end. Ignoring them can lead to more serious internal damage, requiring a more extensive rebuild.
Essential Tools and Supplies
Before you begin, gather all the necessary tools and supplies. Having everything ready will make the process smoother and less frustrating.
Tools You’ll Need:
- Wrench Set: For removing axle bolts, caliper bolts, etc.
- Socket Set: Various sizes, including those for your axle nuts and fork pinch bolts.
- Torque Wrench: Essential for tightening bolts to the correct specifications.
- Allen Wrench Set: Many dirt bike components use Allen bolts.
- Screwdrivers: Flathead and Phillips.
- Pliers: Regular and needle-nose.
- Seal Puller: A specialized tool to safely remove the old seal.
- Seal Driver Set: Specifically designed to press in new seals without damaging them.
- Vice Grips or Hose Clamps: To hold springs.
- Drain Pan: To catch the old fork oil.
- Shop Rags/Paper Towels: Lots of them!
- Clean Workspace: A clean environment is key to preventing contamination.
- Bike Stand: To lift the front of your bike securely. A triple tree stand is ideal, but a sturdy front wheel stand will also work.
- Rag or Towel: To wrap around the fork stanchion when using a seal puller to prevent scratching.
- Plastic or Rubber Mallet: For gentle persuasion.
- Measuring Tape or Caliper: For measuring spring free length if needed.
Supplies You’ll Need:
- New Fork Seals: Ensure you have the correct size and type for your specific dirt bike model. It’s wise to buy high-quality seals.
- New Fork Oil: Use the exact type and weight recommended by your bike’s manufacturer.
- New Dust Seals (Optional but Recommended): These seals keep dirt out and work in conjunction with the oil seals. It’s good practice to replace them at the same time.
- New O-rings (Optional but Recommended): Small o-rings are used in various places on the forks.
- Degreaser/Brake Cleaner: For cleaning parts.
- Lubricant: For initial fork stanchion lubrication and seal installation. Light grease or suspension lube is ideal.
Step-by-Step Guide to Changing Fork Seals
This process involves disassembling a portion of your dirt bike’s front forks. It’s a detailed task, so take your time and follow each step carefully.
Step 1: Prepare the Bike
- Lift the Front End: Place your dirt bike securely on a stand so that the front wheel is off the ground. Ensure the bike is stable.
- Remove the Front Wheel: Loosen and remove the axle bolt and nut. Carefully slide the axle out and remove the front wheel. You may need to loosen the pinch bolts on the fork legs to do this.
- Remove the Brake Caliper: Disconnect the brake line and unbolt the caliper from the fork leg. Hang the caliper securely out of the way to avoid damaging the brake line.
- Remove the Front Fender and Handlebars (if necessary): Depending on your bike and the accessibility, you might need to remove the front fender for easier access. Sometimes, loosening or removing the handlebars can provide more working room.
Step 2: Fork Leg Disassembly
This is where the actual fork leg disassembly begins. We’ll focus on one fork leg at a time.
Step 2.1: Loosen Pinch Bolts and Top Cap
- Loosen Top Cap Bolts: Locate the bolts on the top of the fork cap. Before loosening the pinch bolts, slightly loosen the top cap bolts. This prevents the top cap from being under spring pressure when you eventually loosen it.
- Loosen Pinch Bolts: Find the pinch bolts on the lower part of the fork leg where it clamps around the axle. Loosen these bolts.
- Remove the Fork Leg: Gently twist and pull the fork leg downwards, separating it from the triple clamp.
Step 2.2: Remove the Spring
- Position the Fork: Place the fork leg upright.
- Loosen the Top Cap: Now, fully loosen and remove the top cap using the appropriate wrench. Be prepared for some internal pressure.
- Control the Spring: As you remove the top cap, the fork spring will likely want to expand. You can use vice grips on the spring or a specialized tool to keep it compressed as you work, or simply be ready to catch it.
- Remove the Spring: Carefully lift the spring out of the fork leg. You may need to slightly compress the fork leg to get it out.
- Drain the Old Oil: Invert the fork leg over your drain pan to allow the old fork oil to drain out completely. You can pump the inner leg a few times to help expel more oil.
Step 2.3: Accessing the Seals
Now that the spring is out and the oil is drained, you need to get to the seals.
- Locate the Dust Seal: The dust seal is the outer rubber seal at the top of the lower fork leg assembly. It’s usually held in place by a circlip.
- Remove the Circlip: Use a small flathead screwdriver or a pick to carefully pry out the circlip that retains the dust seal. Be cautious not to scratch the fork stanchion.
- Remove the Dust Seal: Once the circlip is out, the dust seal should slide off. You might need to gently pry it loose.
- Locate the Oil Seal: Beneath the dust seal is the main oil seal. It’s pressed into the fork leg.
- Remove the Oil Seal: This is where the seal puller comes in. Slide the seal puller tool down the fork stanchion and hook it under the oil seal. Apply firm, upward pressure. You may need to rock it slightly. Remember to wrap a rag around the stanchion to protect it from the seal puller. If you don’t have a dedicated seal puller, you can try a large flathead screwdriver, but this carries a higher risk of damaging the fork stanchion.
Step 3: Cleaning and Inspection
With the old seals removed, it’s time to clean everything and inspect for any damage.
- Clean the Fork Leg: Thoroughly clean the inside of the fork leg where the seals sit. Use a degreaser or brake cleaner and a clean rag. Ensure there’s no old oil, dirt, or seal material left.
- Inspect the Fork Stanchion: This is a crucial step. Carefully examine the chrome-plated inner tube (the stanchion) for any nicks, scratches, or gouges. Even minor damage can tear new seals immediately. If you find any significant damage, the fork stanchion may need repair or replacement, or you might have to consider a full rebuild. A light surface scratch might be polishable, but deep gouges are problematic.
- Clean Internal Components: If you’re doing a full front fork oil change, this is the time to clean any other internal components you can access, like the damping rods or pistons, according to your service manual.
Step 4: Installing New Seals
This is a delicate part of the process, requiring precision.
- Lubricate New Seals: Apply a thin layer of new fork oil or suspension-specific lubricant to the new oil seal and dust seal. This helps them slide into place and prevents damage during installation.
- Install the Oil Seal:
- Slide the new oil seal onto the fork stanchion, ensuring it’s oriented correctly (usually with the garter spring facing inward).
- Use your seal driver set. Select a driver that is the same diameter as the fork leg and slightly smaller than the fork stanchion.
- Carefully place the driver over the seal. Using a rubber mallet or plastic hammer, gently tap the driver straight down. The goal is to press the seal evenly into its seat. Do not hammer directly on the seal.
- Tap until the seal is fully seated. You’ll feel it bottom out. Overdriving the seal can damage it.
- Install the Dust Seal: Slide the new dust seal over the fork stanchion and tap it into place with the seal driver until it’s flush with the top of the fork leg assembly.
- Reinstall the Circlip: Insert the circlip back into its groove to secure the dust seal.
Step 5: Refilling with New Fork Oil
This step is critical for proper damping and suspension performance.
- Set the Oil Level: Consult your dirt bike’s service manual for the correct fork oil level and type. Fork oil level is often specified by a measurement from the top of the inner fork leg down to the oil surface, with the fork fully compressed and the spring removed.
- Add New Oil: Carefully pour the specified amount and weight of new fork oil into the fork leg.
- Bleed the Forks: Gently pump the inner fork leg up and down a few times. This helps to distribute the oil and work out any air bubbles. You might hear some gurgling.
- Measure Oil Level Again: After bleeding, re-measure the oil level to ensure accuracy. Adjust by adding or removing oil as needed.
Step 6: Reassembly
Now, put everything back together.
- Reinstall the Spring: Carefully place the fork spring back into the fork leg.
- Reinstall the Top Cap: Thread the top cap back into the fork leg by hand to avoid cross-threading.
- Tighten the Top Cap: Tighten the top cap bolts to the manufacturer’s specified torque.
- Slide Fork Leg Back into Triple Clamps: Carefully slide the fork leg back up through the triple clamps.
- Tighten Pinch Bolts: Tighten the pinch bolts on the triple clamp to the specified torque.
- Reinstall Front Wheel and Brake Caliper: Put the front wheel back in place, slide the axle through, and tighten the axle bolt and nut to the correct torque. Reattach the brake caliper and torque its bolts.
- Reinstall Fender (if removed): Secure the front fender.
- Repeat for the Other Fork: If you are replacing seals on both forks, repeat the entire process for the second fork leg.
Step 7: Final Checks and Adjustments
- Bounce the Forks: Gently bounce the front end of the bike to check for any binding or inconsistencies.
- Test Ride: Take your bike for a short, gentle test ride. Pay attention to how the suspension feels. It should be smooth, controlled, and free from leaks.
- Check for Leaks: After the test ride, inspect the seals again for any signs of oil leakage.
Maintaining Your Dirt Bike Forks for Longevity
Proper dirt bike fork maintenance is key to extending the life of your suspension and ensuring consistent performance.
Regular Cleaning
- After Every Ride: Wash your bike thoroughly. Pay special attention to cleaning the fork stanchions and seals. Use a soft cloth or sponge and water, or a mild degreaser. Avoid abrasive materials that can scratch the stanchions.
- Wipe Down Stanchions: Regularly wipe down the fork stanchions with a clean, lint-free cloth. This removes dirt and grit that can get past the dust seals.
Checking Oil and Seals
- Visual Inspection: Periodically inspect your fork seals for any signs of oil leakage or damage. A small amount of oil weeping is normal, but significant dripping is a sign of failure.
- Oil Level Check: While not a standard service item on all bikes, if you suspect an issue, you can check your fork oil level according to your manual.
Fork Oil Changes
- Frequency: The frequency of fork oil changes depends on your riding conditions. For aggressive off-road riding, consider changing the oil every 20-30 hours of use, or at least once a year. For less intense use, every 40-50 hours might suffice.
- Benefits: Fresh fork oil provides consistent damping. Old oil can break down, lose its viscosity, and become contaminated with wear particles, leading to poor suspension performance and premature wear on internal components. A front fork oil change is a crucial part of overall dirt bike suspension service.
Addressing Suspension Issues
- Bottoming Out: If your dirt bike forks are bottoming out, it could be due to low oil level, incorrect oil weight, worn-out internal components, or simply the need for stiffer springs or valving adjustments.
- Harshness: A harsh fork could be caused by too much oil, the wrong oil weight, or issues with the damping circuits.
- Pike Down: If the forks compress too much under braking, it might indicate a need for firmer springs or adjustments to the compression damping.
Frequently Asked Questions (FAQ)
Q1: How often should I change my dirt bike fork seals?
A1: The lifespan of fork seals varies greatly depending on riding conditions, the quality of the seals, and how well you maintain them. A good rule of thumb is to inspect them regularly. If you ride in dusty or wet conditions, you might need to replace them more often. Many riders aim to replace them every 1-2 years or when they notice oil leaks or degraded suspension performance.
Q2: Can I reuse the old fork oil?
A2: No, it is strongly recommended to always use fresh fork oil. Old fork oil loses its lubricating properties, can become contaminated with metal particles from wear, and may have changed viscosity. Using old oil can damage your internal fork components and lead to poor suspension performance.
Q3: What is fork stanchion lubrication?
A3: Fork stanchion lubrication refers to keeping the exposed chrome-plated inner tubes of your forks clean and properly lubricated. While the oil seals are designed to keep oil in and dirt out, regular cleaning and a light application of suspension lubricant can help prevent dirt from scratching the stanchions and ensure smooth operation of the seals and bushings.
Q4: What happens if my dirt bike forks are bottoming out?
A4: Bottoming out means your suspension is reaching its maximum compression limit. This can be caused by insufficient damping, the wrong spring rate for your weight and riding style, or low fork oil levels. If your forks are consistently bottoming out, it can lead to a harsh ride, loss of control, and damage to internal components. It’s an indicator that your suspension may need adjustment or a rebuild.
Q5: What is involved in rebuilding dirt bike forks?
A5: Rebuilding dirt bike forks is a more in-depth process than just changing seals. It typically involves completely disassembling the forks, cleaning all components, replacing worn parts such as bushings, seals, and O-rings, and potentially re-valving the forks to change their damping characteristics. It also always includes a front fork oil change.
Q6: How do I know if I need to rebuild my dirt bike forks?
A6: You might need to rebuild your dirt bike forks if you experience consistent issues like: a harsh ride, excessive bottoming out, a lack of damping control, leaks that persist even after seal replacement, or if the forks feel “dead” or unresponsive. It’s also good practice to rebuild them periodically as part of comprehensive dirt bike suspension service, especially after many hours of use.
Q7: Can I do a dirt bike front end rebuild myself?
A7: Yes, with the right tools, a service manual, and patience, many riders can perform a dirt bike front end rebuild. This would typically include changing fork seals, dust seals, fork oil, and potentially replacing bushings and other wear items. For more complex issues like bent stanchions or damaged internals, professional assistance might be necessary.
By following this guide, you can successfully change your dirt bike fork seals, perform a front fork oil change, and contribute to better overall dirt bike fork maintenance. This DIY dirt bike fork repair will not only save you money but also give you a greater appreciation for your machine’s performance.