
What is the most important measurement when buying a bike? The most important measurement when buying a bike is generally the seat tube length or the top tube length, as these directly relate to how the bike will fit your body and affect your riding comfort and performance.
Getting the right bike frame size is crucial for a comfortable and efficient ride. A frame that’s too big or too small can lead to discomfort, pain, and even injury. But how do you actually measure a bike frame to ensure it’s the right fit for you? This guide will walk you through the process step-by-step, covering all the essential bike frame dimensions and bicycle geometry measurement points.
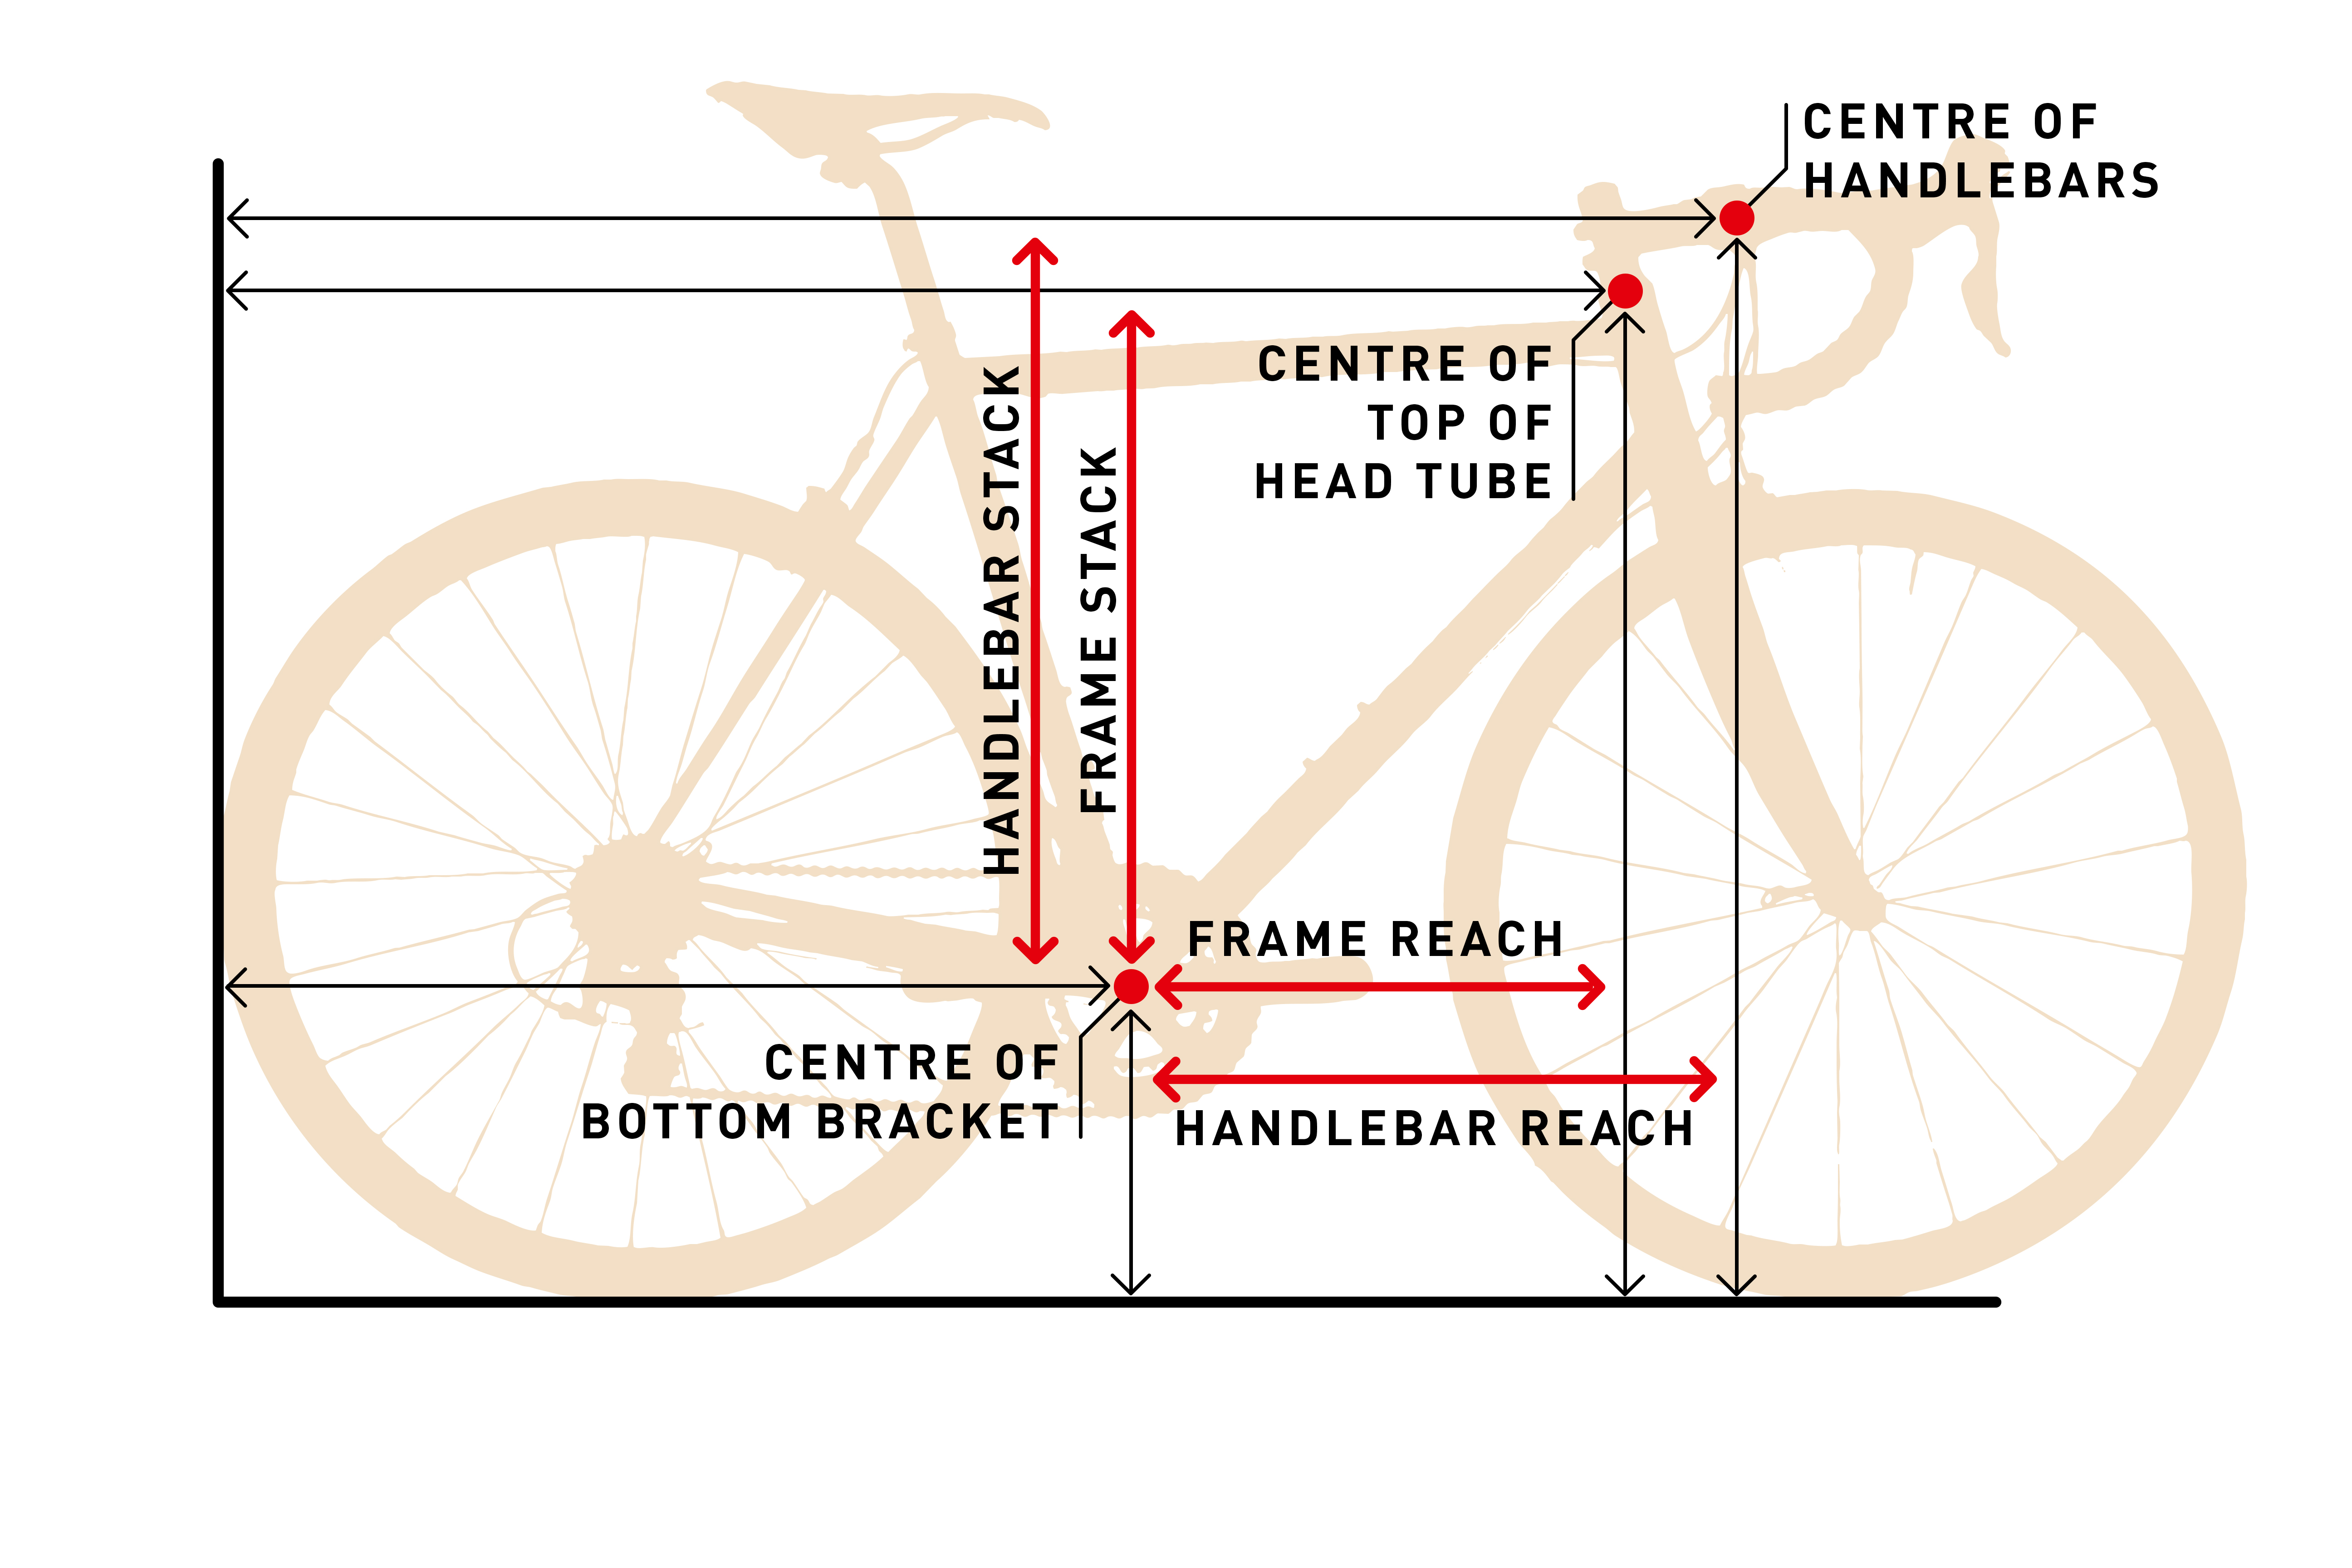
Image Source: rideonmagazine.com.au
Why Measure Your Bike Frame?
Before we dive into the “how,” let’s quickly touch on the “why.” Measuring your bike frame isn’t just for the meticulous cyclist. It serves several key purposes:
- Ensuring Proper Fit: As mentioned, this is paramount. The right fit means better control, less fatigue, and more enjoyment.
- Comparing Bikes: When looking at different models or brands, understanding their frame measurements allows for direct comparisons, helping you pinpoint which bike is best suited to your body.
- Buying Used Bikes: This is where frame measurement becomes invaluable. You can’t test ride every used bike, so knowing how to measure allows you to make an informed purchase remotely or when inspecting in person.
- Troubleshooting Fit Issues: If you’re experiencing discomfort on your current bike, measuring its frame can help identify if the issue stems from an incorrect frame size.
- Component Compatibility: Certain components, like seatposts or front derailleurs, are specified by frame dimensions.
Key Considerations Before You Start Measuring
Before you grab your tape measure, consider these points:
- Tools: You’ll need a good quality metal tape measure. A flexible fabric tape measure can stretch and give inaccurate readings.
- Level Surface: Ensure the bike is on a flat, level surface.
- Accuracy: Be as precise as possible. Small errors can add up.
- Bike Type: The exact measurement points can vary slightly between road bikes, mountain bikes, and hybrid bikes. We’ll focus on common measurements applicable to most.
Measuring Essential Bike Frame Dimensions
Let’s break down the key measurements. We’ll start with the most commonly used and then move to more detailed bicycle geometry measurement points.
1. Seat Tube Length
This is one of the most fundamental measurements and often used in frame size guide charts.
How to Measure Seat Tube Length:
- Locate the Seat Tube: This is the tube that runs from the bottom bracket shell upwards towards the saddle.
- Measure from the Center of the Bottom Bracket to the Top of the Seat Tube:
- Place the tape measure at the very center of the bottom bracket shell, where the crank arms attach.
- Run the tape measure straight up along the center of the seat tube.
- The measurement is taken to the point where the seat tube ends. For most bikes, this is where the seat tube meets the top tube and chainstays/seatstays.
- Important Note: For bikes with a sloping top tube (common on modern road and mountain bikes), measure to the imaginary horizontal line extending from the junction of the top tube and head tube across to the seat tube. Alternatively, and perhaps simpler, measure to the point where the seat tube would exit the seat tube if the top tube were horizontal.
- Record the Measurement: This is typically done in inches or centimeters.
- What it tells you: Seat tube length is a primary indicator of the frame’s overall size. It directly influences the maximum amount of seatpost you can insert into the frame and the standover height.
2. Top Tube Measurement
The top tube connects the head tube to the seat tube. Its measurement is critical for rider comfort and reach.
How to Measure Top Tube Length:
There are two common ways to measure the top tube: Effective Top Tube (ETT) and Actual Top Tube. The Effective Top Tube is the most commonly used for sizing.
a) Effective Top Tube (ETT):
- Locate the Head Tube: This is the tube at the front of the bike where the fork steers.
- Locate the Seat Tube: As identified previously.
- Measure from the Center of the Head Tube to the Center of the Seat Tube:
- Imagine a horizontal line extending from the top of the head tube to the seat tube.
- Measure the length of this imaginary horizontal line.
- Precision Tip: For greater accuracy, you can measure from the center of the head tube to the point where the seat tube intersects this imaginary horizontal line.
- Record the Measurement: Usually in centimeters for ETT.
b) Actual Top Tube:
- Measure the physical length of the top tube: Measure from the point where the top tube meets the head tube, to the point where it meets the seat tube. This measurement is less common for sizing purposes as it doesn’t account for different head tube lengths or seat tube angles.
- What it tells you: The ETT is a key determinant of how “stretched out” you will be on the bike. A longer ETT generally means a more forward, aerodynamic riding position, while a shorter ETT offers a more upright posture.
3. Head Tube Length
The head tube houses the headset and allows the fork to rotate. Its length impacts handlebar height.
How to Measure Head Tube Length:
- Locate the Head Tube: At the front of the bike.
- Measure the Outer Length of the Head Tube:
- Measure from the top edge of the head tube where the top bearing cover sits, down to the bottom edge where the lower bearing cover sits.
- You are measuring the metal tube itself, not including any headset components.
- Record the Measurement: Typically in centimeters.
- What it tells you: Along with the headset spacers and stem, the head tube length directly influences your handlebar height. A longer head tube will result in a more upright riding position.
4. Head Tube Angle
This angle dictates how the steering behaves.
How to Measure Head Tube Angle:
This is more complex without specialized tools. However, you can approximate it:
- Imagine a Vertical Line: Picture a line perfectly straight up and down, passing through the center of the front wheel’s axle.
- Imagine a Line Along the Head Tube: Picture a line running down the center of the head tube.
- Measure the Angle: The head tube angle is the angle between the vertical line and the head tube line.
- A slacker angle (e.g., 67 degrees) means the wheel is further forward, making the steering more stable and less twitchy, ideal for downhill riding.
- A steeper angle (e.g., 73 degrees) makes the steering quicker and more responsive, good for climbing and tight turns.
- Tools: A digital angle finder or a protractor with a plumb bob can provide more accurate measurements.
- What it tells you: The head tube angle affects the bike’s handling characteristics. A slacker angle generally provides more stability, while a steeper angle offers quicker steering.
5. Chainstay Length
The chainstays are the two tubes running from the bottom bracket shell back to the rear dropouts.
How to Measure Chainstay Length:
- Locate the Chainstays: The tubes connecting the bottom bracket to the rear wheel axle.
- Measure from the Center of the Bottom Bracket to the Center of the Rear Dropout:
- Measure from the absolute center of the bottom bracket shell.
- Follow the line of the chainstay back to the very center of the rear axle hole (dropout).
- Important Note: Chainstays are often asymmetrical, especially on mountain bikes. Measure both sides and typically use the longer measurement or the measurement on the drive side if there’s a significant difference.
- Record the Measurement: Usually in centimeters or millimeters.
- What it tells you: Chainstay length affects the bike’s stability and agility. Longer chainstays generally improve stability, especially when loaded, and make wheelies easier. Shorter chainstays make the bike more nimble and quicker to turn.
6. Bottom Bracket Measurement (Shell Width and Diameter)
The bottom bracket is where the crankset is mounted. While less critical for general sizing, it’s important for component compatibility.
How to Measure Bottom Bracket Shell:
- Locate the Bottom Bracket Shell: The cylindrical housing where the bottom bracket bearings are installed, situated at the junction of the seat tube, down tube, and chainstays.
- Measure the Width: Measure the outside width of the shell. This is commonly 68mm or 73mm for road and mountain bikes (English threaded), but can vary greatly for press-fit systems (e.g., 89.5mm, 92mm, etc.).
- Measure the Diameter: Measure the inside diameter of the shell where the bearings or bearing cups fit. This is typically 34.7mm for English threaded bottom brackets.
- Record the Measurements: In millimeters.
- What it tells you: Primarily used for determining the correct type of bottom bracket and crankset to install.
7. Standover Height
This is how high the top tube is from the ground when standing over the bike.
How to Measure Standover Height:
- Place the Bike on a Level Surface: Ensure the tires are on the ground.
- Measure from the Ground to the Top Tube:
- Locate the top tube. The most relevant point is usually the midpoint between the seat tube and the head tube, or slightly forward of that.
- Place your tape measure flat on the ground and extend it vertically upwards to the top of the top tube at this point.
- Alternative (and often better) method: Stand over the bike with your feet flat on the ground. Measure from the ground up to your crotch. This gives you a personal standover height. The bike’s standover height should be 1-3 inches (2-7 cm) lower than your inseam measurement for mountain bikes, and 1-2 inches (2-5 cm) lower for road bikes, allowing you to straddle the bike comfortably without the top tube hitting you.
- What it tells you: Crucial for ensuring you can comfortably straddle the bike with both feet on the ground when stopped. A proper standover height prevents injury in case of sudden stops or dismounts.
Other Important Bicycle Geometry Measurements
While the above are the most critical for sizing, other measurements define a bike’s handling and ride feel.
Wheelbase
The distance between the centers of the front and rear axles.
- Measurement: From the center of the front axle to the center of the rear axle.
- What it tells you: A longer wheelbase generally leads to greater stability, especially at speed and on rough terrain. A shorter wheelbase makes the bike more agile and easier to maneuver.
Seat Tube Angle
The angle of the seat tube relative to the horizontal.
- Measurement: Similar to the head tube angle, this requires an angle finder or careful measurement with a protractor and plumb bob against a horizontal reference.
- What it tells you: Affects rider position relative to the pedals. A steeper seat tube angle places the rider more forward over the bottom bracket, which is beneficial for climbing and efficient power transfer. A slacker angle puts the rider further back, which can be more comfortable for long rides and descending.
Reach and Stack (More Advanced)
These are critical for modern bike fitting and often found on manufacturer geometry charts.
- Reach: Measured horizontally from the center of the bottom bracket to the center of the top of the head tube. It’s a primary indicator of how “long” a bike feels.
- Stack: Measured vertically from the center of the bottom bracket to the top of the head tube. It indicates how “tall” a bike’s front end is.
These two measurements (Reach and Stack) are increasingly important as they isolate the relationship between the handlebar and bottom bracket, regardless of stem length or seatpost setback.
Putting It All Together: Creating Your Frame Size Guide
Once you have these measurements, how do you use them?
- Know Your Body Measurements: The most important body measurement is your inseam. Stand against a wall, place a book between your legs as if it were a saddle, and mark the top of the book. Measure from the floor to the mark.
- Compare to Manufacturer Charts: Bike manufacturers provide frame size guide charts for their models. These often use seat tube length (measured differently by some brands, e.g., center-to-top vs. center-to-center) or ETT as primary indicators.
- Use Online Calculators: Many websites offer bike fit calculators that take your body measurements and recommend frame sizes.
- Test Ride (If Possible): The best way to confirm fit is a test ride. Pay attention to how your body feels. Are you overly stretched? Are you cramped?
Example: Using Your Measurements
Let’s say you have an inseam of 32 inches.
- For a Road Bike: You’d look for a bike with a standover height of roughly 30-31 inches. The seat tube length might be around 54-56 cm, and the effective top tube might be around 55-57 cm.
- For a Mountain Bike: You’d look for a standover height of about 30-31 inches (allowing more clearance). Seat tube length might be a bit more variable due to longer suspension travel, but ETT is still key.
It’s important to remember that different brands and even different models within the same brand can have slightly different geometry. A 56cm road bike from one brand might feel similar to a 55cm from another. This is why looking at ETT, Reach, and Stack is becoming more important.
How to Measure Bike Tube Lengths Accurately
When performing how to measure bike tube lengths, precision is key. Always use a metal tape measure. For angles, a digital angle finder is best. When measuring from the center of one component to the center of another, visualize where the axle or the center of the tube is.
Table of Common Bike Frame Measurements and Their Significance:
| Measurement | What it is | What it Affects | Typical Unit |
|---|---|---|---|
| Seat Tube Length | Center of BB to top of seat tube. | Rider’s seated height, standover height. | cm or inches |
| Effective Top Tube (ETT) | Horizontal distance from center of head tube to center of seat tube. | Rider’s reach to handlebars, body position (stretched vs. upright). | cm |
| Head Tube Length | Length of the head tube itself. | Handlebar height, rider’s upper body posture. | cm |
| Head Tube Angle | Angle between the head tube and the horizontal plane. | Steering responsiveness, bike stability. | Degrees |
| Chainstay Length | Center of BB to center of rear dropout. | Bike’s stability, agility, rear-wheel placement. | cm or mm |
| Standover Height | Vertical distance from the ground to the top of the top tube (at a specific point). | Rider’s ability to straddle the bike comfortably. | cm or inches |
| Wheelbase | Distance between front and rear axle centers. | Bike’s stability at speed, turning agility. | cm or inches |
| Seat Tube Angle | Angle between the seat tube and the horizontal. | Rider’s position relative to the pedals, efficiency for climbing/descending. | Degrees |
| Bottom Bracket Shell | Width and diameter of the shell where the crankset mounts. | Bottom bracket and crankset compatibility. | mm |
Frequently Asked Questions (FAQ)
Q: Do I need special tools to measure my bike frame?
A: A good quality metal tape measure is essential. For angles like the head tube angle, a digital angle finder will provide the most accuracy, but an educated guess can be made without one for general purposes.
Q: How do I measure the top tube on a bike with a sloping top tube?
A: Measure the effective top tube (ETT). This is the horizontal distance from the center of the head tube to the point where the seat tube intersects an imaginary horizontal line drawn from the top of the head tube.
Q: My bike manufacturer’s website lists seat tube length in “center to top.” How does that differ from “center to center”?
A: “Center to top” includes the part of the seat tube that extends above the top tube. “Center to center” measures from the center of the bottom bracket to the center of where the seat tube meets the top tube. The difference is usually minimal, but always check the manufacturer’s specific definition. ETT is often a more reliable metric for comparing bikes across brands.
Q: How does chainstay length affect my ride?
A: Longer chainstays generally make a bike more stable, especially when carrying weight or riding at speed. They also create more space between the rider and the rear wheel, making it easier to lift the front wheel or perform stoppies. Shorter chainstays make the bike feel more responsive and quicker to turn, giving it a more agile feel.
Q: What is “standover height” and why is it important?
A: Standover height is the distance from the ground to the top tube of the bike when you are standing over it. It’s crucial because it ensures you can comfortably straddle the bike with both feet on the ground without the top tube hitting your crotch, which is vital for safety and confidence, especially when stopping suddenly.
Q: Can I just use my height to determine my bike size?
A: Height is a starting point, but it’s not the whole story. Your inseam, torso length, and arm length all play a role in determining the best fit. Using measurements like effective top tube and standover height, along with your inseam, provides a more accurate picture.
Q: How do I find the center of the bottom bracket or dropouts for my measurements?
A: For the bottom bracket, imagine a point directly in the middle of the cylindrical shell where the crankset attaches. For dropouts, visualize the center of the hole where the wheel axle sits. Precision here is key for accurate bike frame dimensions.
By carefully measuring these key dimensions, you can confidently assess whether a bike frame is likely to fit you well. Remember, while measurements provide an excellent guide, a test ride is always the ultimate confirmation of a good fit. Happy riding!