
Can you replace fork seals on a dirt bike yourself? Yes, absolutely! With the right tools, patience, and this detailed guide, you can conquer the task of dirt bike fork seal replacement and bring your bike’s front suspension back to life. A motorcycle fork oil change often goes hand-in-hand with this procedure, ensuring optimal performance. Tackling front fork seal repair yourself is a rewarding way to save money and deepen your connection with your machine. This guide will walk you through every step of DIY motorcycle fork service, from gathering your supplies to enjoying a leak-free ride.
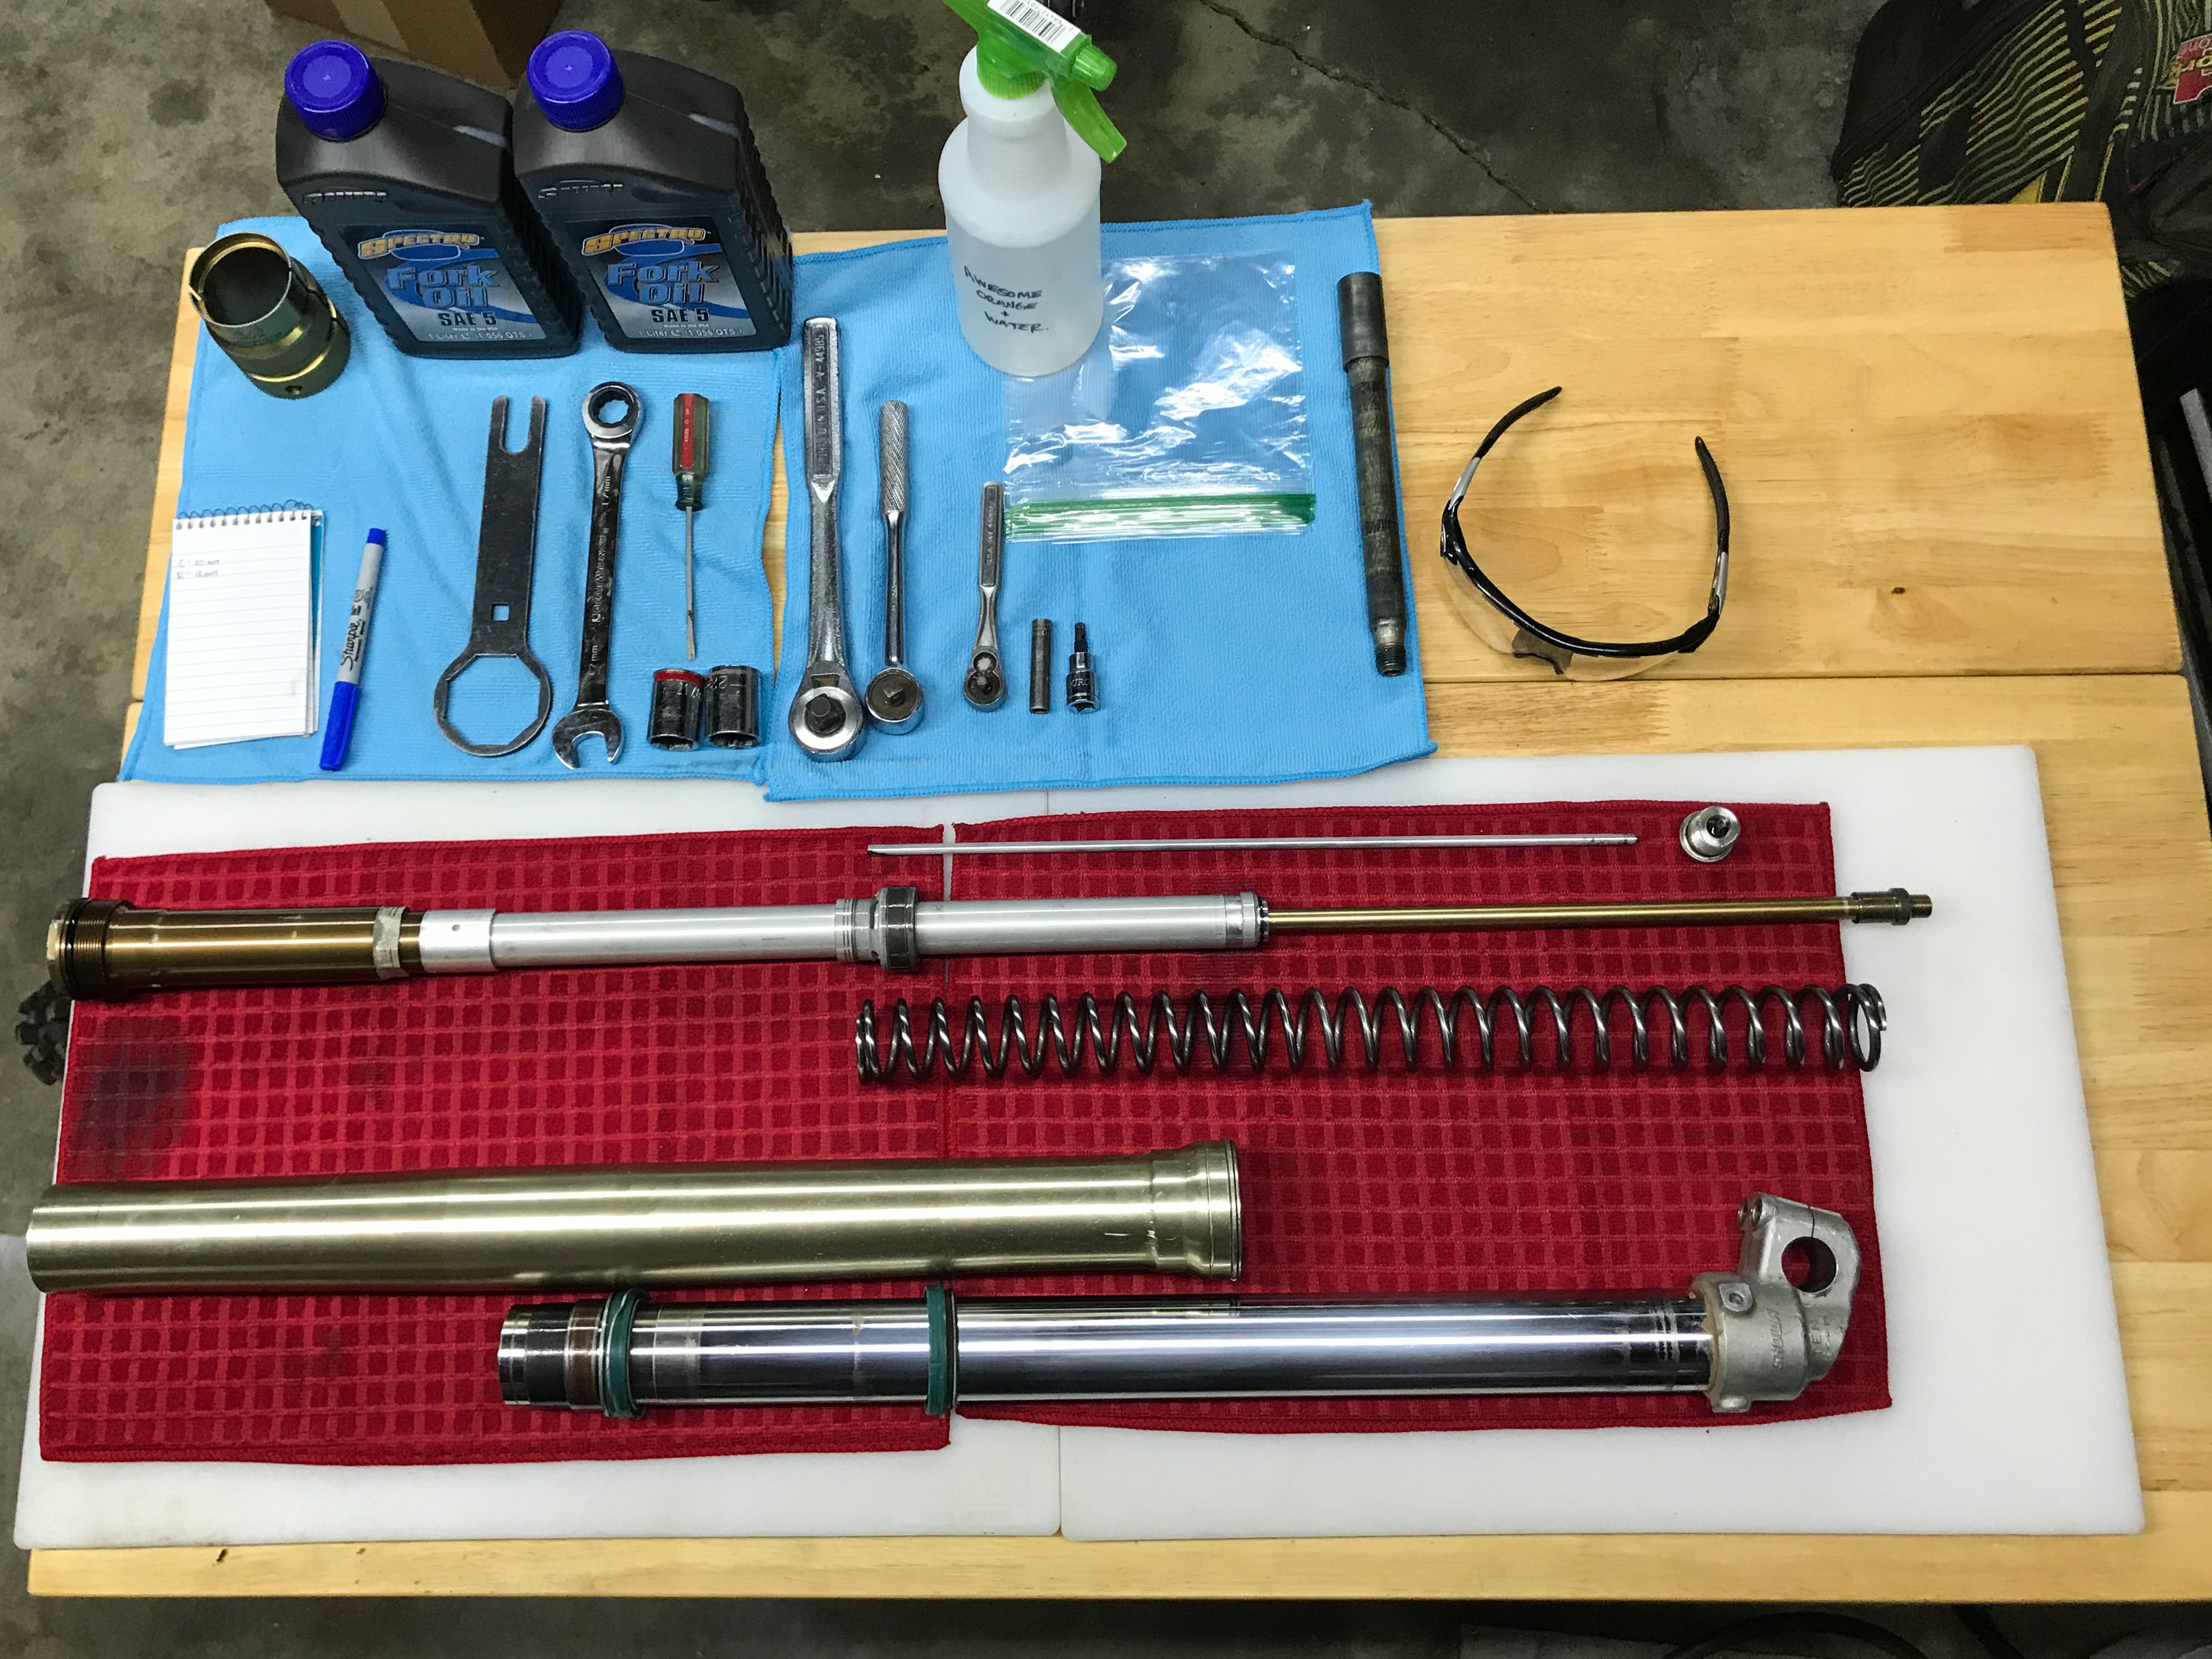
Image Source: blog.pro-x.com
Why Your Dirt Bike Needs New Fork Seals
Fork seals are critical components of your dirt bike’s front suspension. Their primary job is to keep the fork oil contained within the fork legs and to prevent dirt and grime from entering the sensitive inner workings. When these seals start to fail, you’ll typically notice a few tell-tale signs:
- Fork Oil Leaks: This is the most obvious indicator. You’ll see oil weeping from the top of the fork leg, around the seal itself, or even dripping onto your brake caliper or wheel.
- Degraded Suspension Performance: Leaking seals mean your forks are losing oil. This can lead to a softer, less controlled ride. You might experience a feeling of your forks being “mushy” or bottoming out more easily.
- Dirt and Contamination: If dirt gets past the seals, it can contaminate the fork oil and damage the fork’s internal surfaces, leading to premature wear and more costly repairs down the line.
- Inconsistent Damping: The damping circuits in your forks rely on clean, pressurized oil. Contamination or low oil levels can disrupt this, making your suspension feel unpredictable.
Addressing dirt bike fork leakage fix promptly is crucial for maintaining safe and enjoyable riding. Ignoring leaky seals can lead to more extensive damage and higher repair costs.
Gathering Your Tools and Supplies
Before you dive into the project, ensure you have all the necessary tools and supplies. Having everything ready will make the process smoother and more efficient.
Essential Tools:
- Socket Set: With various metric sizes.
- Wrench Set: Again, metric sizes are key.
- Torque Wrench: Essential for tightening bolts to the correct specifications.
- Allen Wrench Set: For various internal fork components.
- Screwdrivers: Both flathead and Phillips.
- Pliers: Needle-nose and regular.
- Rubber Mallet: For gentle persuasion.
- Vice Grips or Pliers: To hold components if needed.
- Seal Driver Tool: This is a specialized tool that ensures you install new seals evenly and without damage. You can often find universal seal drivers that fit multiple fork sizes, or you might need one specific to your bike’s fork diameter.
- Hose Clamp Pliers: For removing and installing spring clips.
- Plastic Bags or Rags: For wiping down parts and catching drips.
- Catch Pan or Bucket: To drain and dispose of old fork oil.
- Degreaser/Brake Cleaner: For cleaning parts.
- Shop Towels or Paper Towels: For cleaning up spills and wiping parts.
Necessary Supplies:
- New Fork Seals: Ensure you get the correct size and type for your specific dirt bike make and model. A good quality fork seal kit installation is key.
- New Fork Oil: Refer to your bike’s owner’s manual for the correct type and viscosity (e.g., 5wt, 10wt).
- New Fork Wiper Seals (Optional but Recommended): These work with the main seals to keep dirt out. They are often replaced at the same time.
- New Inner Dust Seals (Optional but Recommended): Similar to wiper seals, these provide an extra layer of protection.
- New O-rings and Washers (Optional but Recommended): It’s a good idea to replace any small seals or washers you encounter during the disassembly process, especially those on the damping rod or bladder.
- Seal Lubricant: A specialized fork seal lubricant can help the new seals slide in smoothly and seal properly. Lightly greasing the seal lip is important.
Step-by-Step Guide to Replacing Fork Seals
This guide assumes you have basic mechanical knowledge and are working on a dirt bike that has already had its front wheel and fender removed. If not, that’s your first step!
Step 1: Remove the Forks from the Triple Clamps
- Loosen the Triple Clamp Bolts: Locate the bolts securing the fork tubes to the upper and lower triple clamps. Loosen these bolts slightly. Don’t remove them completely yet.
- Slide the Forks Out: Carefully slide the fork tubes downwards and out of the triple clamps. You may need to twist them slightly. For the lower triple clamp, you’ll likely need to remove the pinch bolts entirely.
Step 2: Disassemble the Fork Leg
This is where the real work begins. Be methodical and keep track of all parts.
H3: Accessing the Fork Internals
- Remove the Top Cap (Preload Adjuster if applicable): On some forks, the top cap will have a preload adjustment mechanism. You’ll typically need to use an Allen wrench to unscrew this cap. Some forks may have a spring-loaded valve stem on the top cap – be careful not to puncture this if your forks are air-assisted.
- Drain the Fork Oil:
- Locate the bottom drain bolt on the fork leg (usually at the very bottom).
- Place your catch pan underneath.
- Carefully loosen and remove the drain bolt. Let the old fork oil drain completely. This might take a few minutes. Be prepared for a bit of oil to come out.
- Once drained, reinsert the drain bolt. Do not tighten it fully yet.
- Remove the Spring Retaining Clip (if applicable): Many forks have a clip that holds the fork spring in place. This clip is usually located in a groove just below the top cap threads. You can often use a small pick or a thin screwdriver to carefully pry this clip out. Be extremely cautious not to scratch the fork stanchion tube.
- Remove the Fork Spring:
- With the top cap removed and the spring clip out, the fork spring is no longer under tension.
- Gently slide the fork spring upwards and off the damper rod.
- Carefully remove any spacers or washers that were on top of the spring. Keep them in order!
- Remove the Top Cap Assembly:
- Now that the spring is out, you can fully unscrew the top cap assembly.
- Have your catch pan ready as there might be a small amount of residual oil.
H4: Separating the Fork Slider and Stanchion
This is the most critical part of the front suspension seal replacement.
- Locate the Bottom Bolt: This is the bolt that secures the damper rod inside the fork leg. It’s usually at the very bottom of the fork slider.
- Secure the Damper Rod: To prevent the damper rod from spinning when you try to unscrew the bottom bolt, you often need to hold it in place.
- Method A (Special Tool): Some forks have a specific slot or tool interface on the end of the damper rod that allows you to hold it with a specialized tool or Allen wrench while you loosen the bottom bolt.
- Method B (Impact Wrench/Drill): If you don’t have the specialized tool, you can sometimes use an impact wrench or a drill with a socket on the bottom bolt. The quick bursts of power can sometimes break the bolt loose without the damper rod spinning. This method requires care to avoid damaging the bolt or the threads.
- Method C (Holding the Stanchion): In some cases, you might be able to lightly clamp the stanchion tube in a vise with soft jaws to prevent it from turning while you loosen the bottom bolt.
- Remove the Bottom Bolt: Once the damper rod is secured, use your socket and wrench to carefully loosen and remove the bottom bolt.
- Separate the Slider and Stanchion: After removing the bottom bolt, the fork slider and stanchion tube should be able to be carefully pulled apart. They might be a bit sticky due to the old seals. A gentle twisting motion can help.
Step 3: Removing the Old Seals and Hardware
Now that the fork is apart, you can remove the old parts.
- Remove the Dust Seal: This is the outer seal that keeps dirt and grime out. It’s usually held in place by a spring clip. Use a small pick or screwdriver to carefully pry out the spring clip. Once the clip is out, you should be able to pull the dust seal off the fork stanchion.
- Remove the Old Fork Seal: The fork seal is located deeper within the fork slider. You can often pry this out with a seal removal tool or a flathead screwdriver. Be very careful not to scratch the inside of the fork slider bore, as this is where the new seal will seat.
- Remove the Retaining Clip (Snap Ring): Most forks have a small metal retaining clip that holds the fork seal in place. This clip sits in a groove in the fork slider bore. You’ll need to use a small pick or a thin, flathead screwdriver to carefully pry this clip out of its groove. This is a crucial step for replacing fork stanchion seals.
Step 4: Cleaning and Inspection
Thorough cleaning is essential for a successful motorcycle fork rebuild.
- Clean All Parts: Use degreaser or brake cleaner and clean shop towels to thoroughly clean all the disassembled parts, including the fork slider, stanchion tube, damper rod, springs, and any other internal components.
- Inspect for Damage:
- Stanchion Tubes: Look for any nicks, scratches, or gouges on the polished surface of the stanchion tubes. Any damage here will prevent the new seals from sealing properly and can lead to future leaks. If there is minor damage, you might be able to polish it out, but significant damage usually requires professional attention or stanchion replacement.
- Fork Slider Bore: Inspect the inside of the fork slider bore where the seals sit. Ensure there are no burrs, scratches, or corrosion.
- Damper Rod: Check the damper rod for any bends or damage to the valving.
- Threads: Inspect all threaded components for damage.
Step 5: Installing the New Fork Seals and Components
This is where your new fork seal kit installation comes into play.
- Install the Retaining Clip (Snap Ring): Place the new retaining clip into the groove inside the fork slider bore where the old seal was. Ensure it’s seated correctly.
- Install the New Fork Seal:
- Apply a small amount of fork seal lubricant or clean fork oil to the lip of the new fork seal.
- Place the new fork seal onto the fork stanchion tube, making sure it’s oriented correctly (the spring-loaded side usually faces inward, towards the fork oil).
- Using your seal driver tool, carefully and evenly tap the new seal into the fork slider bore until it’s seated fully. You should hear a distinct “thud” when it’s properly seated. Never hammer the seal in with a screwdriver or pliers, as this can easily damage it.
- Install the New Dust Seal:
- Apply a thin layer of grease or seal lubricant to the lip of the new dust seal.
- Slide the new dust seal over the stanchion tube and into its recess in the fork slider.
- Carefully tap it into place with your seal driver or a rubber mallet, ensuring it’s seated evenly.
- Reassemble the Fork:
- Slide the fork spring back onto the damper rod.
- Reinstall any spacers or washers that were on top of the spring, making sure they are in the correct order.
- Carefully screw the top cap assembly back into the stanchion tube. You may need to compress the spring slightly to get the threads to engage.
- Install the spring retaining clip if your fork uses one.
- Reinsert the bottom bolt. Ensure the damper rod is held in place as you tighten this bolt. Torque it to your bike’s specifications.
- If you used a specialized tool to hold the damper rod, remove it now.
Step 6: Adding Fresh Fork Oil
This is the motorcycle fork oil change portion of the service.
- Measure the Fork Oil: Refer to your owner’s manual or a service manual for the correct amount of fork oil and the oil level measurement. The oil level is usually measured from the top of the stanchion tube downwards, with the fork fully compressed and the spring removed.
- Add the New Fork Oil: Use a measuring syringe or a graduated container to accurately measure the correct amount of new fork oil. Slowly pour the oil into the fork leg.
- Pump the Fork: Gently pump the fork leg up and down several times to help distribute the oil throughout the internal components and bleed any trapped air. You should feel some resistance.
- Check the Oil Level: With the fork fully compressed (and spring removed), use a dipstick or a ruler with a piece of tape to measure the oil level from the top of the stanchion tube. Adjust the oil level by adding a small amount or carefully siphoning some out if it’s too high.
- Reinstall the Top Cap: Once the oil level is correct, reinstall the top cap assembly and tighten it securely.
Step 7: Reinstalling the Forks
- Insert Forks into Triple Clamps: Carefully slide the fork tubes back into the triple clamps.
- Tighten Triple Clamp Bolts:
- Start by snugging up the lower triple clamp bolts.
- Then, tighten the upper triple clamp bolts.
- Crucially, use a torque wrench to tighten all triple clamp bolts to your bike’s specified torque values. Uneven or overtightening can cause the forks to bind, affecting suspension performance and potentially damaging the triple clamps.
- Reinstall Front Wheel and Fender: Mount your front wheel, align the brake calipers, and reattach the front fender.
- Bleed Brakes (If Necessary): If you had to disconnect any brake lines, you’ll need to bleed your front brake system to ensure proper function.
Step 8: Final Checks and Test Ride
- Check for Leaks: After reassembly, give the fork legs a good wipe down. Compress the forks a few times and check around the new seals for any signs of oil weeping.
- Test Ride: Take your dirt bike for a short, gentle test ride. Pay attention to how the front suspension feels. It should be smooth, controlled, and responsive. Listen for any unusual noises.
Common Pitfalls and Tips for Success
- Wrong Fork Oil: Using the wrong weight or type of fork oil can significantly alter your suspension’s performance. Always consult your owner’s manual.
- Damaged Stanchions: Even a small scratch on the stanchion tube can ruin a new seal. Be exceptionally careful during disassembly and cleaning.
- Uneven Seal Installation: Using a seal driver is paramount. If the seal is driven in crooked, it will leak.
- Over-tightening Bolts: This can strip threads or warp components. Always use a torque wrench.
- Forgetting the Spring Clip: If your fork has a spring clip, forgetting to install it or not seating it properly can lead to the fork bottoming out violently or the cap coming loose.
- Contaminated Oil: If your old oil is black and gritty, it indicates internal wear or contamination. This might be a sign that more extensive motorcycle fork rebuild procedures are needed.
- Service Manual is Your Friend: While this guide is comprehensive, your bike’s specific service manual will have exact torque specifications and diagrams that are invaluable.
Frequently Asked Questions (FAQ)
Q1: How often should I replace my dirt bike fork seals?
A1: There’s no set mileage for fork seal replacement. It depends on riding conditions, the quality of the seals, and maintenance. However, it’s a good idea to inspect them regularly for leaks and consider replacing them every 1-2 years or if you notice any signs of leakage or degraded suspension performance. A proactive dirt bike suspension maintenance schedule is always best.
Q2: Can I reuse my old fork seals?
A2: No, you should never reuse old fork seals. They are designed to be a one-time-use item. Once compressed and seated, they lose their ability to seal effectively if removed and reinstalled. Always use a fresh set from a reputable fork seal kit installation.
Q3: What happens if I don’t replace leaking fork seals?
A3: If you don’t address leaking fork seals, the oil will continue to leak out, leading to a loss of suspension damping. Dirt and debris can also enter the fork, contaminating the oil and damaging internal components, potentially leading to a complete motorcycle fork rebuild or fork leg replacement.
Q4: Is it difficult to replace fork seals on a dirt bike?
A4: Replacing fork seals requires patience and attention to detail, but it’s a manageable DIY project for someone with basic mechanical skills. The most challenging aspects are usually disassembling the fork leg without damaging the stanchion and correctly installing the new seals. Using the right tools, like a seal driver, makes a big difference.
Q5: What kind of oil do I use for my dirt bike forks?
A5: You need to use specialized motorcycle fork oil. The viscosity (e.g., 5wt, 10wt, 15wt) is critical and depends on your bike model and intended use. Always consult your owner’s manual or a reputable service manual for the recommended type and amount of fork oil for your specific dirt bike.
By following this comprehensive guide, you’ll be well-equipped to tackle dirt bike fork seal replacement yourself. A well-maintained front suspension is key to control, comfort, and safety on the trails or track. Happy wrenching!