
Measuring a bike correctly is essential for a comfortable and efficient ride, and it’s straightforward if you know what to look for. The key is to focus on bike frame size, as this dictates much of how the bike will feel and fit you. This guide will walk you through the essential measurements and why they matter for your bike fit.
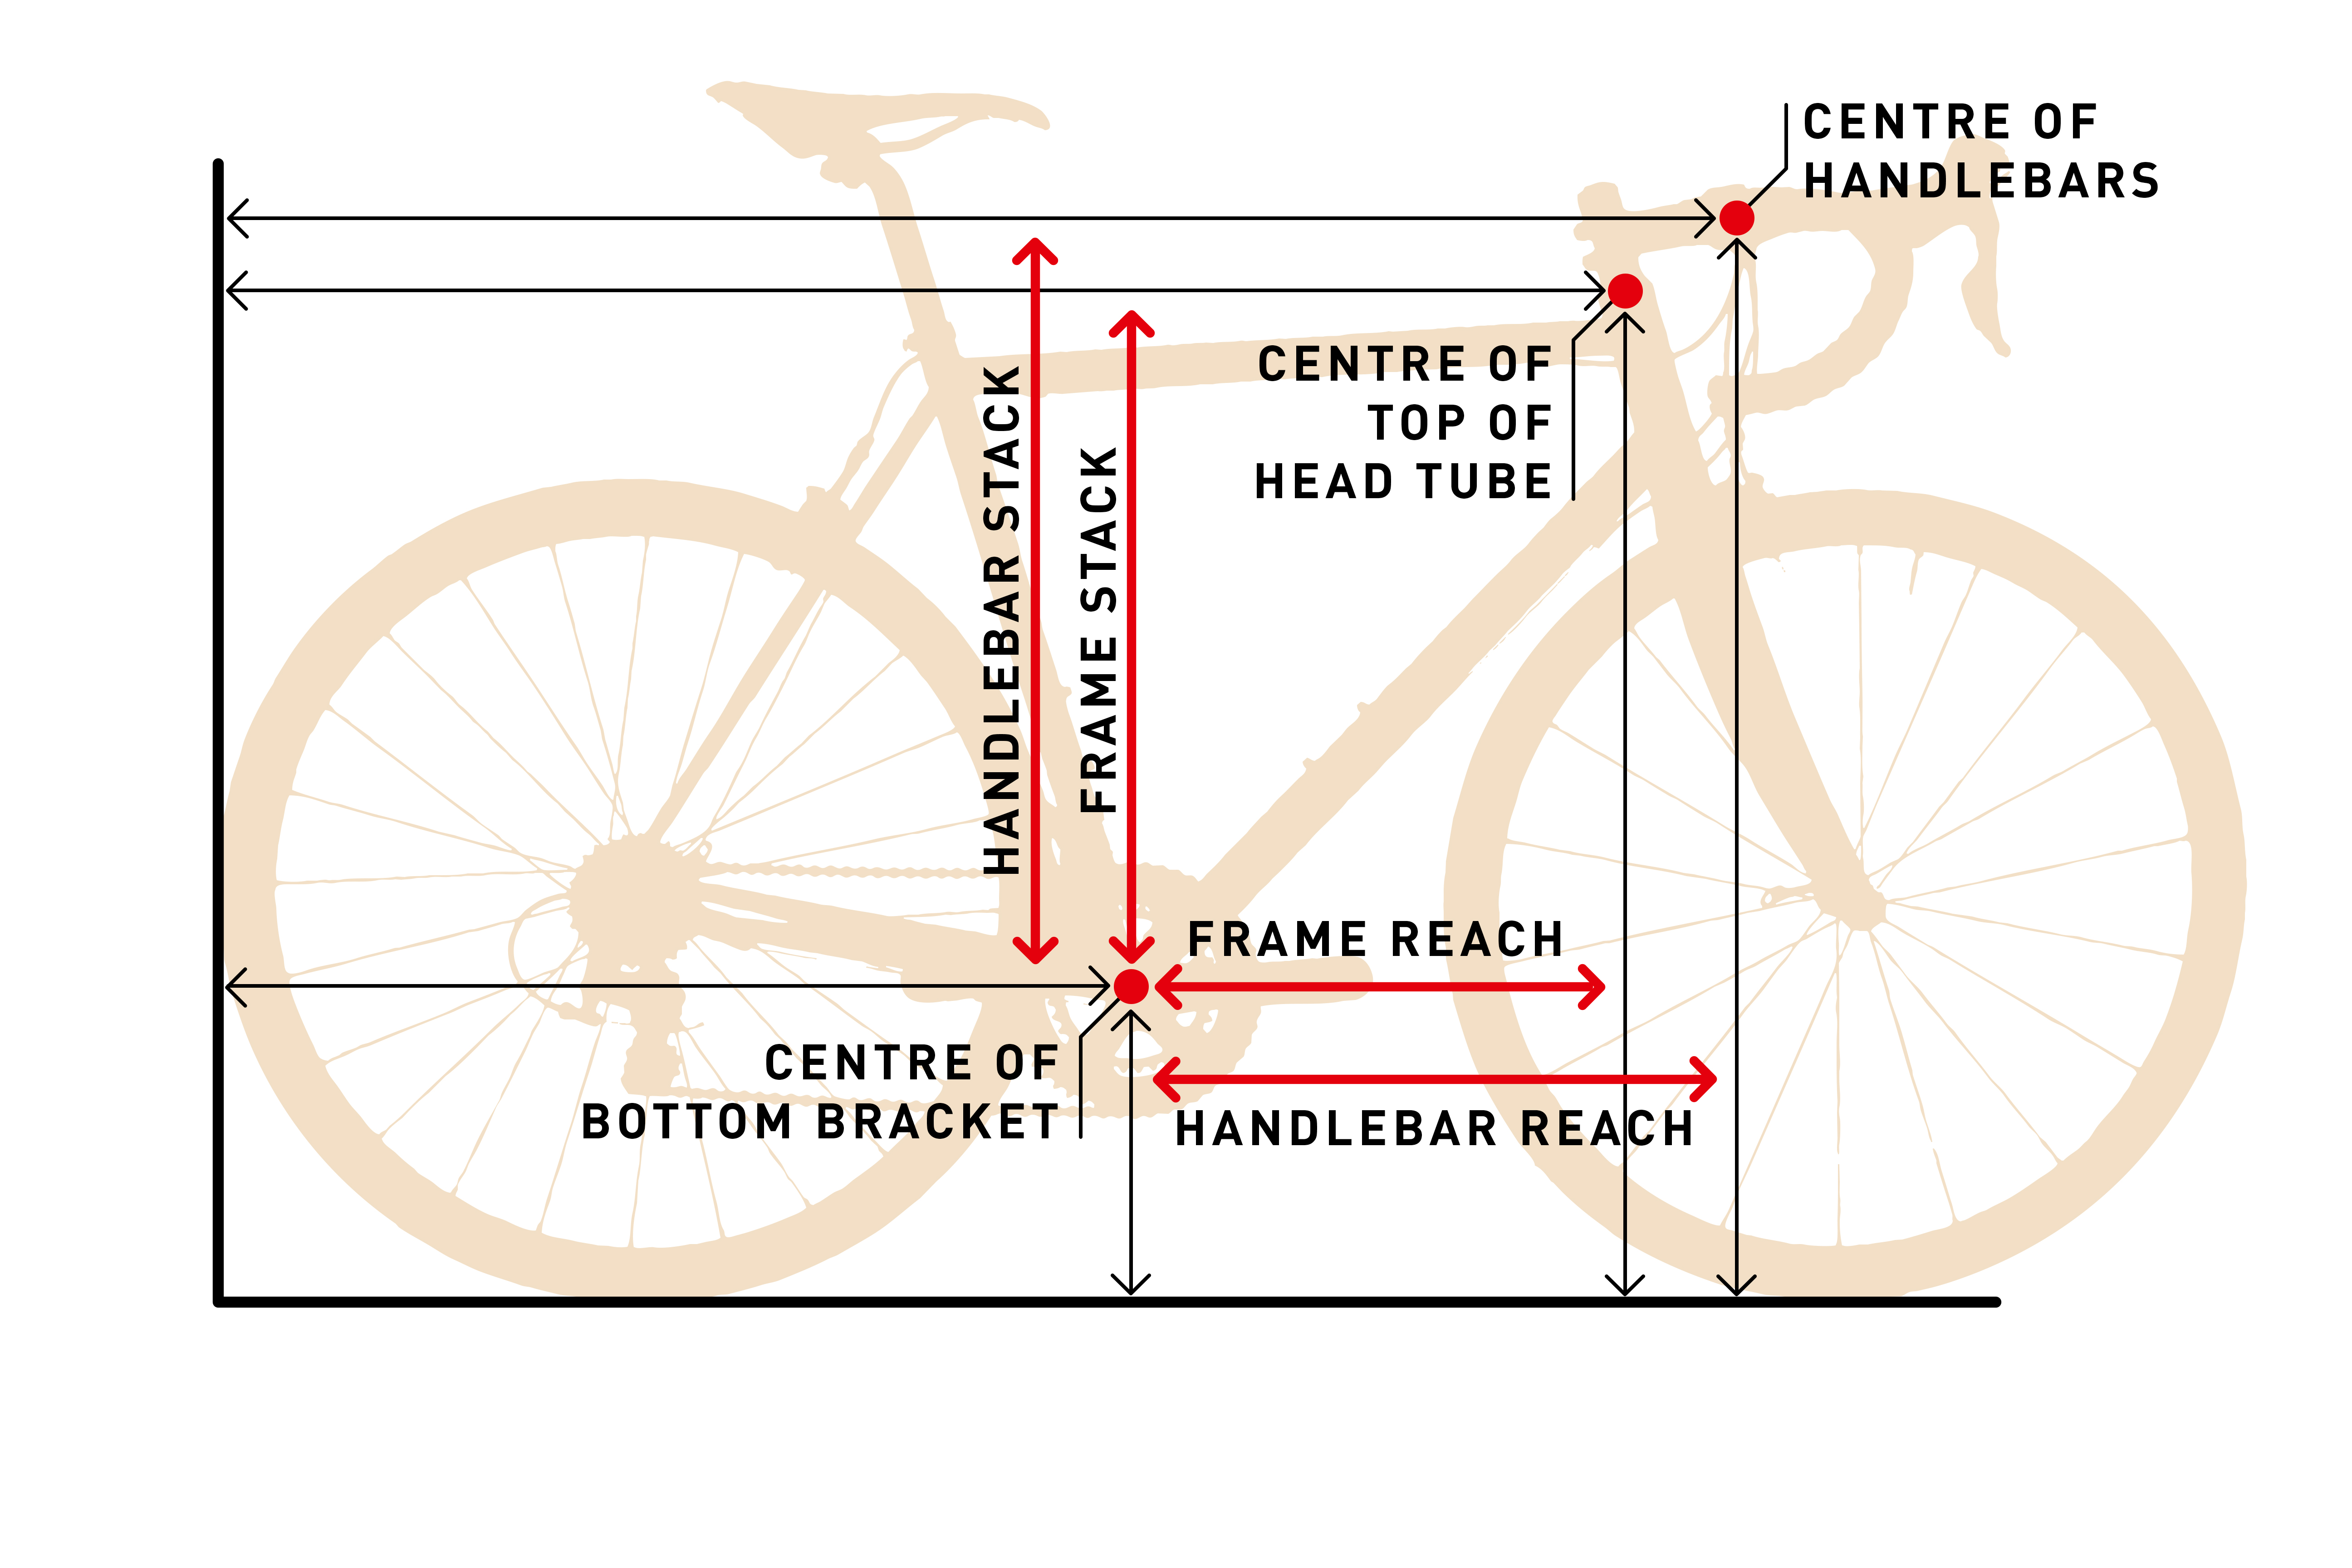
Image Source: rideonmagazine.com.au
Why Measuring Your Bike Matters
Getting the right measurements for your bike isn’t just about vanity; it’s about your health, comfort, and performance. A bike that’s too big or too small can lead to a host of problems, from discomfort and pain to inefficient pedaling and even injury. Proper bike fit ensures that your body is aligned correctly with the bike, allowing for optimal power transfer, reduced fatigue, and an enjoyable riding experience. Whether you’re a casual rider or a seasoned cyclist, taking the time to measure your bike and understand these measurements is a worthwhile investment in your cycling journey.
Finding Your Perfect Bike Frame Size
Your bike frame size is the foundation of a good bike fit. It’s not a single number, but rather a combination of measurements that determine how the bike will interact with your body. Different types of bikes – road bikes, mountain bikes, hybrid bikes – have different measurement systems and prioritize different aspects of the frame.
Essential Bike Measurements Explained
Let’s dive into the specific measurements you’ll need to take and what they tell you about your bike.
Seat Tube Length
The seat tube length is a fundamental measurement for determining bike frame size, especially on traditional road bikes. This is the distance from the center of the bottom bracket (where the crank arms attach) to the top of the seat tube.
-
How to Measure:
- Find the center of the bottom bracket.
- Locate the top edge of the seat tube.
- Measure the straight-line distance between these two points.
- Note: On bikes with sloping top tubes or compact frames, the seat tube might not extend all the way up. In such cases, the measurement is often taken to where the top tube intersects the seat tube.
-
What it Tells You: A longer seat tube generally means a taller frame. This measurement is crucial for ensuring you have adequate seat tube length to adjust your saddle height correctly for your leg length.
Top Tube Length
The top tube length is another critical measurement for bike frame size and bike fit. It’s the distance from the center of the head tube to the center of the seat tube.
-
How to Measure:
- Locate the center of the head tube (where the handlebars attach).
- Find the center of the seat tube.
- Measure the straight-line distance between these two points.
- Note: Some manufacturers list a “virtual top tube length” for bikes with sloping top tubes. This is the equivalent horizontal distance if the top tube were perfectly horizontal.
-
What it Tells You: This measurement, along with the stem length, dictates how stretched out you’ll be when riding. A longer top tube length generally leads to a more stretched-out riding position, common on performance road bikes, while a shorter top tube offers a more upright and comfortable position.
Head Tube Length
The head tube length influences the bike’s front-end height and, consequently, your riding posture. It’s the tube through which the fork steerer tube passes.
-
How to Measure:
- Measure the external length of the head tube.
- This is typically a straightforward measurement from the top to the bottom of the head tube.
-
What it Tells You: A longer head tube length will result in a higher handlebar position, leading to a more upright and relaxed riding posture. Shorter head tubes promote a more aggressive, aerodynamic, and bent-over position.
Head Tube Angle
The head tube angle is a key component of bicycle geometry that affects how the bike handles. It’s the angle between the ground and the head tube.
-
How to Measure:
- This measurement is usually found in the bike’s specifications.
- If you need to measure it yourself, you’ll need a protractor and a level.
- Place the level on the ground and the protractor against the head tube.
- Measure the angle.
-
What it Tells You: A slacker (smaller) head tube angle (e.g., 68 degrees) makes the bike more stable at speed and on descents, as it increases the trail figure. A steeper (larger) head tube angle (e.g., 73 degrees) makes the bike quicker to steer and more responsive, which is desirable for climbing and tight turns.
Seat Tube Angle
Similar to the head tube angle, the seat tube angle also impacts your riding position and how your weight is distributed. It’s the angle between the ground and the seat tube.
-
How to Measure:
- This is another specification usually found with the bike’s bicycle geometry details.
- If measuring manually, use a protractor and a level.
- Place the level on the ground and the protractor against the seat tube to determine the angle.
-
What it Tells You: A steeper seat tube angle positions you more forward over the pedals, which can be beneficial for climbing and efficient power output. A slacker seat tube angle pushes you further back, often preferred for descending or for riders who want a more relaxed pedaling position.
Crank Arm Length
While not directly a measurement of the frame, crank arm length is crucial for bike fit and pedaling efficiency. These are the arms that connect your pedals to the bottom bracket.
-
How to Measure:
- Measure from the center of the bolt that holds the pedal to the center of the bottom bracket spindle.
- Crank arms are typically measured in millimeters (e.g., 170mm, 175mm).
-
What it Tells You: Shorter crank arms can help riders with shorter legs, reducing the need to over-extend. Longer crank arms can provide more leverage and potentially more power for riders with longer legs. The correct crank arm length can significantly improve pedaling mechanics and comfort.
Standover Height
Standover height is a critical safety measurement, particularly for beginners or those riding bikes where quick dismounts are important, like mountain bikes. It’s the distance from the ground to the top of the top tube, measured at a point where you would typically straddle the bike.
-
How to Measure:
- Place the bike on a flat, level surface.
- Hold a tape measure vertically from the ground.
- Measure up to the highest point of the top tube, usually midway between the seat tube and the head tube.
-
What it Tells You: You should be able to stand over your bike with both feet flat on the ground and have at least an inch or two of clearance between your crotch and the top tube. This clearance is vital for safe dismounts and prevents injury if you have to stop suddenly or lose your balance.
Wheelbase
The wheelbase is the distance between the centers of the front and rear wheels. It’s a fundamental aspect of bicycle geometry that influences stability and agility.
-
How to Measure:
- Measure the distance from the center of the front wheel’s axle to the center of the rear wheel’s axle.
- This measurement is typically found in the bike’s specifications.
-
What it Tells You: A longer wheelbase generally provides greater stability, especially at higher speeds and on descents. A shorter wheelbase makes the bike more agile and quicker to maneuver, which is beneficial for tight turns and technical terrain.
Bottom Bracket Drop
The bottom bracket drop is the vertical distance from the horizontal line connecting the centers of the front and rear wheel axles to the center of the bottom bracket.
-
How to Measure:
- This is a specification found in the bicycle geometry charts.
- Measuring it accurately requires some equipment and precision.
-
What it Tells You: A greater bottom bracket drop (meaning the bottom bracket is lower) lowers the bike’s center of gravity, enhancing stability and cornering. A smaller drop can make the bike feel more nimble but less stable.
Reach and Stack
These are increasingly important measurements for modern bike fit, especially for road and gravel bikes, as they better describe the rider’s position on the bike.
-
Reach: The horizontal distance from the center of the bottom bracket to the center of the top of the head tube.
- What it Tells You: This measurement, combined with stem length, dictates how long and low your riding position will be. A longer reach means a more stretched-out position.
-
Stack: The vertical distance from the center of the bottom bracket to the top of the head tube.
- What it Tells You: This measurement, combined with headset spacers and stem height, determines how high your handlebars will be. A higher stack means a more upright riding position.
How to Measure Your Bike: Step-by-Step
Now that you know what each measurement represents, let’s get hands-on.
Tools You’ll Need
- Measuring Tape: A metal tape measure is ideal for its rigidity and accuracy.
- Level: To ensure you’re measuring straight lines.
- Pen and Paper (or digital device): To record your measurements.
- Optional: Bicycle Specific Geometry Tools: For very precise measurements, especially of angles.
- Optional: A Helper: Having someone to hold the bike or tape measure can make things easier.
Measuring Key Frame Dimensions
Let’s start with the most common and important measurements.
Measuring the Seat Tube Length
- Locate the Bottom Bracket: Find the very center of where your crank arms attach to the frame.
- Locate the Top of the Seat Tube: Identify the uppermost point of the seat tube. This is usually where the seatpost inserts.
- Measure: Place one end of your measuring tape at the center of the bottom bracket. Run the tape measure up to the top of the seat tube. Keep the tape measure taut and straight.
- Record: Write down the measurement. For many bikes, you’ll measure along the center line of the seat tube itself. For sloping top tubes, you might be measuring to where the top tube meets the seat tube. Refer to the manufacturer’s specifications if you have them, as they often use specific methods for this measurement.
Measuring the Top Tube Length
- Locate the Head Tube Center: Find the exact center of the head tube, the tube where your fork and handlebars connect.
- Locate the Seat Tube Center: Again, find the center of the seat tube, where it meets the top tube.
- Measure: Place one end of your tape measure at the center of the head tube and run it straight to the center of the seat tube. This is the “effective top tube” length, often referred to as the actual top tube.
- Record: Note down this measurement. On bikes with compact or sloping top tubes, manufacturers often provide a “virtual top tube length,” which is the horizontal measurement from the head tube center to the point where a horizontal top tube would intersect the seat tube. This is often the more relevant measurement for fit.
Measuring Standover Height
- Prepare the Bike: Ensure the bike is on a firm, level surface.
- Position the Tape Measure: Hold the end of your measuring tape at the ground directly beneath the top tube of the bike.
- Measure Vertically: Raise the tape measure vertically until it touches the top tube. It’s best to measure at the midpoint of the top tube, between the seat tube and the head tube.
- Record: Note the measurement. You can then compare this to your inseam measurement.
Measuring Other Important Dimensions
These measurements provide more detailed information about your bicycle geometry.
Measuring Head Tube Length
- Identify the Head Tube: This is the tube at the front of the bike that houses the headset and the fork steerer tube.
- Measure the Outer Length: Use your measuring tape to measure the straight distance from the very top of the head tube to the very bottom.
- Record: Write down this length. This is a direct measurement and is generally straightforward.
Measuring Head Tube Angle
- Consult Specifications: The easiest way to know the head tube angle is to look up your bike’s specifications online or in the manual.
- Manual Measurement (Advanced): If you need to measure it yourself, you’ll need a protractor and a level. Place the level parallel to the ground against the head tube. Then, use the protractor to measure the angle between the head tube and the level. This requires some dexterity and precision.
Measuring Seat Tube Angle
- Consult Specifications: Similar to the head tube angle, this is best found in your bike’s official geometry chart.
- Manual Measurement (Advanced): If measuring manually, use a level placed parallel to the ground against the seat tube. Use a protractor to measure the angle between the seat tube and the level.
Measuring Crank Arm Length
- Locate the Pedal Bolt: Find the bolt where the pedal attaches to the crank arm.
- Locate the Bottom Bracket Spindle: Identify the center of the spindle that goes through the bottom bracket shell.
- Measure: Place one end of your tape measure at the center of the pedal bolt. Run the tape measure straight to the center of the bottom bracket spindle.
- Record: This is the crank arm length, usually measured in millimeters.
Measuring Wheelbase
- Locate Axle Centers: Find the center of the front wheel axle and the center of the rear wheel axle.
- Measure the Distance: Use your tape measure to find the distance between these two center points.
- Record: This measurement gives you an idea of the bike’s overall length and stability characteristics.
Relating Measurements to Your Body for Bike Fit
Knowing how to measure your bike is only half the battle; the other half is knowing how to use those measurements to achieve a proper bike fit.
What Are Your Body Measurements?
Before you can effectively match bike measurements to your body, you need to know your own dimensions.
Inseam Measurement
This is perhaps the most critical body measurement for cycling.
- Stand Tall: Stand with your back against a wall, wearing the cycling shoes you typically use.
- Use a Book or Level: Place a book or a small level between your legs, just as you would sit on a saddle.
- Mark the Wall: Have a friend or use a pencil to mark the wall at the top edge of the book/level.
- Measure the Distance: Step away from the wall and measure the distance from the floor to the mark. This is your inseam.
Arm Length and Torso Length
While more complex to measure precisely, arm and torso length influence reach and stack preferences.
- Arm Length: Measure from the tip of your shoulder to the center of your fist.
- Torso Length: Measure from your crotch (pubic bone) up to the notch at the base of your neck.
Matching Bike Measurements to Your Body
Here’s how the bike measurements correlate to your body dimensions for a better bike fit.
Seat Tube Length and Inseam
Your inseam is the primary factor in determining the correct seat tube length.
- General Rule: For road bikes, multiply your inseam by 0.67 to get a rough estimate of your ideal seat tube length. For mountain bikes, this is less critical as standover height and top tube measurements are often more important due to varying suspension designs.
- Saddle Height Adjustment: The seat tube length allows for a range of saddle height adjustments. Once you have a frame that’s in the ballpark, you can fine-tune your saddle height using your inseam and the crank length.
Top Tube Length and Your Reach
The top tube length, in conjunction with stem length, determines your reach to the handlebars.
- Body Proportions: Riders with longer torsos and/or longer arms will generally prefer a longer top tube and/or stem. Riders with shorter torsos or arms will need a shorter top tube and/or stem.
- Comfort vs. Performance: A longer reach means a more stretched-out, aerodynamic position, often preferred by racers. A shorter reach offers a more upright, comfortable position, ideal for touring or casual riding.
Head Tube Length and Handlebar Height
The head tube length directly impacts how high your handlebars will be.
- Flexibility: If you have good flexibility, you might prefer a lower handlebar position (shorter head tube, fewer spacers) for better aerodynamics. Less flexible riders or those seeking comfort will opt for a higher handlebar position (longer head tube, more spacers).
- Riding Style: Racers usually want a lower front end, while endurance riders often benefit from a higher front end.
Standover Height and Safety
This is straightforward: standover height should allow you to comfortably straddle the bike.
- Clearance is Key: Aim for at least 1-2 inches of clearance between your crotch and the top tube for safety. This is particularly important for mountain bikes and hybrid bikes. Road bikes often have higher top tubes, so this measurement is still relevant but the clearance might be less.
The Importance of Bicycle Geometry Charts
Most reputable bike manufacturers provide detailed bicycle geometry charts for each of their models. These charts are invaluable resources. They will list all the measurements discussed above and more, allowing you to compare different bikes and see how they might fit you.
Table: Key Geometry Measurements and Their Impact
| Measurement | What it Affects | Rider Type/Preference |
|---|---|---|
| Seat Tube Length | Saddle height adjustability, frame size | Crucial for matching to inseam. A frame that’s too short or too long limits saddle adjustment. |
| Top Tube Length | Rider’s reach to handlebars, riding posture | Longer = more stretched out (aerodynamic); Shorter = more upright (comfortable). Influenced by stem length. |
| Head Tube Length | Handlebar height, rider posture | Longer = higher handlebars (upright); Shorter = lower handlebars (aggressive). Influenced by headset spacers. |
| Head Tube Angle | Steering stability and responsiveness | Slacker (smaller degree) = stable at speed; Steeper (larger degree) = quick steering. |
| Seat Tube Angle | Rider’s position over the pedals | Steeper = forward position (climbing); Slacker = rearward position (descending, comfort). |
| Crank Arm Length | Pedaling efficiency, leverage, leg extension | Shorter = less leg extension; Longer = more leverage. Depends on leg length. |
| Standover Height | Safety, ease of dismount | Must provide adequate clearance between rider and top tube. Crucial for preventing injury. |
| Wheelbase | Stability and agility | Longer = more stable; Shorter = more agile. |
| Reach | Horizontal distance to handlebars, rider’s stretch | Longer reach contributes to a more stretched-out position. |
| Stack | Vertical distance to handlebars, rider’s posture | Higher stack contributes to a more upright position. |
Beyond Basic Measurements: The Art of Bike Fit
While these measurements are essential, a truly dialed-in bike fit often involves more nuanced adjustments and professional assessment.
Professional Bike Fitting Services
If you’re serious about cycling, investing in a professional bike fit is highly recommended. A certified bike fitter will:
- Analyze your riding style and goals.
- Conduct a thorough assessment of your flexibility, range of motion, and any physical limitations.
- Use specialized tools and software to measure your body precisely.
- Adjust your current bike (or help you select a new one) to optimize saddle height, saddle fore/aft position, handlebar height and reach, and cleat position for the ultimate in comfort and performance.
Common Bike Fit Adjustments
Even without a professional fitter, you can make some common adjustments:
- Saddle Height: Adjust up or down until your leg is slightly bent at the bottom of the pedal stroke.
- Saddle Fore/Aft Position: Adjust forward or backward so that when the pedal is at its lowest point, your knee is roughly above the pedal spindle (KoM position).
- Handlebar Height and Reach: Adjust stem height (using spacers) and swap out stems of different lengths to achieve a comfortable reach and a position that suits your flexibility.
- Brake Lever Position: Ensure you can comfortably reach and operate the brake levers.
Frequently Asked Questions (FAQ)
Q: What is the most important measurement for bike size?
A: The bike frame size, which is largely determined by the seat tube length and top tube length, is the most important measurement.
Q: Can I measure my bike with just a tape measure?
A: Yes, you can measure many key dimensions like seat tube length, top tube length, standover height, and wheelbase with just a tape measure. More complex measurements like angles require specialized tools.
Q: How do I measure my bike’s frame size if it has a sloping top tube?
A: For sloping top tubes, the effective top tube length (a horizontal measurement) is usually more important than the actual seat tube length. Manufacturers typically provide this virtual measurement in their geometry charts.
Q: What is a good standover height for a bike?
A: You should have at least 1-2 inches (2.5-5 cm) of clearance between your crotch and the top tube when standing over the bike with your feet flat on the ground.
Q: How do I measure crank arm length?
A: Measure from the center of the pedal bolt to the center of the bottom bracket spindle.
Q: Does wheelbase affect bike handling?
A: Yes, the wheelbase significantly affects handling. A longer wheelbase provides more stability, while a shorter one offers greater agility.
Q: What is bicycle geometry?
A: Bicycle geometry refers to the angles and dimensions of a bike frame, such as head tube angle, seat tube angle, top tube length, and wheelbase, which dictate how the bike handles and fits the rider.
Q: How often should I check my bike measurements?
A: It’s a good idea to re-check your bike measurements if you’re experiencing discomfort, or if you’ve changed components like the crankset or handlebars. Regularly inspecting your bike ensures it remains in optimal condition.
By taking the time to measure your bike and understand how these dimensions relate to your body, you can ensure a more comfortable, efficient, and enjoyable cycling experience. Whether you’re buying a new bike or fine-tuning your current ride, accurate measurements are your first step towards a perfect bike fit.