
The average bike brake pad can last anywhere from 1,000 to 3,000 miles for rim brakes, and 5,000 to 10,000 miles for disc brakes, but this is a very broad estimate. Bicycle brake pad lifespan is influenced by a variety of factors, and knowing these can help you predict when you’ll need to replace them and keep your bike safe.
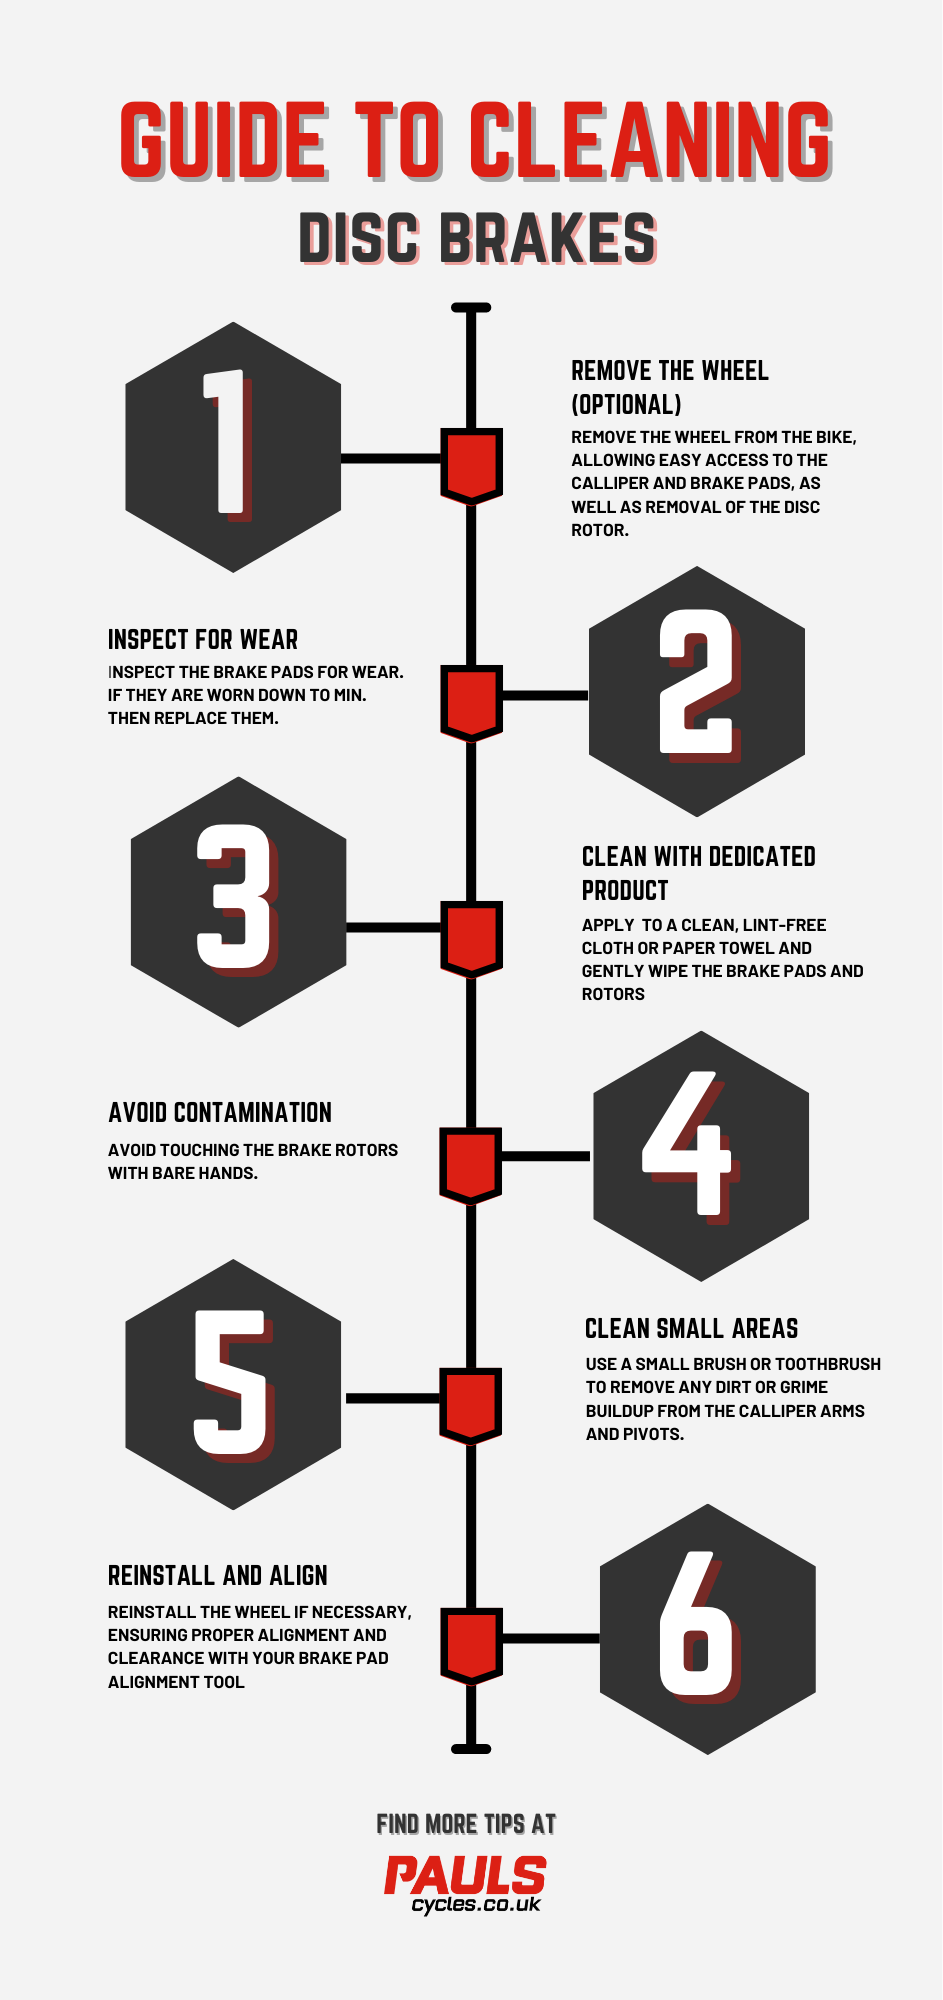
Image Source: www.paulscycles.co.uk
Deciphering Brake Pad Durability
Your bike’s brake pads are crucial for safe riding. They are the interface between your braking system and the wheel, converting kinetic energy into heat. Over time, this constant friction causes bike brake wear. Estimating how long they will last involves looking at several key elements.
How to Check Bike Brake Pad Wear
Regularly checking your brake pads is an essential part of bike maintenance. It’s not difficult, and it ensures your brakes are always ready to perform.
Here’s a simple way to check:
- For Rim Brakes:
- Look at the rubber pad. Most pads have wear indicator lines or grooves.
- If the grooves are gone, or the pad surface looks very smooth and worn down, it’s time for a change.
- Also, check if the pad is hitting the tire instead of the rim. This is a sign of excessive wear and potential misalignment.
- For Disc Brakes:
- You’ll need to remove the wheel to get a good look.
- Locate the brake caliper. The brake pads are inside this.
- Look between the caliper arms at the pad material.
- Most pads have a minimum thickness marking, often a small hole or a line. If the pad material is worn down to this point, or significantly thinner than the backing plate, it’s time to replace them.
Factors Affecting Bike Brake Pad Life
Many things can influence how quickly your brake pads wear out. Some are related to how you ride, and others are about the conditions you ride in.
Riding Habits and Techniques
- Braking Style: Frequent, hard braking will wear pads down much faster than smooth, progressive braking. Riding downhill often or in stop-and-go traffic leads to more wear.
- Riding Terrain: Riding on hilly terrain means more braking. Riding on flat roads with fewer stops generally results in longer pad life.
- Riding Frequency: The more you ride, the more miles you put on your brake pads, naturally leading to quicker wear.
Environmental Conditions
- Weather: Wet and muddy conditions are notorious for accelerating brake pad wear. Grit and water act like sandpaper, grinding away the pad material.
- Road Surface: Riding on dusty or gritty roads will also increase wear. Fine particles embed themselves into the pad material and the braking surface.
- Temperature: While less of a direct factor for pad wear itself, extreme heat from constant heavy braking can contribute to brake fade and potentially affect pad material over the long term.
Brake System Components
- Brake Pad Material: Different materials have different wear rates.
- Organic (Resin) Pads: These are softer and offer excellent stopping power, especially in dry conditions, but they wear out faster. They are also quieter and less likely to damage the braking surface.
- Metallic (Sintered) Pads: These are harder and more durable, lasting longer, especially in wet or muddy conditions. However, they can be noisier and may cause more wear on the wheel rim or disc rotor.
- Semi-Metallic Pads: These are a hybrid, aiming to balance the benefits of both organic and metallic pads, offering a good compromise in terms of wear life and performance.
- Braking Surface:
- Rim Brake Tracks: The aluminum or carbon braking surface on your wheel rim. Carbon rims can wear differently and may require specific pad types.
- Disc Brake Rotors: The metal disc attached to your wheel hub. The material and thickness of the rotor can influence pad wear.
- Brake Type: As mentioned, disc brakes generally last longer than rim brakes due to the larger surface area and better performance in adverse conditions.
- Brake Adjustment and Alignment: Properly adjusted brakes ensure the pad makes even contact with the braking surface. Misalignment can cause uneven wear, reducing the overall lifespan of the pad.
Rider Weight and Bike Load
- Rider Weight: A heavier rider will require more force to slow down, leading to increased friction and faster brake pad wear.
- Bike Load: Carrying extra weight, such as in panniers or a backpack, also increases the braking force needed and thus the rate of pad wear.
Estimating Bike Brake Pad Durability
Estimating bike brake pad durability requires considering the factors above. Here’s a general guideline, but remember these are approximations:
| Brake Type | Pad Material | Typical Lifespan (Miles) | Notes |
|---|---|---|---|
| Rim Brakes | Organic (Resin) | 1,000 – 2,000 | Softer, quieter, good in dry. Wears faster, especially in wet. |
| Rim Brakes | Metallic | 1,500 – 3,000 | Harder, last longer, better in wet. Can be noisier and wear rims faster. |
| Disc Brakes | Organic (Resin) | 5,000 – 7,000 | Good modulation, quiet. Wear faster than metallic. |
| Disc Brakes | Metallic | 7,000 – 10,000+ | Very durable, perform well in all conditions. Can be noisy, may require more bedding-in time. |
| Disc Brakes | Semi-Metallic | 6,000 – 8,000 | Balanced performance, good lifespan. |
Important Consideration: These are average figures. Riding down a steep mountain pass in the rain will drastically shorten the life of any brake pad compared to leisurely city cycling on dry days.
The Process of Brake Pad Degradation
Brake pad degradation is a gradual process. As the friction material wears away, the braking performance can decrease.
- Reduced Stopping Power: Thinner pads have less material to dissipate heat and friction, leading to less effective braking.
- Increased Stopping Distance: This is a safety hazard, as you’ll need more space to come to a complete stop.
- Noise: Worn-out pads can start to squeal or grind, often an audible warning sign.
- Damage to Braking Surfaces: If pads wear down completely to the metal backing plate, they can severely damage your rim or disc rotor, leading to much more expensive repairs.
When to Replace Bike Brake Pads
Knowing when to replace bike brake pads is about recognizing the signs of wear and understanding your bike’s maintenance needs.
- Visual Inspection: As described earlier, if the pad material is worn down to the wear indicator lines or is very thin, it’s time.
- Braking Performance: If you notice a significant decrease in your bike’s stopping power or an increase in stopping distance.
- Auditory Cues: A persistent squealing or grinding noise during braking is a strong indicator that your pads are worn or contaminated.
- Contact with Tire/Rotor: For rim brakes, if the pad is contacting the tire. For disc brakes, if the pad material is visibly thinner than the metal backing plate.
Replacing Bike Brake Pads
Replacing bike brake pads is a common maintenance task that most cyclists can learn to do themselves.
For Rim Brakes:
- Gather Tools: You’ll likely need a wrench (often 5mm or 6mm Allen key) to loosen the brake pad retaining bolt.
- Remove Old Pads: Loosen the bolt holding the old pad. Slide the old pad out.
- Install New Pads: Slide the new pad into the brake arm, ensuring it’s oriented correctly (check the shape and wear indicators).
- Align and Tighten: Position the new pad so it makes full contact with the rim. It should be parallel to the rim surface and slightly angled to avoid contacting the tire. Tighten the retaining bolt firmly.
- Test: Spin the wheel and apply the brake. Ensure the pad is hitting the rim squarely and that the brake functions smoothly.
For Disc Brakes:
- Gather Tools: You’ll need Allen keys (often 4mm or 5mm) and potentially a pad spreader tool or a flathead screwdriver.
- Remove the Wheel: Take the wheel off your bike.
- Remove Old Pads: Most disc brake systems use a retaining pin or clip. Remove this, and the pads should slide out. Sometimes, you might need to push the pistons back slightly to free the pads.
- Install New Pads: Ensure the new pads are the correct type for your brake model. Place them into the caliper, making sure they sit correctly against the piston and the other brake pad mounting point.
- Spread Pistons: Gently push the brake pistons back into the caliper body. Use a pad spreader tool or a clean flathead screwdriver to create space for the new, thicker pads. Be careful not to damage the pistons.
- Reinstall Wheel: Put the wheel back on your bike.
- Bed In New Pads: This is crucial for disc brakes. After installation, pump the brake lever several times until the lever feels firm. Then, find a safe, open area and perform several moderate-speed stops without fully locking up the wheels. Repeat this process 5-10 times. This transfers a thin layer of pad material to the rotor, optimizing performance.
Maintenance Schedule for Bike Brakes
A proactive maintenance schedule for bike brakes will ensure they are always in good working order and can help extend the life of your brake pads.
- After Every Ride (Quick Check): Briefly inspect pads for obvious damage or contamination, especially after riding in adverse conditions.
- Every Month (or 200-500 miles): Perform a more thorough visual inspection of brake pads and rotors/rims. Check brake lever feel for sponginess.
- Every 3-6 Months (or 1000-2000 miles): A more in-depth check. Clean brake components, inspect pad thickness more carefully, check cable tension or hydraulic fluid levels, and ensure alignment is correct. This is a good time to replace worn pads if needed.
- Annually: A comprehensive brake service, which might include bleeding hydraulic brakes, inspecting brake lines for leaks, and a thorough cleaning and lubrication of moving brake parts.
How Often to Change Bike Brake Pads
The question of how often to change bike brake pads depends entirely on the factors we’ve discussed. For a casual rider who primarily uses dry conditions and rides on flatter terrain, it might be once a year or even less. For a dedicated cyclist who rides in all weather, tackles steep descents, or carries heavy loads, it could be every few months. The best answer is to check them regularly.
Frequently Asked Questions (FAQ)
- Q: Can I ride with worn-out brake pads?
A: It’s highly unsafe. Worn pads significantly reduce your stopping power, increasing your stopping distance and the risk of accidents. You also risk damaging your wheel rims or rotors. - Q: Do different bike brands use different brake pads?
A: Yes, many manufacturers use proprietary pad shapes and compounds, especially for disc brakes. It’s important to identify your specific brake model to get the correct replacement pads. - Q: How does cleaning affect brake pad life?
A: Regular cleaning of your wheels, rims, and rotors can help remove abrasive materials that contribute to wear. Cleaning contamination from pads themselves (like oil or grease) can restore some performance, but it won’t reverse physical wear. - Q: What is brake pad bedding-in?
A: Bedding-in, or “burnishing,” is the process of conditioning new brake pads and rotors to work optimally together. For disc brakes, it involves a series of moderate stops to transfer pad material to the rotor surface. For rim brakes, it’s more about the pad material conforming to the rim. - Q: My brakes are squealing. What does that mean?
A: Squealing can be caused by several things: contaminated pads, glazed pads (hardened surface from overheating), poor alignment, or simply worn-out pads. It’s always a signal to inspect your brakes.
Conclusion
The lifespan of your bike brake pads is not a fixed number. By understanding the various factors that influence bike brake wear, from your riding style and the weather to the specific components on your bike, you can better predict when replacements are needed. Regular visual inspections and listening to your brakes are your best tools for ensuring optimal braking performance and, most importantly, your safety on every ride. Knowing how to check bike brake pad wear and when to replace them is a fundamental skill for any cyclist.