
Getting the right bike shoe fit is crucial for comfort, performance, and preventing injuries. A perfectly fitting cycling shoe should feel snug and supportive without any pinching or pressure points. It should allow your foot to move naturally within the shoe, but with enough structure to transfer power efficiently to the pedals.
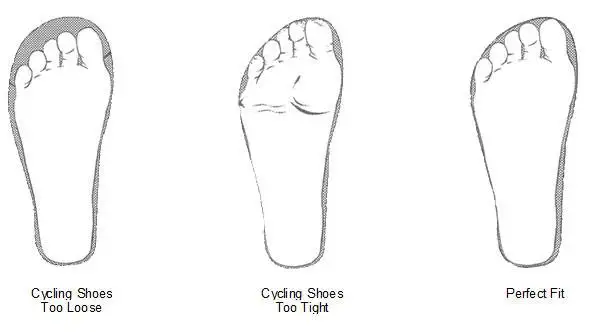
Image Source: motionfit.net
Deciphering Your Ideal Cycling Shoe Fit
The quest for the best fitting cycling shoes involves several key considerations. It’s not just about picking a size; it’s about how the shoe interacts with your foot and your pedaling style. A poor fit can lead to blisters, hot spots, numbness, and even long-term foot problems. Conversely, a great fit enhances your cycling experience, making rides more enjoyable and efficient. This guide will walk you through the essential aspects of achieving that perfect cycling shoe fit.
The Foundation: Understanding Your Foot Shape
Before you even look at a shoe, take time to understand your own feet. Do you have high arches, flat feet, or something in between? Are your feet wide or narrow? Most cycling shoe brands cater to standard widths, but some offer wider or narrower options.
Foot Measurement Basics
- Length: Measure from the back of your heel to the tip of your longest toe. Do this standing up, with weight distributed evenly.
- Width: Measure the widest part of your foot, typically across the ball of your foot.
- Arch Height: Place your foot on a piece of paper after wetting the sole. The imprint will reveal your arch type. A full imprint suggests flat feet, a minimal imprint suggests high arches, and a distinct curve with a partial imprint indicates a normal arch.
Arch Support Considerations
Different arch types require different levels of support.
- Flat Feet: May benefit from shoes with good arch support built-in, or the option to add aftermarket insoles.
- High Arches: Often find relief with shoes that offer more cushioning and flexibility, or insoles that provide better contact with the arch.
- Normal Arches: Generally have the most flexibility in shoe choice.
Navigating the Cycling Shoe Sizing Guide
Most cycling shoe brands have their own sizing charts, which can differ significantly from your everyday shoe size. This is where a reliable cycling shoe sizing guide becomes invaluable.
Key Sizing Factors to Remember
- Brand-Specific Charts: Always consult the manufacturer’s sizing chart for the specific brand you are considering.
- Measure Both Feet: Feet can be slightly different sizes. Always base your decision on the larger foot.
- Consider Sock Thickness: Try on shoes with the type of cycling socks you typically wear. Thicker socks will require more room.
- Afternoon/Evening Try-On: Your feet naturally swell throughout the day. Trying on shoes in the afternoon or evening will give you a more accurate representation of fit.
Achieving Proper Cycling Shoe Tightness
This is arguably the most critical element of cycling shoe comfort. Too tight, and you risk circulation issues, numbness, and pain. Too loose, and you lose power transfer, experience heel slip, and increase the risk of blisters.
The Dial System (BOA and Similar)
Many modern cycling shoes use dial-based closure systems, like BOA. These systems offer micro-adjustments for a truly customized fit.
- Initial Tightening: Start by tightening the dial until the shoe feels snug, but not constricting.
- Incremental Adjustments: During your ride, you can make small adjustments to dial in the proper cycling shoe tightness.
- Even Pressure: Ensure the tension is distributed evenly across your foot. Avoid overtightening one area.
Strap and Buckle Systems
Traditional strap and buckle systems still have their place.
- Top Strap: The top strap, usually around the ankle, provides crucial heel hold. Tighten it securely but without cutting off circulation.
- Middle Strap: This strap often secures the midfoot. Aim for snugness to prevent foot slippage.
- Toe Strap: The strap across the toes should be snug but allow for slight toe wiggle. Avoid over-tightening, which can lead to toe numbness.
Fathoming the Fit: What to Look For
When you put on a cycling shoe, several sensations should be present, and several should be absent.
The Ideal Fit Sensations
- Snugness: Your foot should feel held and supported, with no excess movement.
- Heel Lock: Your heel should remain firmly in place, with no cycling shoe heel slip when you pull your foot upwards.
- Forefoot Security: The forefoot should feel comfortably cradled, not squeezed.
- Even Pressure: The closure system should distribute pressure evenly across your foot.
Sensations to Avoid: Identifying Cycling Shoe Pressure Points
- Pinching: Sharp or uncomfortable pressure anywhere on the foot, especially along the sides or top.
- Numbness: Often caused by overtightening, cutting off circulation.
- Hot Spots: Areas of localized discomfort or burning that can quickly turn into blisters.
- Toe Compression: Your toes should not be cramped or jammed against the front of the shoe.
Ensuring Sufficient Cycling Shoe Toe Box Room
While you want a secure fit, your toes need a little breathing room.
The Toe Wiggle Test
- With the shoe fastened, you should be able to slightly wiggle your toes.
- You should not feel your toes pressing firmly against the front of the shoe.
- If your toes hit the end, the shoe is likely too short, which can lead to black toenails and discomfort.
Preventing Toe Bangs
- Ensure there’s enough length in the shoe so your toes don’t constantly impact the front when descending or hitting bumps.
- This is particularly important for mountain biking shoes where trails can be rough.
Addressing Cycling Shoe Heel Slip
Cycling shoe heel slip is a major performance killer and can cause painful blisters.
Causes and Solutions
- Shoe Too Big: If the shoe is simply too large, you may need to size down.
- Poor Lacing/Dialing: Not tightening the heel or ankle straps/dials sufficiently.
- Foot Shape Mismatch: The heel cup of the shoe might not match the shape of your heel. Some shoes have more pronounced heel cups than others.
- Wider Heels: If you have proportionally wider heels compared to your forefoot, you might need to explore brands known for accommodating this.
Lacing Techniques to Improve Heel Hold
- Heel Lock Lacing: For shoes with eyelets, a specific lacing technique can help secure the heel. Thread the laces through the two innermost eyelets at the top of the shoe, creating a loop. Then, pass the lace end through the loop on the opposite side and pull to cinch the heel down.
The Importance of the Cycling Shoe Break-In Period
Even the best fitting cycling shoes might require a short cycling shoe break-in period.
What to Expect
- Initial Stiffness: Most new cycling shoes, especially those with carbon soles, will feel stiff at first.
- Molding to Your Foot: Over several rides, the shoe’s materials will begin to mold to the unique contours of your foot.
- Minor Adjustments: You might need to make small adjustments to the closure systems during this period.
Tips for a Smooth Break-In
- Short Rides First: Start with shorter rides to get a feel for the shoes.
- Listen to Your Feet: Pay close attention to any developing hot spots or pressure points.
- Adjust as Needed: Don’t hesitate to loosen or tighten straps/dials during your rides.
- Avoid Long Rides Initially: Don’t embark on a century ride on your first day with new shoes.
Choosing Between Different Cycling Disciplines
The how to choose bike shoes depends heavily on your riding style.
Road Cycling Shoes
- Stiffness: Generally the stiffest soles for maximum power transfer.
- Aerodynamics: Often sleeker designs.
- Cleat System: Typically 3-bolt cleat pattern.
- Ventilation: Good ventilation is important for long rides in warm weather.
Mountain Biking Shoes
- Durability: Built to withstand rough terrain and potential impacts.
- Traction: Lugged outsoles for walking and grip on varied surfaces.
- Protection: Often feature reinforced toe boxes and ankle protection.
- Cleat System: Typically 2-bolt cleat pattern (SPD compatible) for easier clipping in and out, and better walkability.
Gravel Cycling Shoes
- Hybrid Design: Often a blend of road and mountain bike shoe features.
- Comfort and Walkability: More emphasis on comfort for off-bike excursions.
- Durability and Traction: Good enough for loose surfaces.
- Cleat System: Usually 2-bolt for practicality.
Material Matters for Comfort and Fit
The materials used in cycling shoes significantly impact their feel and fit.
Common Materials and Their Properties
- Synthetic Leather/Microfiber: Offers good flexibility, breathability, and can mold to the foot over time.
- Mesh: Enhances ventilation and breathability, keeping feet cooler.
- Carbon Fiber Soles: Extremely stiff for optimal power transfer, but can feel less forgiving initially.
- Nylon Soles: More flexible and often more comfortable for casual riding or walking.
Common Mistakes When Buying Cycling Shoes
Avoiding these pitfalls will save you time, money, and discomfort.
What NOT to Do
- Assuming Your Road Shoe Size: Your normal shoe size is not a reliable indicator.
- Buying Online Without Trying: Unless you’ve tried the exact model and size before, it’s a gamble.
- Ignoring Discomfort: If a shoe doesn’t feel right in the shop, it won’t magically improve on the bike.
- Over-Tightening: This is a very common mistake that leads to numbness and pain.
- Forgetting About Insoles: Stock insoles are often basic. Consider aftermarket insoles for customized support.
The Long-Term Benefits of a Perfect Fit
Investing time and effort into finding the right cycling shoe fit pays dividends.
Performance and Health Advantages
- Enhanced Power Transfer: A secure fit ensures your pedaling effort is efficiently transferred to the cranks.
- Reduced Fatigue: Proper support and pressure distribution minimize foot fatigue on long rides.
- Injury Prevention: Prevents issues like plantar fasciitis, metatarsalgia, and nerve compression.
- Increased Comfort: Makes cycling more enjoyable, encouraging you to ride more often.
Final Thoughts on How to Choose Bike Shoes
Finding the perfect cycling shoe is a process. It requires patience, attention to detail, and a willingness to try different options. Remember that cycling shoe comfort is paramount, as it directly impacts your enjoyment and performance on the bike. By following these guidelines, you’ll be well on your way to experiencing the difference a truly well-fitting cycling shoe can make.
Frequently Asked Questions (FAQ)
Q1: Can I use regular athletic shoes for cycling?
A1: While you can technically put your feet on pedals with regular athletic shoes, it’s not recommended for performance or safety. Athletic shoes lack the stiffness needed for efficient power transfer, have flexible soles that can bend under pressure, and their laces can get caught in the bike’s drivetrain. Dedicated cycling shoes have stiff soles, secure closure systems, and are designed to work with clipless pedals.
Q2: How tight should my cycling shoes be?
A2: Your cycling shoes should be snug and supportive, like a second skin, but not uncomfortably tight. There should be no pinching or pressure points. You should be able to wiggle your toes slightly, and your heel should not slip when you pull up on the pedals. Proper cycling shoe tightness is about secure support without restricting blood flow.
Q3: Do cycling shoes stretch over time?
A3: Some cycling shoes, particularly those made with synthetic leather or microfiber, will mold to your foot shape and offer a slightly more relaxed fit over time. However, they don’t “stretch” in the way a canvas shoe might. The primary change is the material conforming to your foot during the cycling shoe break-in period. Carbon soles, in particular, will not stretch.
Q4: What is the difference between 2-bolt and 3-bolt cleat patterns?
A4: The main difference lies in their application and how they engage with the pedal.
* 3-bolt (Road): Offers a larger contact area between the shoe and the pedal, providing maximum stiffness and power transfer. Ideal for road cycling.
* 2-bolt (Mountain/Gravel): Features a smaller cleat that recesses into the shoe’s sole, allowing for much better walkability. These are designed for easier clipping in and out and are suitable for mountain biking and gravel riding.
Q5: I have wide feet. What should I look for in cycling shoes?
A5: If you have wide feet, look for brands or specific models that offer “wide” or “extra wide” options. Some brands, like Lake and Shimano, are known for offering a broader range of widths. Pay close attention to the cycling shoe toe box room and ensure it doesn’t feel constricting across the ball of your foot. Trying shoes on in person or ordering from retailers with good return policies is highly recommended.