
Can you adjust your bike saddle angle? Yes, you absolutely can, and it’s a crucial step for improving your cycling experience. Adjusting your bike saddle angle, often referred to as bike saddle tilt or saddle pitch, plays a significant role in rider comfort, cycling posture, and overall pedaling efficiency. While saddle height adjustment and saddle fore-aft position (which includes saddle setback) are perhaps more commonly discussed aspects of bike fit, the subtle nuances of saddle angle can make a world of difference. This guide will delve into how to fine-tune your saddle’s angle for a more enjoyable and effective ride.
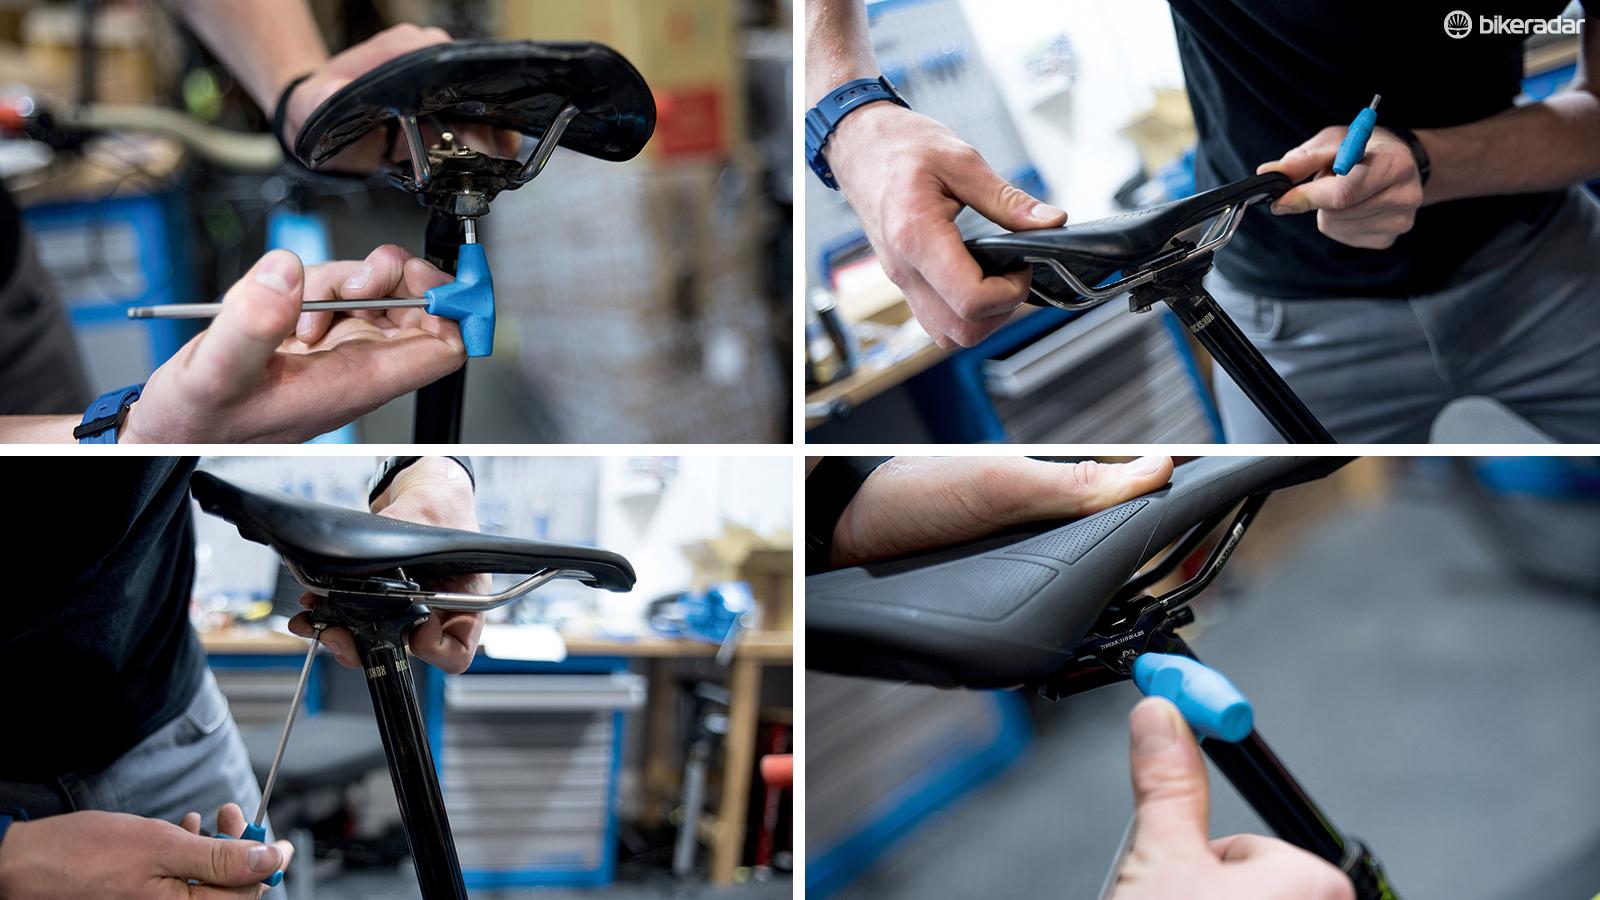
Image Source: c02.purpledshub.com
Why Saddle Angle Matters
The angle of your bike saddle is not just about aesthetics; it’s fundamentally about how your body interacts with the bike. When set correctly, it can:
- Prevent Discomfort and Pain: An improperly angled saddle can lead to pressure points, numbness, and pain in various areas, including the perineum, sit bones, and lower back.
- Improve Power Transfer: The right angle ensures your weight is distributed effectively, allowing you to push down on the pedals with more force and consistency.
- Enhance Cycling Posture: A well-adjusted saddle angle supports a neutral spine and helps you maintain an aerodynamic and comfortable position.
- Reduce Fatigue: By alleviating pressure and promoting efficient pedaling, the correct saddle angle can help you ride longer with less effort.
Common Saddle Angle Issues
Many riders suffer in silence, attributing discomfort to “just riding a bike.” However, these issues often stem from simple adjustments:
- Too High Nose: This can put excessive pressure on your perineum and hands, leading to numbness and discomfort. It can also cause you to slide back on the saddle.
- Too Low Nose: This forces you to constantly push forward, engaging your upper body too much and potentially leading to back strain and inefficient pedaling. You might find yourself riding on the nose of the saddle.
- Excessive Tilt (Forward or Backward): Even a few degrees too much tilt can significantly impact your comfort and control.
Tools and What You’ll Need
Before you start adjusting, gather these essential tools:
- Allen Keys (Hex Wrenches): Most bike seatposts use 4mm, 5mm, or 6mm Allen bolts.
- Torque Wrench: Highly recommended to avoid overtightening and damaging your seatpost or saddle rails. Check the recommended torque for your specific components.
- Level (Optional but Recommended): A small spirit level or a smartphone app can help you accurately measure and adjust the angle.
- Rag: To wipe down your saddle and seatpost.
The Process of Adjusting Saddle Angle
The bike setup process for saddle angle adjustment is relatively straightforward, but requires patience and a systematic approach.
Step 1: Finding a Neutral Starting Point
Most manufacturers recommend starting with the saddle perfectly level. This is your baseline.
- How to Achieve a Level Saddle:
- Place your level on top of the saddle.
- Gently adjust the angle of the saddle until the bubble in the level is centered between the two marked lines.
- If using a smartphone app, ensure the phone is positioned flat on the saddle.
Important Note: While “level” is a common starting point, it’s crucial to remember that this is not the final answer for everyone. Your unique anatomy and riding style will dictate the optimal angle.
Step 2: Riding and Assessing Comfort
This is where the real work begins. After setting the saddle to level, go for a ride. Pay close attention to how your body feels.
- What to Observe During Your Ride:
- Pressure Points: Are you feeling pressure on your sit bones, perineum, or anywhere else?
- Hand and Arm Pressure: Are your hands and arms feeling fatigued or numb? This can be a sign that you’re pushing yourself too far forward on the saddle due to an incorrect angle.
- Back Strain: Is your lower back uncomfortable?
- Leg Position: Do your legs feel like they are in a comfortable and efficient position while pedaling?
- Saddle Sliding: Are you finding yourself sliding forward or backward on the saddle unintentionally?
Step 3: Making Small Adjustments
Based on your observations, you’ll need to make subtle adjustments. It’s best to make one adjustment at a time and then test ride again.
-
Adjusting the Nose Down (Negative Tilt):
- When to Consider: If you feel significant pressure on your perineum, numbness, or if you feel like you’re being pushed off the back of the saddle.
- How to Adjust: Loosen the bolt(s) securing the saddle to the seatpost clamp. Gently tilt the nose of the saddle downwards.
- Amount of Adjustment: Start with a very small adjustment, perhaps just one or two degrees. A common guideline is to aim for no more than 1-3 degrees of downward tilt.
- Tighten and Test: Tighten the bolt(s) securely (using a torque wrench if available). Ride again and assess.
-
Adjusting the Nose Up (Positive Tilt):
- When to Consider: If you feel like you’re constantly sliding forward on the saddle, or if you experience discomfort in your sit bones and feel you’re “falling off” the front.
- How to Adjust: Loosen the bolt(s) securing the saddle. Gently tilt the nose of the saddle upwards.
- Amount of Adjustment: Be very cautious with upward tilt. Even a small amount can cause significant pressure on the perineum. Generally, avoid more than 1-2 degrees of upward tilt.
- Tighten and Test: Secure the bolts and test ride.
Table: Common Saddle Angle Adjustments and Their Effects
| Saddle Angle Adjustment | Common Symptoms Addressed | Potential Negative Effects of Over-Adjustment |
|---|---|---|
| Nose Down (Negative Tilt) | Perineal pressure, numbness, sliding back on saddle | Sit bone pain, excessive pressure on hands/wrists |
| Nose Up (Positive Tilt) | Sliding forward on saddle, sit bone discomfort | Perineal pressure, numbness, increased pelvic tilt |
Step 4: Fine-Tuning for Your Specific Needs
The ideal bike saddle tilt is highly individual. Factors like your flexibility, riding style (road cycling, mountain biking, commuting), and the shape of your saddle all play a role.
- Road Cycling: Often involves a more aggressive, aerodynamic posture. A slightly negative tilt might be beneficial to relieve pressure during prolonged periods in the drops.
- Mountain Biking: Requires more dynamic body movements. A neutral or slightly nose-down angle can provide stability and prevent you from sliding forward on rough terrain.
- Commuting/Leisure Riding: Comfort is paramount. A neutral or very slightly adjusted angle is usually best.
Consider these questions when fine-tuning:
- Are your sit bones making comfortable contact with the widest part of the saddle?
- Can you maintain a stable position on the saddle without feeling like you’re actively holding yourself in place?
- Do you feel balanced between your hands, saddle, and pedals?
The Interplay with Other Bike Fit Adjustments
It’s vital to remember that saddle angle doesn’t exist in isolation. It works in conjunction with:
- Saddle Height Adjustment: Too high or too low a saddle can exacerbate issues caused by incorrect angle. Ensure your saddle height is correct first, as this is foundational to your bike fit.
- Saddle Fore-Aft Position (Saddle Setback): This adjustment determines your distance from the handlebars and the angle of your knees relative to the pedals. Incorrect saddle setback can influence how you perch on the saddle, indirectly affecting how you perceive the saddle angle.
- Grasping Saddle Setback: This refers to how far forward or backward your saddle is positioned along its rails relative to the bottom bracket. It’s adjusted by loosening the saddle clamp and sliding the saddle forward or backward.
- Handlebar Height and Reach: These directly influence your cycling posture. If your handlebars are too low or too far away, you might compensate by tilting your saddle to find a more comfortable position, which is often a misguided solution.
A common troubleshooting sequence:
- Set Saddle Height: Get this as close to optimal as possible.
- Adjust Saddle Fore-Aft Position: Dial in your saddle setback.
- Fine-tune Saddle Angle: Make small adjustments to the bike saddle tilt.
- Adjust Handlebars: If necessary, adjust handlebar height and reach to complement your saddle position and achieve a balanced bike setup.
Saddle Nose Angle vs. Saddle Pitch
While often used interchangeably, saddle nose angle is a more specific term referring to the orientation of the very front of the saddle. Saddle pitch is a broader term that encompasses the overall tilt of the saddle relative to horizontal. For practical adjustment purposes, focusing on the bike saddle tilt – how much the nose is up or down relative to the tail – is usually the most effective approach.
Advanced Considerations and Tips
- Saddle Shape: Different saddle shapes (e.g., flat, curved, with cutouts) interact differently with your anatomy. What works for one saddle might not work for another.
- Riding Style and Flexibility: More flexible riders who can maintain a deeper tuck might prefer a different saddle angle than less flexible riders.
- Listen to Your Body: The ultimate judge is your own comfort and performance. Don’t be afraid to experiment within reasonable limits.
- Document Your Settings: Once you find a comfortable position, record the angle, saddle height, and fore-aft position so you can easily return to it or make informed adjustments in the future.
- Professional Bike Fit: If you’re struggling to find comfort or optimize your performance, consider a professional bike fit. A fitter has specialized tools and expertise to analyze your biomechanics and dial in every aspect of your bike setup, including saddle angle.
Deciphering Saddle Rail Clamps
Most modern saddles attach to the seatpost via two rails that sit in a clamp. These clamps can vary:
- Two-Bolt Clamp: Common on many seatposts, these typically have two bolts that squeeze the rails. Loosening one or both allows for angle adjustment.
- One-Bolt Clamp: Simpler design, often found on integrated seatposts or specific seatpost models. Usually, a single bolt loosens to allow for tilting.
Always consult your seatpost and saddle manufacturer’s instructions for specific tightening procedures and torque values.
Interpreting the Bubble: Using a Level Accurately
When using a level, place it carefully on the flattest part of the saddle, usually midway between the nose and the widest part. Ensure the level itself is on a stable surface. If you’re using a smartphone app, make sure it’s calibrated and held steady.
Fathoming the Optimal Saddle Pitch
There’s no single magic number for saddle pitch. The goal is to achieve a position where:
- Comfortable Sit Bone Contact: You feel your weight distributed primarily on your sit bones.
- Neutral Pelvic Position: Your pelvis isn’t excessively tilted forward or backward.
- No Perineal Pressure: You don’t feel undue pressure in the soft tissue areas.
- Stable Position: You can hold your position without sliding.
Example Scenario:
- Problem: A rider experiences numbness and pain in the perineum after 30 minutes. They feel like they are constantly sliding forward.
- Likely Cause: Saddle nose is too high (positive tilt).
- Solution: Loosen the saddle clamp and gently lower the nose of the saddle by a degree or two. Test ride. If numbness persists, try a small further adjustment. If sliding forward is reduced but sit bone pain increases, the adjustment might be too much, or another factor (like saddle height) might be contributing.
Frequently Asked Questions (FAQ)
Q1: How much should my saddle tilt down?
A: Most riders start with a level saddle. If you experience perineal pressure, a slight downward tilt of 1-3 degrees is often effective. Avoid excessive downward tilt, as this can lead to pressure on your hands and wrists.
Q2: Can I adjust my saddle angle without tools?
A: Typically, no. You will need at least an Allen key to loosen the bolt holding the saddle to the seatpost.
Q3: What if adjusting the saddle angle doesn’t solve my pain?
A: Saddle angle is just one part of bike fit. If adjusting the angle doesn’t help, consider checking your saddle height adjustment and saddle fore-aft position. Issues with handlebar height, reach, or even your saddle choice itself could also be the culprit. A professional bike fit is recommended for persistent pain.
Q4: How often should I check my saddle angle?
A: It’s a good idea to check it periodically, especially if you’ve made other changes to your bike setup or if you start experiencing new discomfort. After a significant ride or a change in riding style, it’s worth reassessing.
Q5: Does saddle angle affect my power?
A: Yes, indirectly. By improving rider comfort and promoting a more efficient cycling posture, the correct saddle angle allows you to pedal more effectively and maintain your power output for longer.
Q6: What is saddle setback?
A: Saddle setback refers to the horizontal distance between the center of the seatpost and the saddle rails. It influences your knee position relative to the pedals and your overall weight distribution on the bike. It is adjusted by sliding the saddle forward or backward on its rails.
By taking the time to adjust your bike saddle tilt correctly, you invest in more comfortable, efficient, and enjoyable rides. Don’t underestimate the impact of this simple bike setup tweak on your overall cycling experience.