
Choosing the right bike size is crucial for a comfortable, efficient, and enjoyable cycling experience. What is the most important factor when measuring bike size? Your inseam measurement for bike. This measurement, combined with other key bike dimensions, will help you find a bicycle that feels like an extension of your own body. This comprehensive guide will walk you through everything you need to know about bike sizing guide and correct bike fit.
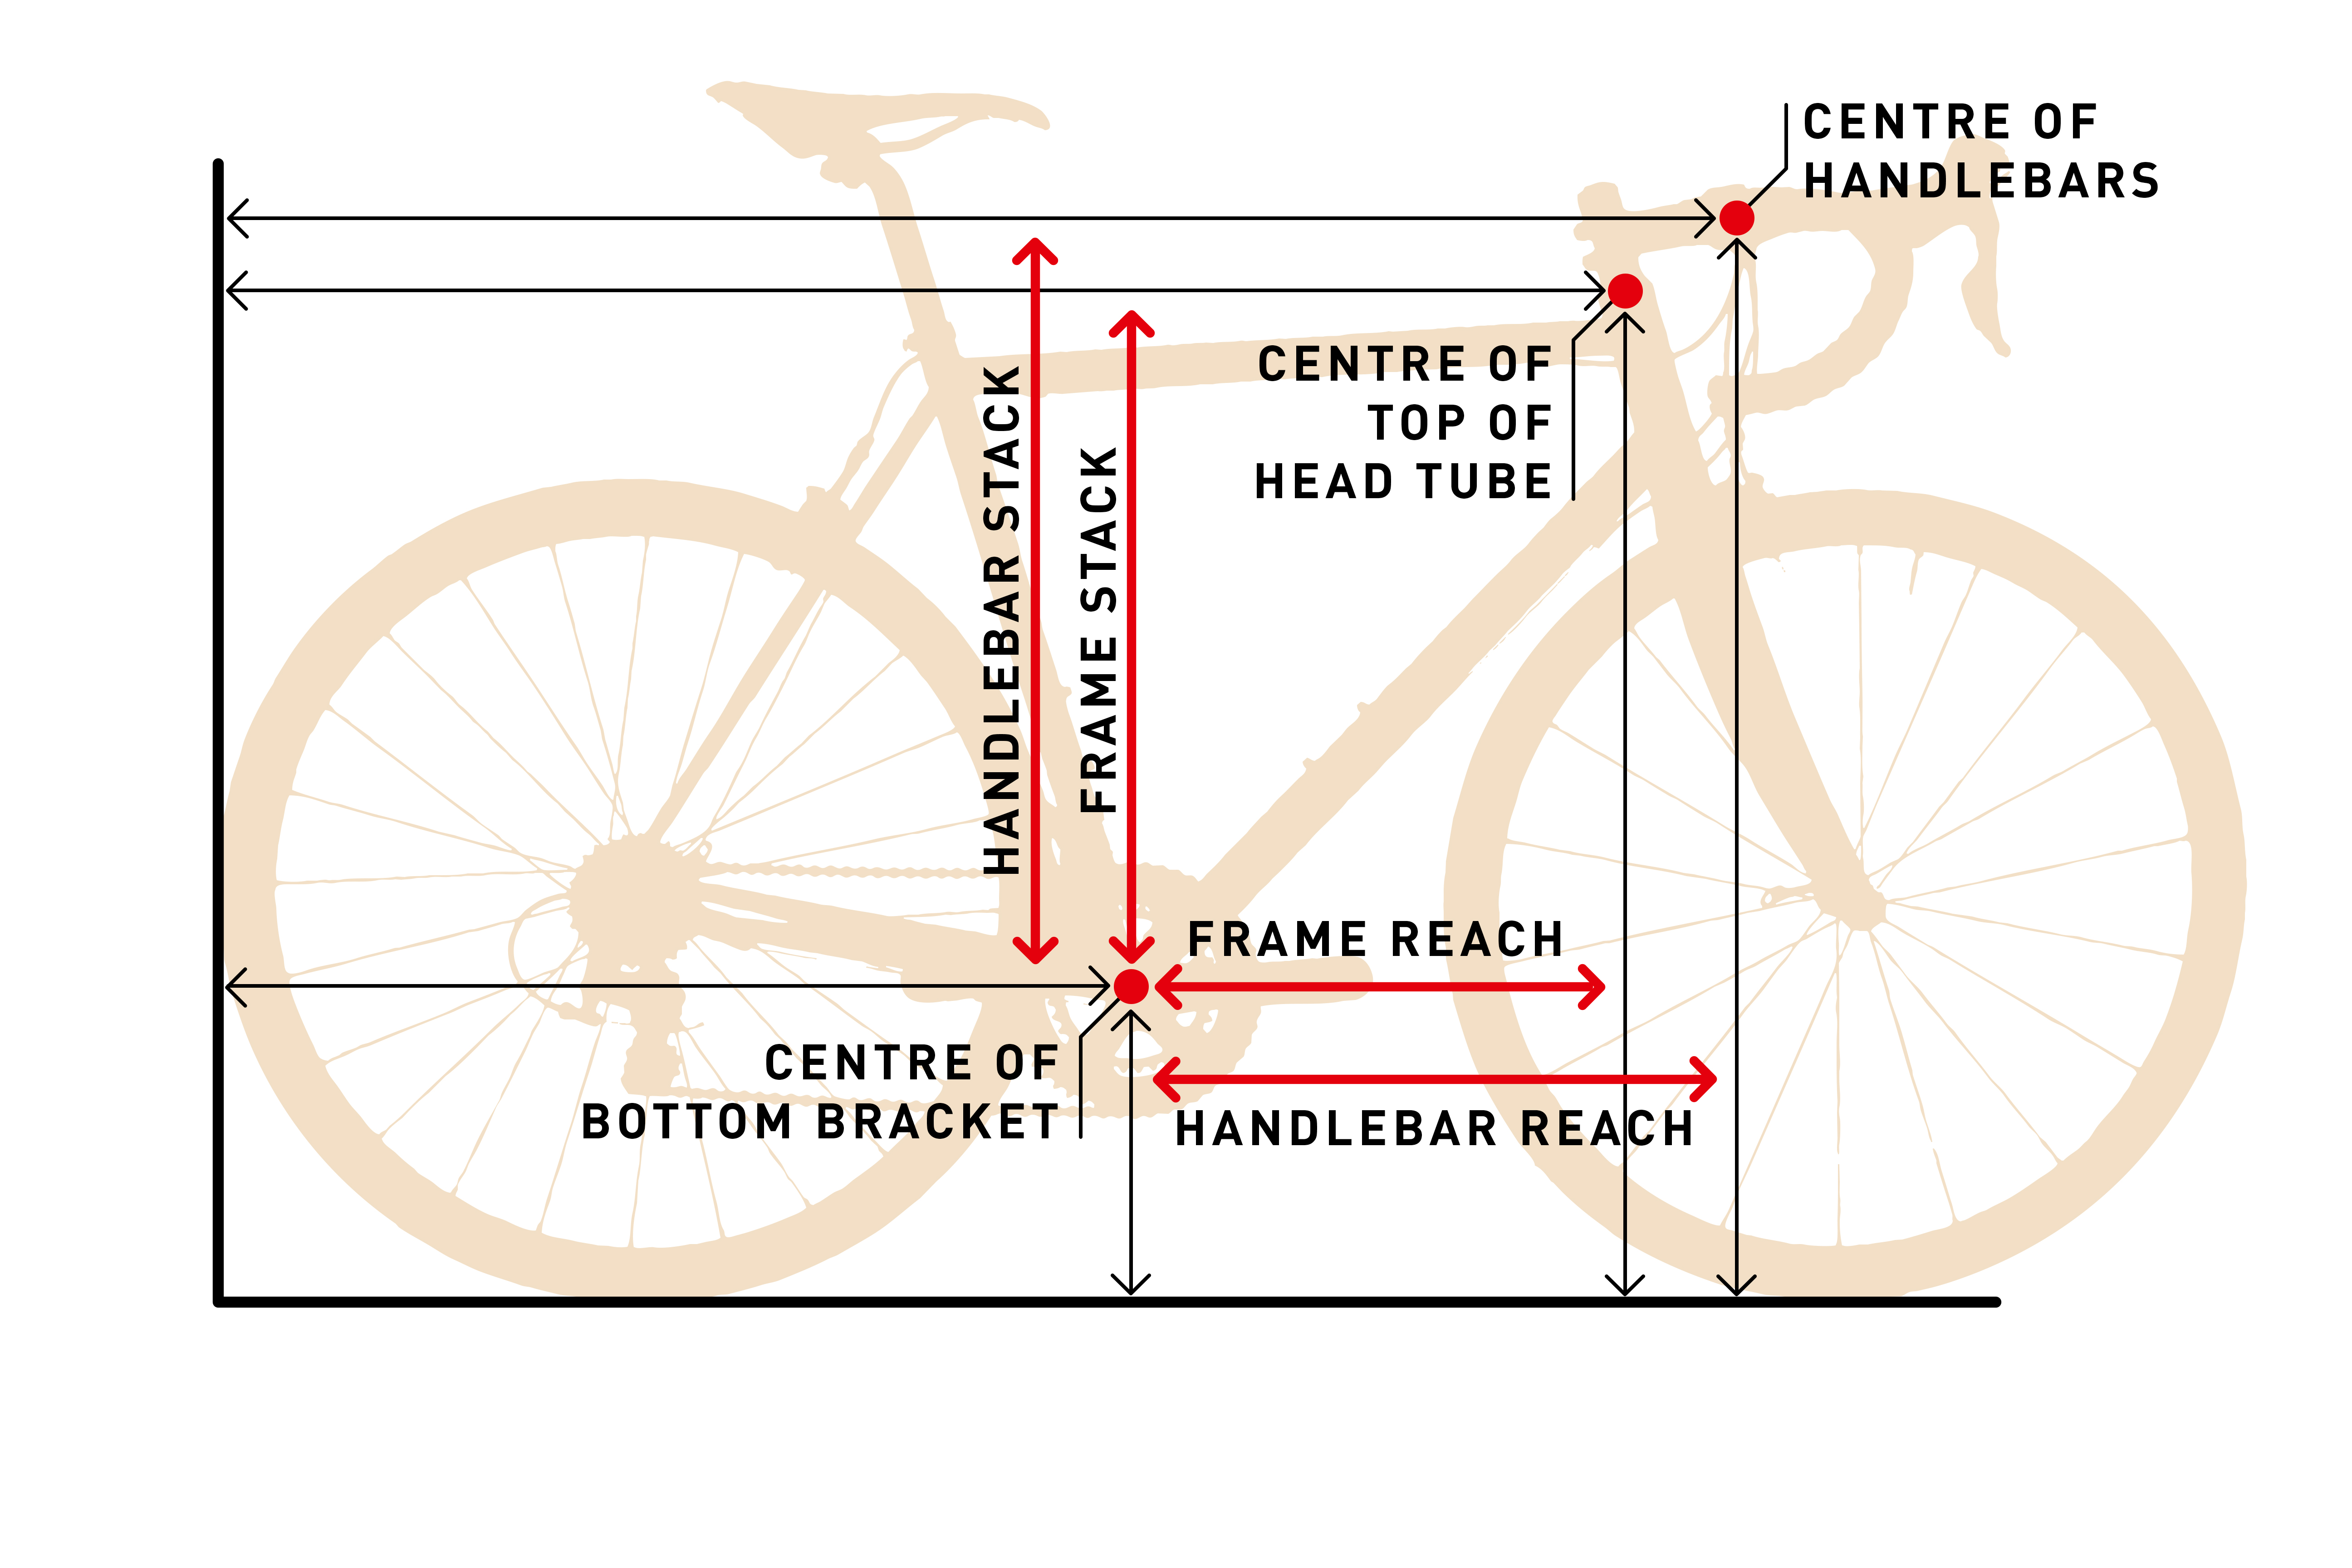
Image Source: rideonmagazine.com.au
Why Bike Fit Matters
A bike that’s too big or too small can lead to a host of problems, from discomfort and pain to reduced performance and even injury.
Common Issues with Incorrect Bike Fit
- Discomfort: Aches and pains in your back, neck, shoulders, hands, and knees.
- Reduced Efficiency: You’ll expend more energy than necessary due to poor body positioning.
- Limited Control: A bike that doesn’t fit well can be harder to maneuver, especially at speed or on challenging terrain.
- Increased Risk of Injury: Incorrect posture and strain can lead to repetitive stress injuries.
- Less Enjoyment: If your bike isn’t comfortable, you’re less likely to ride it regularly.
Key Bike Dimensions to Consider
When looking at bike sizing, several dimensions are important. We’ll explore how to measure bike frame and other critical aspects.
1. Inseam Measurement for Bike: The Foundation
Your inseam is the most critical measurement for determining the right bike size. It’s the length from your crotch to the floor.
How to Measure Your Inseam:
- Find a Wall: Stand with your back against a wall.
- Use a Book or Level: Place a book or a spirit level between your legs, firm against your crotch. Imagine sitting on a saddle.
- Mark the Wall: Hold the book/level parallel to the floor and have a friend mark the wall at the top edge of the book/level.
- Measure the Distance: Use a tape measure to measure from the floor to the mark on the wall. This is your inseam measurement.
- Tip: Wear the shoes you plan to cycle in for the most accurate measurement.
2. Standover Height
This is the distance from the top of the bike’s top tube (the horizontal bar between the seat and handlebars) to the ground.
- Why it matters: You should be able to stand over your bike with both feet flat on the ground, with a few inches of clearance between your crotch and the top tube. This allows you to dismount safely.
3. Reach and Stack (For Road & Gravel Bikes)
These measurements are vital for understanding how the bike’s cockpit will feel.
- Reach: The horizontal distance from the center of the bottom bracket to the center of the top of the head tube. This influences how stretched out you’ll be.
- Stack: The vertical distance from the center of the bottom bracket to the center of the top of the head tube. This affects how high the handlebars will be.
4. Seat Tube Length
This is the length of the bike’s seat tube, from the center of the bottom bracket to the top of the seat tube collar. Historically, this was the primary way bikes were sized, but it’s less indicative of overall fit than reach and stack for many bike types.
5. Top Tube Length
The length of the horizontal top tube. Combined with the stem length, this significantly impacts your riding position.
How to Measure Bike Frame and Calculate Your Size
Now that we know the key bike dimensions, let’s put it into practice.
Using Your Inseam for Bike Sizing
A common starting point for bicycle fitment is using your inseam to calculate an approximate frame size.
Inseam-to-Frame Size Conversion (General Guidelines)
| Inseam (cm) | Approximate Frame Size (cm) – Road Bike | Approximate Frame Size (cm) – Mountain Bike |
|---|---|---|
| 51 – 56 | 47 – 50 | 13 – 14 |
| 56 – 61 | 50 – 52 | 14 – 15 |
| 61 – 66 | 52 – 54 | 15 – 16 |
| 66 – 71 | 54 – 56 | 16 – 17 |
| 71 – 76 | 56 – 58 | 17 – 18 |
| 76 – 81 | 58 – 60 | 18 – 19 |
| 81 – 86 | 60 – 62 | 19 – 20 |
| 86+ | 62+ | 20+ |
- Note: These are general guidelines. Different bike types (road, mountain, hybrid, etc.) and manufacturers will have variations.
The Frame Size Calculator Approach
Many online resources offer a frame size calculator. These tools typically ask for your inseam, height, and sometimes other body measurements.
How a Frame Size Calculator Works:
- Input Your Data: You’ll enter your inseam, height, and potentially other details.
- Algorithm Application: The calculator uses pre-programmed formulas and bike geometry data to suggest a suitable frame size.
- Output: It will provide a recommended frame size, often in centimeters or inches, and sometimes specific model suggestions.
- Where to find them: Most reputable bike manufacturer websites and cycling blogs offer these tools. Search for “bike size calculator” or “frame size calculator.”
Interpreting Bike Geometry Explained
Bike geometry refers to the angles and lengths of the frame tubes. This is what dictates how a bike handles and feels.
Key Geometry Terms:
- Head Tube Angle: The angle of the head tube relative to the ground. A slacker angle (lower number) makes the steering slower and more stable. A steeper angle (higher number) makes steering quicker and more responsive.
- Seat Tube Angle: The angle of the seat tube relative to the ground. This affects your pedaling position.
- Top Tube Length: The horizontal measurement from the center of the head tube to the center of the seat tube.
- Chainstay Length: The distance from the center of the bottom bracket to the center of the rear axle. Longer chainstays generally provide more stability.
- Wheelbase: The distance between the centers of the front and rear wheels. A longer wheelbase typically means more stability.
- Bottom Bracket Drop: The vertical distance between the centers of the front and rear wheel axles and the center of the bottom bracket. A greater drop means a lower center of gravity, improving stability.
How Geometry Affects Fit:
- Reach & Stack: Crucial for determining your torso and arm position. Bikes with longer reach and lower stack will put you in a more stretched-out, aerodynamic position. Bikes with shorter reach and higher stack will result in a more upright position.
- Seat Tube Length & Seat Tube Angle: Influence saddle height and setback.
Using a Bike Measurement Chart
A bike measurement chart can be a helpful visual aid. These charts often correlate rider height and inseam to recommended frame sizes for various bike types.
Example Bike Measurement Chart (Illustrative – Always check manufacturer specs):
| Rider Height (cm/in) | Rider Inseam (cm/in) | Road Bike (cm) | Mountain Bike (in) | Hybrid Bike (cm) |
|---|---|---|---|---|
| 150-160 / 4’11”-5’3″ | 60-65 / 23.5-25.5 | 47-50 | 13-14 | 45-48 |
| 160-170 / 5’3″-5’7″ | 65-70 / 25.5-27.5 | 50-53 | 15-16 | 48-51 |
| 170-180 / 5’7″-5’11” | 70-75 / 27.5-29.5 | 53-56 | 17-18 | 51-54 |
| 180-190 / 5’11”-6’3″ | 75-80 / 29.5-31.5 | 56-59 | 19-20 | 54-57 |
| 190+ / 6’3″+ | 80+ / 31.5+ | 59+ | 20+ | 57+ |
- Remember: This is a simplified example. Always consult the specific brand’s sizing chart.
Specialized Bike Types and Their Sizing Nuances
The way you measure bike frame and determine your size can vary slightly depending on the type of bicycle.
1. Road Bikes
Road bikes are designed for speed and efficiency on paved surfaces.
Key Considerations for Road Bikes:
- Aerodynamics: Road bikes often have a more aggressive, forward-leaning position. Reach and stack are paramount.
- Standover Height: Essential for safety. Aim for 1-2 inches of clearance.
- Frame Size: Typically measured in centimeters (e.g., 54cm, 56cm).
- Saddle-to-Handlebar Drop: The difference in height between your saddle and handlebars. A larger drop means a more aggressive position.
How to Choose Bike Size for Road Bikes:
- Inseam: Use your inseam to get a starting frame size range.
- Reach: Prioritize reach for comfort and your preferred riding style (endurance vs. racing).
- Stack: Important for handlebar height. If you have back issues, you might prefer a higher stack.
2. Mountain Bikes (MTBs)
Mountain bikes are built for off-road riding, offering durability and control.
Key Considerations for Mountain Bikes:
- Standover Height: Crucial for navigating technical terrain. Aim for 2-4 inches of clearance, especially for trail and enduro bikes where you might need to dismount quickly.
- Frame Size: Often measured in inches (e.g., 17″, 18″) or sometimes S, M, L, XL.
- Reach: Affects how stable the bike feels at speed and in rough terrain. Longer reach generally provides more stability.
- Head Tube Angle: Slacker angles improve downhill stability.
How to Choose Bike Size for Mountain Bikes:
- Inseam: Use your inseam for a baseline frame size.
- Reach: For mountain bikes, especially trail and enduro, reach is often a primary consideration for stability and handling.
- Standover Height: More clearance is generally preferred for technical riding.
3. Hybrid and Commuter Bikes
These bikes blend features of road and mountain bikes for versatility.
Key Considerations for Hybrid/Commuter Bikes:
- Comfort: Often prioritize a more upright riding position.
- Standover Height: Important for easy on-and-off in urban environments. Aim for 1-2 inches of clearance.
- Frame Size: Usually measured in centimeters.
How to Choose Bike Size for Hybrid/Commuter Bikes:
- Inseam: Use your inseam for a starting point.
- Comfort: Aim for a size that allows for a comfortable, upright posture. A slightly shorter reach than a road bike might be preferred.
4. Gravel Bikes
Gravel bikes are designed for versatility, handling pavement, dirt roads, and light trails.
Key Considerations for Gravel Bikes:
- Geometry: Often a blend of road and mountain bike geometry, offering stability and comfort.
- Reach and Stack: Similar to road bikes, these influence your position. Gravel bikes might have slightly shorter reach and higher stack for more comfort on longer rides.
- Standover Height: Important for dismounting on varied terrain.
How to Choose Bike Size for Gravel Bikes:
- Inseam: Your inseam is a good starting point.
- Intended Use: If you plan on more off-road riding, you might lean towards a slightly larger size or geometry with more stability. For more road-focused riding, a more traditional road bike fit might be suitable.
Beyond the Numbers: The Importance of a Proper Bicycle Fitment
While charts and calculators are excellent starting points, they don’t tell the whole story. A truly correct bike fit considers your unique body proportions and riding style.
Adjusting Your Fit: Common Components
Once you have the right frame size, several adjustable components can fine-tune your bicycle fitment.
1. Saddle Height and Setback
- Saddle Height: Affects leg extension. Too high or too low can cause knee pain. A general rule of thumb is that when the pedal is at its lowest point, your leg should be slightly bent.
- Saddle Setback: Refers to how far the saddle is positioned forward or backward on its rails. This is adjusted to align your knee over the pedal spindle.
2. Handlebar Height and Reach
- Handlebar Height: Adjusted by using different stem lengths, stem spacers, or by flipping the stem. Affects your torso angle and comfort.
- Handlebar Reach: Primarily adjusted by stem length and handlebar width. This determines how stretched out you are.
3. Stem Length and Angle
The stem connects the handlebars to the steerer tube. Changing its length or angle can significantly alter your riding position.
- Shorter Stem: Brings handlebars closer, resulting in a more upright position.
- Longer Stem: Moves handlebars further away, resulting in a more stretched-out position.
- Stem Angle: An upward angle raises the handlebars; a downward angle lowers them.
4. Handlebar Width and Shape
- Width: Should generally match your shoulder width to promote comfortable arm positioning.
- Shape: Different handlebar shapes (e.g., drop bars, flat bars) and their curvature affect hand comfort and control.
What is a Professional Bike Fit?
For serious cyclists or those experiencing persistent discomfort, a professional bike fit is highly recommended. A bike fitter uses specialized tools and their expertise to analyze your body, flexibility, and riding goals to optimize your position on the bike.
Benefits of a Professional Bike Fit:
- Pain Reduction: Addresses the root causes of aches and pains.
- Performance Enhancement: Optimizes power transfer and aerodynamics.
- Injury Prevention: Reduces strain on your body.
- Increased Comfort and Enjoyment: Makes every ride more pleasant.
Frequently Asked Questions (FAQ)
Q1: Can I still ride a bike if it’s not the perfect size?
Yes, you can ride a bike that is slightly too big or too small, but it will likely be less comfortable and efficient. Small adjustments to the saddle and handlebars can help, but a fundamentally incorrect frame size can only be partially compensated for.
Q2: How do I measure bike frame size if I’m buying a used bike online?
When buying a used bike online, ask the seller for the bike’s brand, model, and year. Then, find the manufacturer’s original specifications online. Pay close attention to the frame size (usually listed in cm or inches) and the bike geometry. If possible, ask for specific measurements like reach and stack.
Q3: What is standover height and why is it important?
Standover height is the distance from the ground to the top of the bike’s top tube. It’s important because it ensures you can comfortably and safely dismount the bike by straddling the top tube with both feet on the ground.
Q4: How do I know if my bike saddle is too high or too low?
If your hips rock side to side when pedaling, your saddle is likely too high. If your knee has a deep bend at the bottom of the pedal stroke, your saddle is likely too low.
Q5: Do different bike brands use the same sizing conventions?
No, sizing conventions can vary significantly between bike brands. Always refer to the specific manufacturer’s bike sizing guide or bike measurement chart for the model you are interested in.
Q6: What’s the difference between reach and stack?
Reach is the horizontal distance from the bottom bracket to the top of the head tube, affecting how stretched out you are. Stack is the vertical distance from the bottom bracket to the top of the head tube, affecting handlebar height.
Q7: I have long legs and a short torso. How does this affect bike sizing?
This body type often means you’ll need a bike with a shorter top tube and reach relative to its seat tube length. You might also need to adjust the stem to a shorter, higher-rise option for a comfortable fit. Always consult a bike sizing guide and consider a professional fitting.
Q8: Is there a definitive bike geometry explained that I should memorize?
While understanding key geometry terms like head tube angle, reach, and stack is beneficial, there isn’t one single geometry that fits everyone. The ideal geometry depends on the type of riding you do and your personal preferences.
By following this comprehensive guide, you’ll be well-equipped to measure bike size, interpret bike dimensions, and ensure you find a bicycle that provides the correct bike fit for countless enjoyable rides. Happy cycling!