
Can you build a bike rim at home? Yes, you can build a bike rim at home with the right tools, patience, and a good understanding of the process. What is involved in building a bike rim? It involves selecting compatible components, meticulously lacing spokes, and precisely tensioning them to achieve a true and durable wheel. This guide will walk you through the entire bicycle wheel assembly process, from choosing your parts to the final truing.
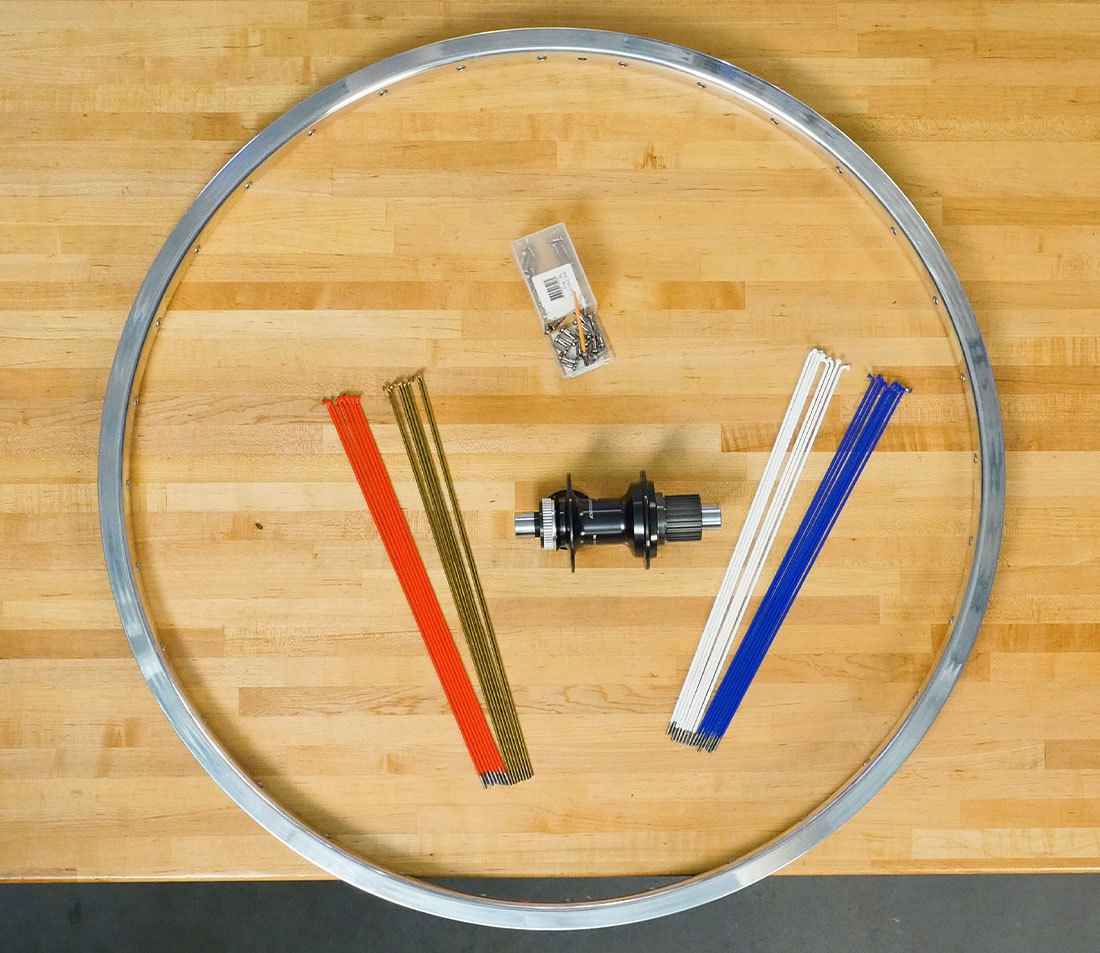
Image Source: www.parktool.com
Why Build Your Own Wheel?
Building your own bicycle wheel might seem daunting, but it offers several advantages. You get complete control over your components, allowing you to tailor your wheel to your specific riding style and needs. It’s also a deeply rewarding experience that can save you money in the long run, especially if you maintain multiple bikes or plan on frequent upgrades. Plus, you gain invaluable knowledge about how your bike works.
Choosing Your Components: The Foundation of Your Wheel
The success of your wheel build hinges on selecting the right parts. Each component plays a crucial role, and compatibility is paramount.
The Rim: The Heart of the Wheel
The rim is the outer circular component of your wheel. Its rim profile affects aerodynamics, tire fit, and braking performance. Different rim diameters are available for various bike types (e.g., 700c for road bikes, 29-inch for mountain bikes).
- Material: Rims are commonly made from aluminum or carbon fiber. Aluminum is generally more affordable and durable, while carbon fiber offers lighter weight and potentially better aerodynamic performance.
- Braking Surface: For rim brakes, the rim braking surface is critical. It needs to be smooth and properly machined for optimal braking. Disc brake rims don’t have a braking surface in the same way, as braking occurs on the rotor attached to the hub.
- Drilling: Rims come pre-drilled for spokes. The number of holes dictates the maximum number of spokes your wheel can have. Ensure the number of spoke holes on your rim matches your hub.
- Rim Width: Modern rims come in various internal and external widths. Wider rims are generally better for wider tires, offering improved stability and comfort.
The Hub: The Wheel’s Centerpiece
The hub is the rotating part of the wheel that attaches to the frame or fork. Hub compatibility is essential.
- Axle Standard: Hubs come with different axle standards (e.g., quick release, thru-axle). Ensure your hub’s axle standard matches your bike’s frame or fork.
- Spacing: The hub’s flange spacing and overall width must match your frame’s dropout spacing.
- Spoke Hole Count: The number of spoke holes on the hub flanges must match the number of spoke holes on your rim.
- Freehub Body: For geared bikes, the hub needs a compatible freehub body (Shimano, SRAM XD, Campagnolo) for your chosen drivetrain.
The Spokes: Connecting Hub and Rim
Spokes transfer force from the hub to the rim, providing structural integrity.
- Material: Most spokes are made of stainless steel, but aluminum and titanium are also used for weight savings.
- Gauge: Spokes come in different gauges (thicknesses). Thicker spokes (lower gauge number) are stronger but heavier. Bladed spokes are often used for aerodynamics.
- Length: Spoke length is critical and depends on the hub dimensions, rim depth, and lacing pattern. Accurate calculation is vital.
- Butting: Double-butted spokes have thinner sections in the middle, reducing weight without sacrificing strength at the spoke ends.
The Nipples: Securing the Spokes
Nipples thread onto the spokes and attach them to the rim.
- Material: Nipples are typically made of brass or aluminum. Brass is more durable and less prone to corrosion, while aluminum is lighter.
- Type: Standard nipples are most common. Self-sealing nipples can help prevent spoke hole damage.
- Size: Ensure the nipple size matches your spoke threads.
Essential Tools for Wheel Building
Having the right tools makes the process much smoother and more accurate.
- Wheel Truing Stand: This is indispensable for holding the wheel and allowing you to make precise adjustments to spoke tension.
- Spoke Wrench: A dedicated wrench that fits the spoke nipples, allowing for secure nipple tightening. Ensure you have the correct size for your nipples.
- Tension Meter: This tool measures the actual spoke tension, ensuring consistency across all spokes.
- Tire Levers: For mounting tires.
- Tire Pump: To inflate your tires.
- Measuring Tape or Calipers: For precise measurements if you’re calculating spoke lengths yourself.
- Lubricant: For spoke threads and hub bearings.
- Rag: For cleaning.
- Optional: Spoke Nipple Driver: A tool that can speed up the process of threading nipples onto spokes.
The Bicycle Wheel Assembly Process: Step-by-Step
This is where the magic happens! Let’s break down the bicycle wheel assembly.
Step 1: Preparation and Spoke Length Calculation
Before you start, ensure all your components are clean and ready.
Spoke Length Calculation: This is arguably the most critical step. An incorrect spoke length will prevent you from achieving a true wheel or could even damage your components. There are many online spoke calculators available that take your hub dimensions, rim ERD (Effective Rim Diameter), and chosen spoke lacing patterns to calculate the correct spoke lengths. Alternatively, you can use a spoke wrench and a known good wheel to measure lengths.
Step 2: Lacing the Wheel: The Art of Spoke Placement
Spoke lacing patterns determine how spokes are arranged. Common patterns include:
- 2-Cross: Each spoke crosses over two other spokes on its way to the rim. This is a common and strong pattern for many applications.
- 3-Cross: Spokes cross over three other spokes. This pattern offers excellent strength and durability, often used for heavier riders or demanding conditions.
- Radial: Spokes run directly from the hub flange to the rim, with no crossing. This is the lightest and most aerodynamic pattern but offers less lateral stiffness and is generally not recommended for front wheels with rim brakes or for rear wheels on geared bikes.
Let’s assume a common 3-cross pattern for this guide.
- Prepare the Hub: Ensure your hub is clean and lubricated.
- Insert the First Spoke: Take your hub and your rim. Pick a spoke hole on the hub flange. Insert a spoke from the outside of the flange, threading a nipple onto it a few turns.
- Locate the Rim Hole: Identify the corresponding rim hole. For a 3-cross pattern, you’ll skip a certain number of rim holes. The exact number depends on your spoke count and lacing pattern. For a typical 36-spoke wheel with 3-cross, you’ll typically skip two rim holes after the initial spoke goes in.
- Add the Next Spoke: Take another spoke and insert it into a hole on the opposite side of the hub flange (usually 180 degrees across). Thread a nipple onto it.
- Continue Around the Hub: Insert spokes into every other hole on this side of the hub.
- Connect to the Rim: Now, take the first spoke you laced and connect it to its corresponding rim hole. For 3-cross, this spoke will typically curve under two spokes already present in the rim and go into its designated hole. Thread a nipple onto it.
- Add the Second Spoke: Take the second spoke (from the opposite side of the hub) and connect it to its rim hole, following the 3-cross pattern. It will usually go over the existing spokes in the rim.
- Work in Spokes: Continue this process, working with pairs of spokes from opposite sides of the hub. As you add spokes, you’ll see the pattern emerge. Ensure you maintain the correct spoke crossing.
- The “Drive Side” and “Non-Drive Side”: For rear wheels, the side with the cassette (drive side) has spokes that are usually more angled to accommodate the cassette. The non-drive side has spokes that are more parallel. This difference in angle is crucial for strength and balance.
- Initial Tension: Once all spokes are in place, snug up all the nipples so the spokes are just taut. The wheel should hold its shape.
Step 3: Bringing Up Spoke Tension: The Crucial Phase
This is where the spoke tension comes into play and you’ll be doing a lot of nipple tightening.
- Mount the Wheel in the Truing Stand: Place your loosely laced wheel in the truing stand.
- Initial Tensioning: Begin turning each nipple a few turns at a time, working around the wheel systematically. Aim for an even, light tension on all spokes. The goal is to remove all slack and get the spokes to sing when plucked – a consistent, high-pitched tone.
- Using the Tension Meter: This is where the tension meter becomes invaluable. Start measuring the tension of each spoke. The target tension varies depending on the rim, spokes, and intended use, but a common range for many road wheels is 100-130 kgf (kilograms-force). Check your rim and hub manufacturer’s specifications for recommended tension.
- Gradual Increase: Increase the tension gradually, working in small increments. Avoid overtightening any single spoke. Turn each nipple an eighth or a quarter turn at a time, then move to the next spoke.
- Monitor True: As you increase tension, the wheel will start to true itself. You’ll be constantly checking for lateral (side-to-side) and radial (up-and-down) wobbles.
Step 4: Truing the Wheel: Achieving Roundness and Straightness
Truing a wheel is the process of adjusting spoke tension to eliminate wobbles and ensure the rim is perfectly round and centered.
-
Lateral Truing:
- Spin the wheel in the truing stand.
- Identify any side-to-side wobbles (the rim moving left or right).
- If the rim is wobbling to the left at a certain point, tighten the spokes on the right side of the wheel at that point.
- If the rim is wobbling to the right, tighten the spokes on the left side of the wheel at that point.
- Make small adjustments (e.g., quarter-turn) and re-spin to check.
-
Radial Truing:
- Identify any up-and-down wobbles (the rim moving closer or further from the center).
- If the rim is high at a certain point, loosen the spokes on both sides of the hub flange at that point.
- If the rim is low at a certain point, tighten the spokes on both sides of the hub flange at that point.
- Again, make small adjustments and re-spin.
-
Spoke Tension Balancing: As you true the wheel, you’ll be adjusting spoke tensions. Periodically check the tension meter and adjust any spokes that are significantly out of your target range. The goal is to have consistent tension across all spokes on a given side of the wheel.
-
Stress Relieving: After you’ve got the wheel reasonably true and tensions are in the ballpark, it’s important to stress relieve the wheel. This helps the components settle and can reveal new wobbles.
- You can do this by firmly pressing on the spokes opposite each other, then on spokes adjacent to each other.
- Alternatively, some builders gently squeeze the entire wheel.
- After stress relieving, re-true the wheel as needed.
-
Final Tensioning and Truing: Repeat the tensioning and truing process, making smaller adjustments until the wheel is perfectly true laterally and radially, and all spokes have consistent tension within your target range.
Step 5: Final Touches and Mounting
- Rim Strip: Install a rim strip to protect your inner tube from the spoke holes.
- Tire and Tube: Mount your tire and tube. For clincher tires, ensure you use tire levers carefully to avoid pinching the tube.
- Inflation: Inflate the tire to your desired pressure.
- Final Check: Spin the wheel one last time to ensure everything is still true and tight.
Important Considerations for Success
- Patience is Key: Wheel building is not a race. Take your time, be methodical, and don’t get discouraged.
- Consistency: Aim for consistency in every step, especially spoke tension.
- Learn from Mistakes: If your first wheel isn’t perfect, don’t worry. Every build is a learning experience.
- Consult Resources: Utilize online resources, videos, and forums dedicated to wheel building.
- Rim Braking Surface Integrity: If you are building a wheel for rim brakes, always ensure you are not damaging the rim braking surface during the truing process. Avoid over-tightening spokes that could lead to excessive pressure on the rim wall.
Frequently Asked Questions (FAQ)
Q1: How long does it take to build a bike wheel?
A1: For a beginner, it can take anywhere from 2 to 4 hours. Experienced builders can do it much faster, sometimes in under an hour.
Q2: Can I use different spoke lengths on the same wheel?
A2: Yes, it’s very common, especially on rear wheels where spoke bracing angles differ between the drive side and non-drive side. Accurate calculation is crucial.
Q3: What is the most common spoke tension?
A3: Target spoke tension varies greatly by rim, spokes, and intended use. However, for many road and mountain bike wheels, it falls in the 100-130 kgf range. Always check manufacturer recommendations.
Q4: How do I know if my spokes are tensioned correctly?
A4: The best way is to use a spoke tension meter. You can also get a feel for it by plucking spokes – they should all have a similar pitch.
Q5: What happens if I overtighten a nipple?
A5: Overtightening can strip the threads on the spoke or nipple, damage the rim at the spoke hole, or lead to uneven and excessive spoke tension, compromising the wheel’s integrity.
Q6: Can I use a standard wheel truing stand for disc brake wheels?
A6: Yes, a standard truing stand works well for tensioning and truing. You’ll just need to be mindful of spoke tension and not any rotor alignment.
Q7: Is it cheaper to build a wheel than to buy a pre-built one?
A7: Not always, especially for entry-level wheels. However, for higher-end or custom builds, building yourself can often be more cost-effective, and you get exactly what you want.
Building a bike wheel is a satisfying skill that opens up a world of customization for your bicycle. By carefully selecting your components, using the right tools, and following these steps, you can successfully build a strong, true, and reliable wheel that will enhance your riding experience.